

I’m thrilled to share five brand-new projects featuring the Scrappy Boy Stamps November release! Each project is unique, and I’ve included additional photos to showcase how they were put together. Let’s dive in!
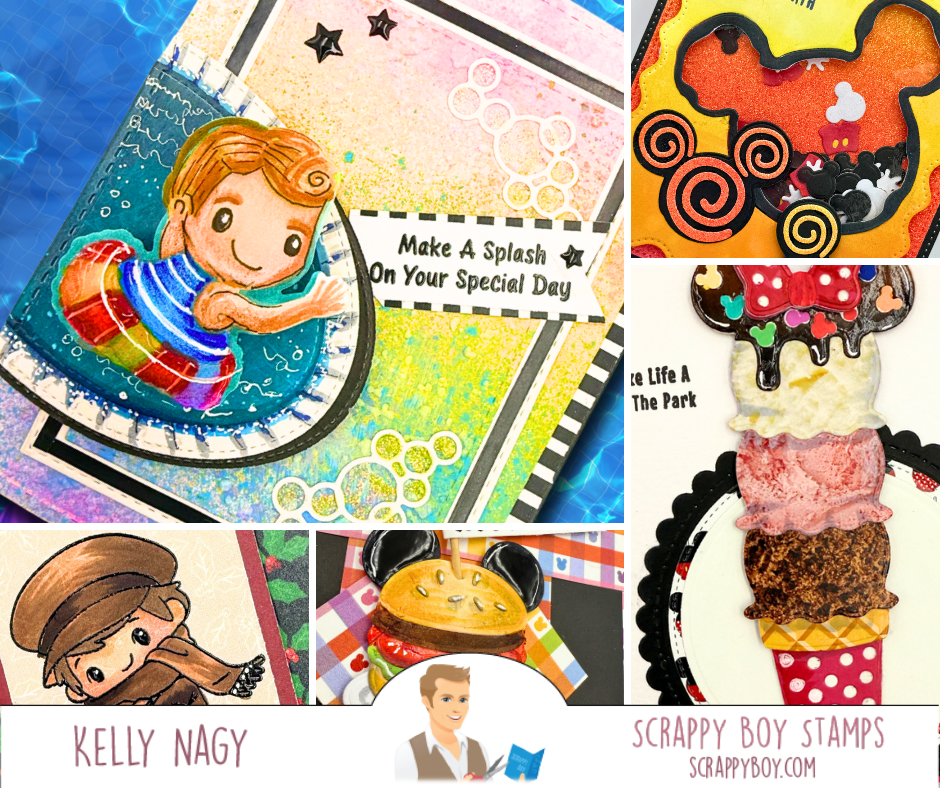
Project 1: Make a Splash A2 Card
I used no line water coloring to create a swimming scene versus a ballerina. I created a pool using the oval stitched nested dies as well as a white gel pen over patterned paper to create a visual illusion of moving water. The colored image is popped up using an action wobbler and adds an extra fun interactive touch to my card. The background is made using Distress Ink Sprays using a watercolor panel in a rainbow pallet.
The following Scrappy Boy Stamps’ products were used:
- Butt-Cracker Suite Stamps
- Undersea Water Scene Builder Dies
- Stitched Rectangle Nested Dies
- Stitched Oval Nested Dies
Project 2: Happiest Memories on Earth Shaker Card
The following card is the result of creative usage of my scraps. I had some panels left over and created a shaker card featuring some of the fun shaker bit panel dies from scrappy boy stamps. I also used the mouse head die from the mouse pizza builder die set. Mouse heads and swirl from a different set. It’s fun to mix a match and create something special and unique, especially when the die is used in a way that it was not originally intended. Imagine this card using reds and greens and creating a Christmas holiday themed card or pinks, reds and whites for Valentine’s Day. Your creativity is only limited by your imagination. Have fun and I can’t wait to see what you make.
The following Scrappy Boy Stamp products were used:
- Rectangle Stitched A2 Nesting Dies
- Mouse Pizza Builder Die Set
- Mouse Embellishment Lollipop Die Set

Project 3: Let’s Ketchup A2 Card
I created this A2 size card featuring the large and small burger from hamburger embellishment die set. I thought it was fun to use an actual toothpick to create a flag with a sentiment from my stash to make it a fun way to display the sentiment on the card. Another fun thing I found out while using my scraps was the bits that get popped out of the gloves on any of the mouse hands or gloves are perfectly shaped sesame seeds for your buns. I like to cut my dies out in white and then use my Copic markers to color them. I think it gives them a totally different look and I really loved the outcome. 
- MOUSE HAMBURGER EMBELLISHMENT DIE SET
- PATTERNED PAPER FROM SCRAPPY BOY STAMPS 

Project 4: You Make Life A Walk In The Park
I created this A2 card wanting to stack multiple scoops of ice cream. I was able to achieve this by cutting the different scoops out and then stacking them. I covered them up using my Copic markers and giving them texture. I also used glossy accents on the glaze and white gel pen to help give a glossy hot fudge dripped look. I used some of the shaker bits from the shaker bit panels and added some crystal effects on top which created a very candy like appearance.
I use the following Scrappy Boy products;
- MOUSE ICE CREAM EMBELLISHMENT DICE SET
- SCRAPPY BOY, STAMPS PATTERN PAPER
- MOUSE HEAD SHAKER BIT PANEL DIE
- Stitched circle dies

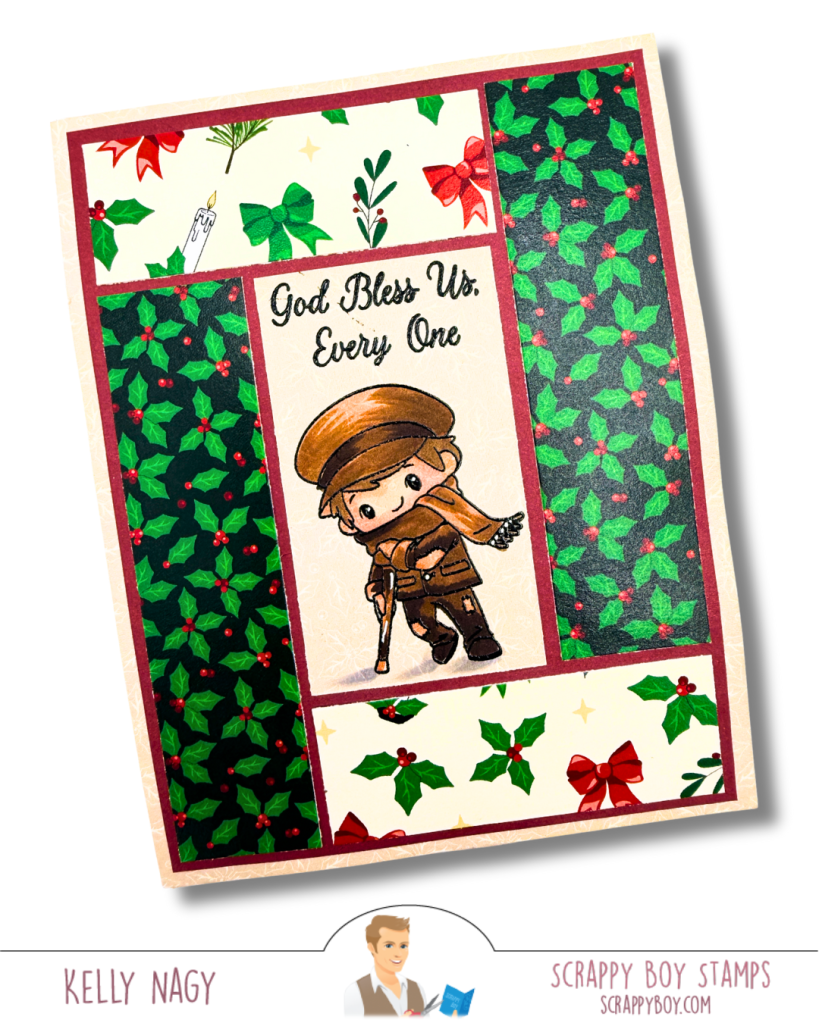
Project 5: The Christmas Carol Tiny Tim Card
I used the Christmas Carol stamps and coordinating pattern paper available from the November 2025 release Scrappy Boy Stamps.
Thank you for checking out this week’s projects from the November Scrappy Boy Stamps’ Release! I hope you feel inspired to try these designs.

