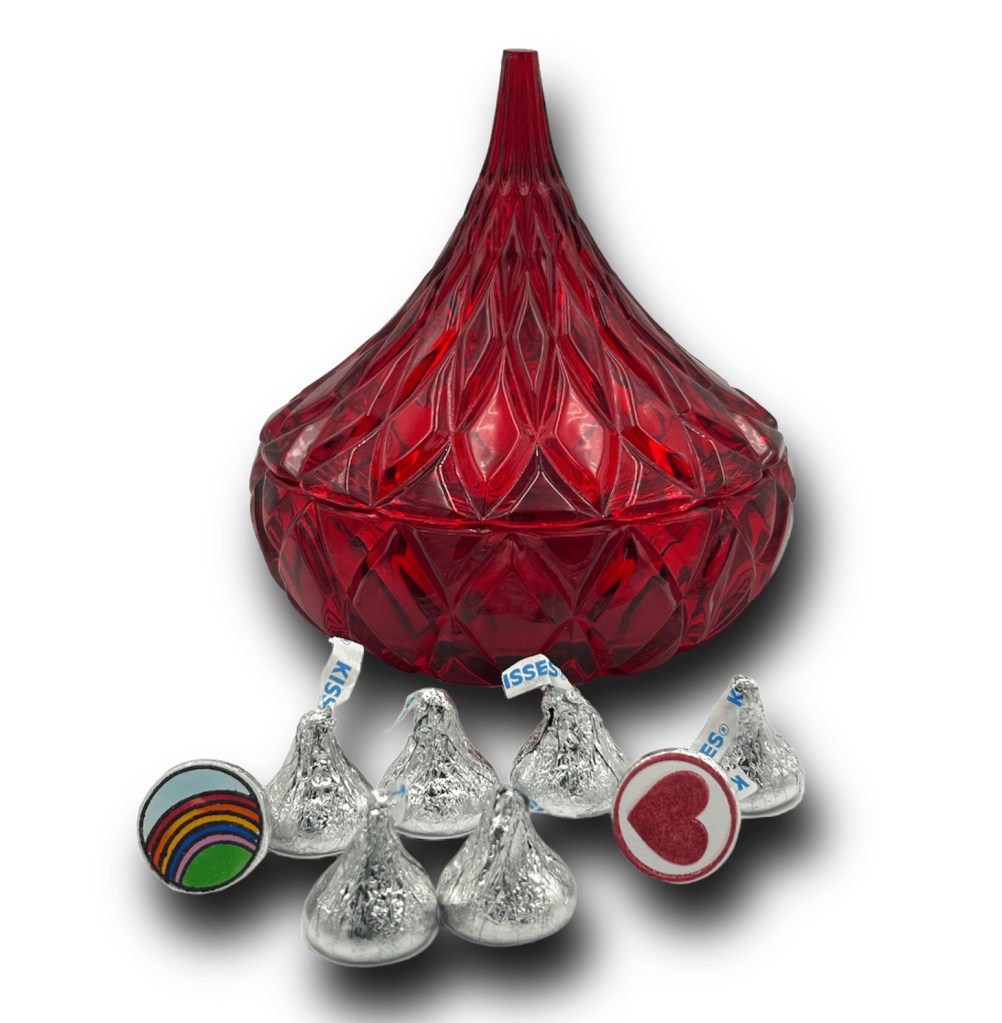
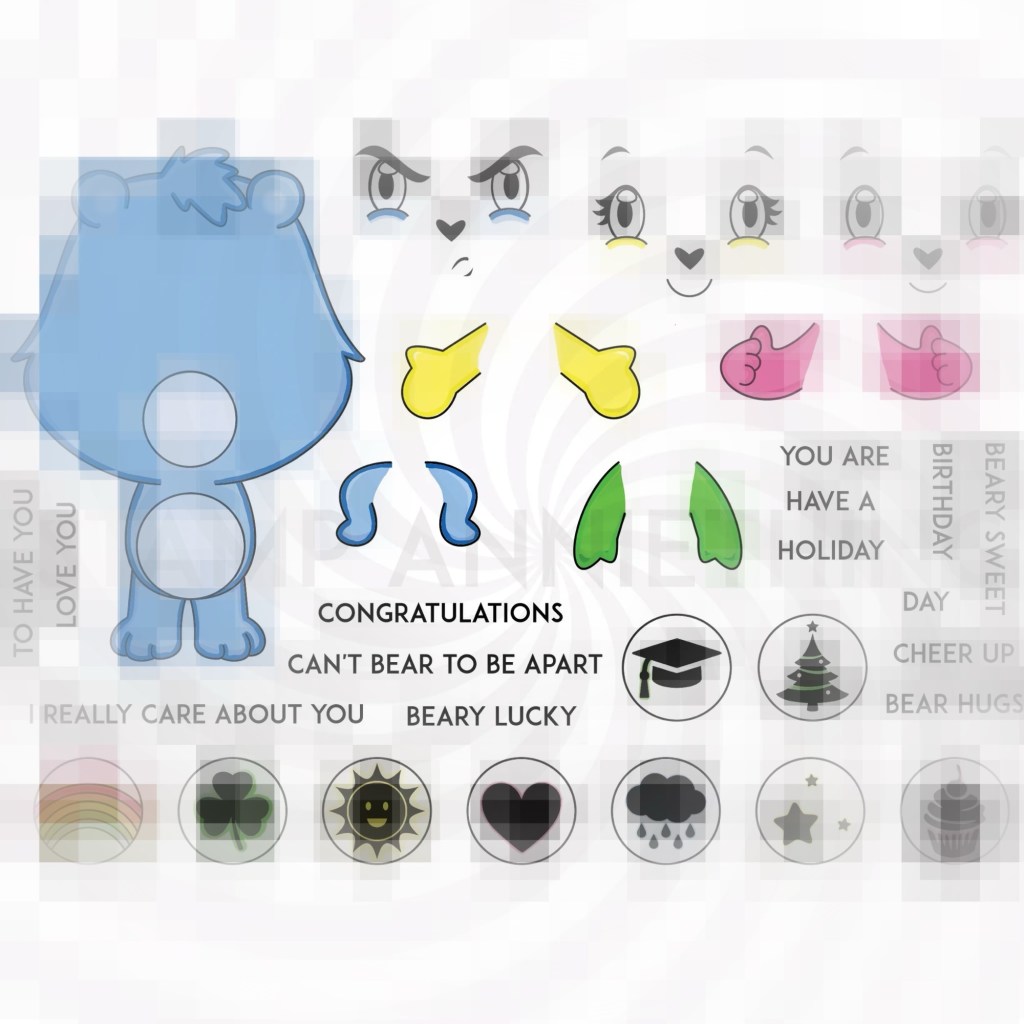
Belly Badges from set fit perfectly to bottom of all standard size Hershey’s Kisses.
The Build a Caring Bear set will certainly be a great addition to any paper crafter’s stash. This is a versatile set that is great for cards, planners, scrapbook pages and even party decor and favors!!!
The belly badge goes in the middle of the bear’s tummy, but these badges are also the perfect size to adorn the bottom of a Hershey’s Kiss!
If you’re looking for a fun and unique way to personalize your treats inside your treat bags, look no further than the soon to be restocked BUILD A CARING BEAR set from Stamp Anniething. These fun images can be stamped in all black, stamped with your favorite color and are the perfect size to decorate the bottom of a Hershey’s Kiss, and with a wide variety of themed emblems in the set, you can customize each treat to fit your holiday, event or celebration.
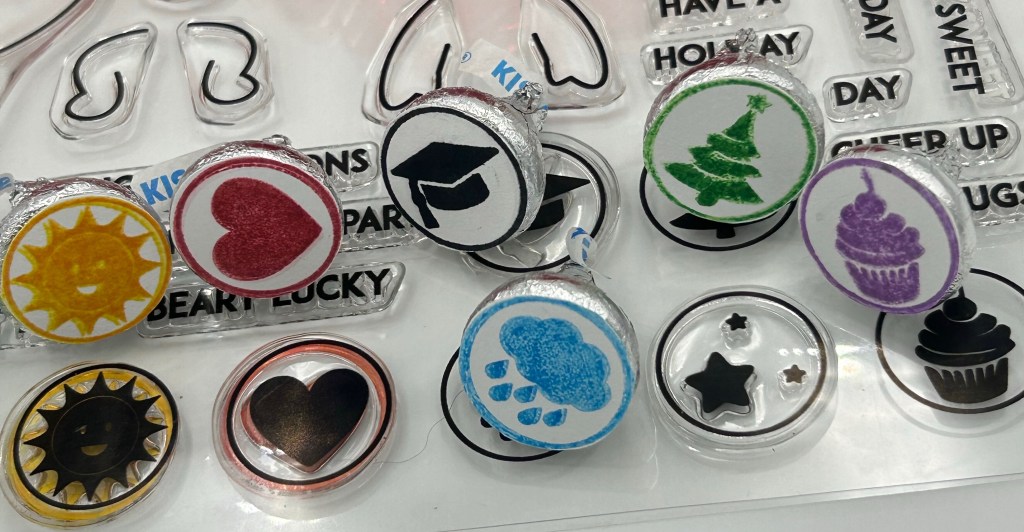
Circle size stamps can be easily fussy cut out or use a small circle die or punch
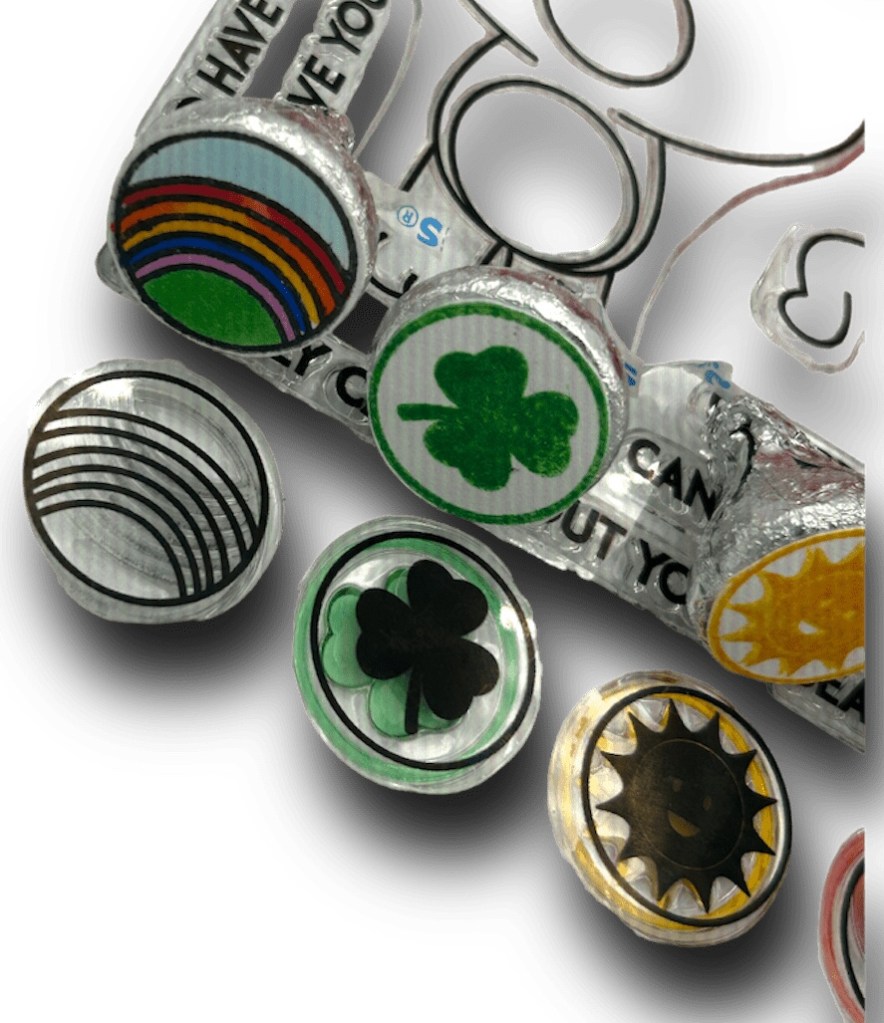
Build a Caring Bear belly badge stamps have a variety of different emblems to match the themes of your party or event. Here are just a few ideas:
Sunshine – Get Well, Be Happy, Don’t worry
Heart – Love, wedding (emboss in gold or silver), Anniversary, Valentines
Once you’ve chosen your badges, it’s as simple as attaching them to the bottom of each Hershey’s Kiss using a dab of frosting or melted chocolate. You can also adhere using double-sided tear/paper tape. Not only do these badges add a colorful and fun touch to your treat bags, but they also make each treat feel more personalized and thoughtful.
So the next time you’re planning a party or event, consider adding Build a Caring Bear belly badges to your list of decorations. With their colorful designs and customizable options, they’re sure to be a hit with guests of all ages! Happy Crafting!
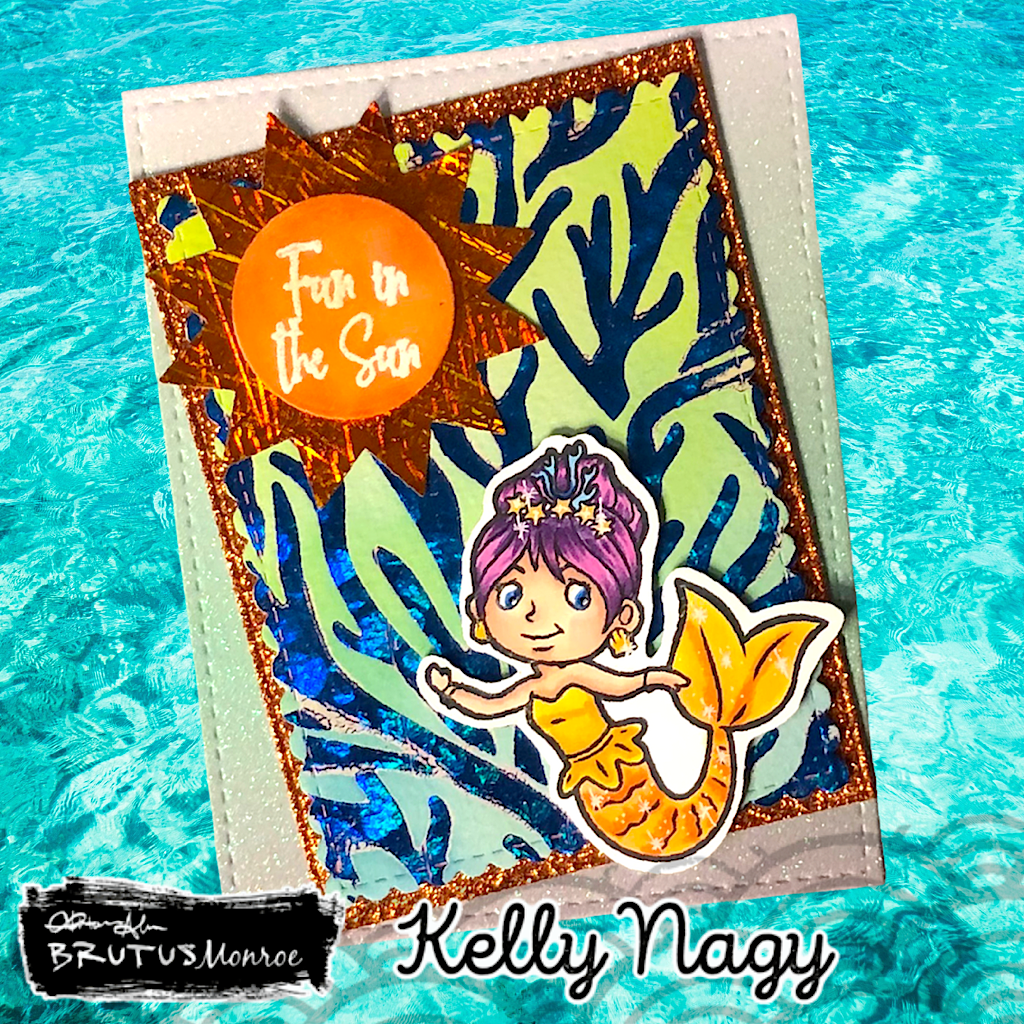
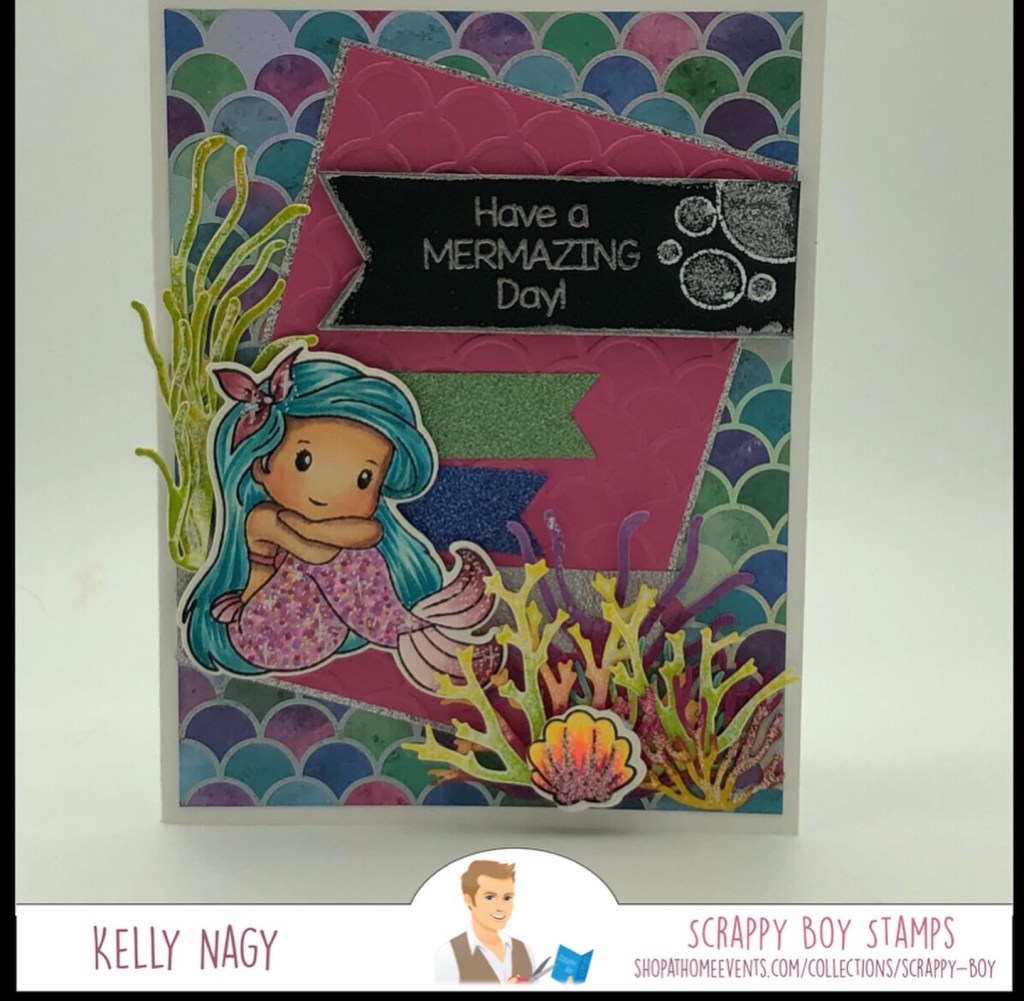
Today is National Mermaid Day and it’s the perfect excuse to break out your crafting stash and get creative. Whether you’re a seasoned crafter or a beginner, there are plenty of ways to celebrate this mystical day with some mermaid-themed cards.
Box card featuring Stamp Anniething
There are so many fun and creative ways to celebrate National Mermaid Day with your crafting stash. Whether you choose to create something practical like one of the cards I have posted, a mermaid tail blanket or something decorative like wall art, the possibilities are endless. So grab your crafting supplies, set your imagination free, and celebrate one of the most enchanted and captivating creatures of the sea!
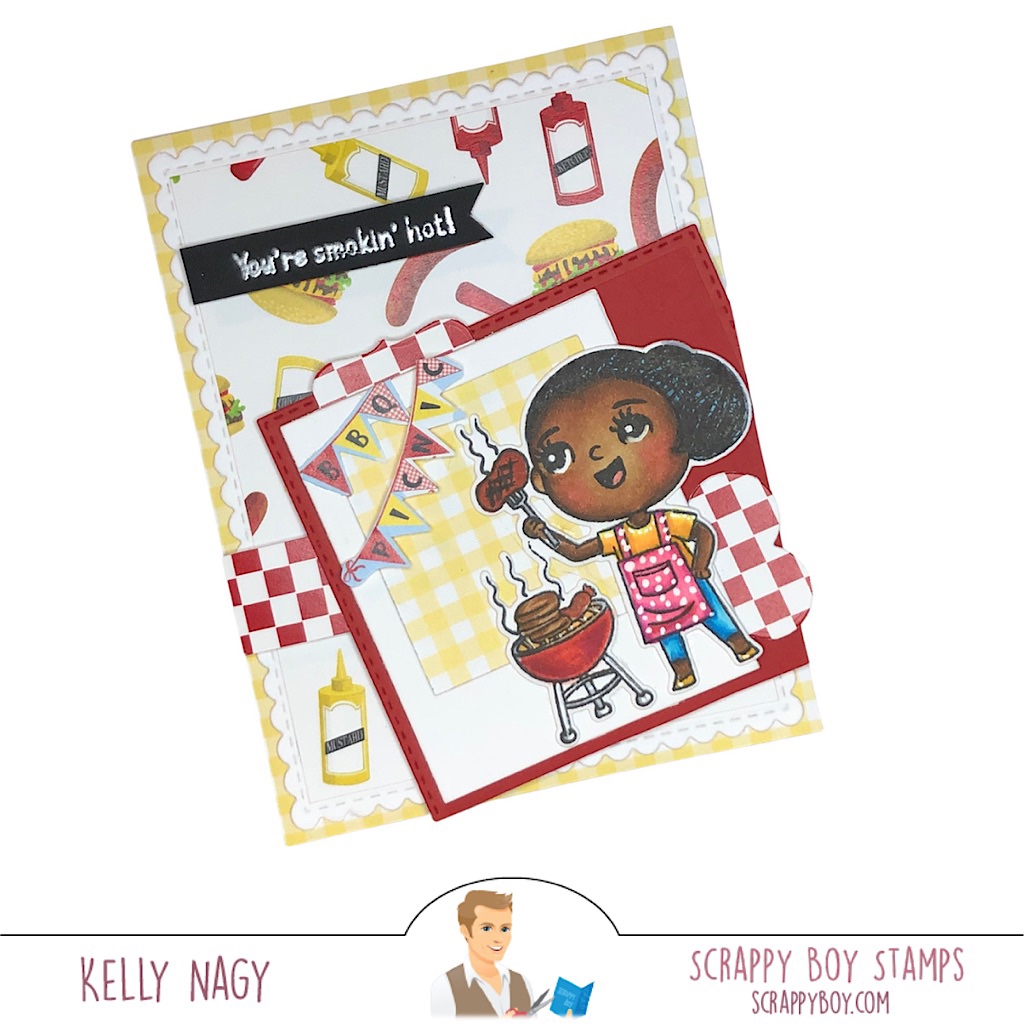
Check your stamps for grilling meat on a stick!!!! Celebrate EVERYTHING!!!!
Observed each year on March 28th, National Something on a Stick Day is a food holiday that lets you use your creative talents. Once you get started, the possibilities are endless. Foods that come on a stick are fun and easy to eat.
Check your stash for lollipops – Yum! Yay for food on a stick!
From cool summer treats like the Popsicle to frozen food staples like the corn dog, food on a stick is one of the world’s great inventions. Fresh fruit kabobs and skewers of grilled veggies and meat are both summer favorites.
Street fairs and food trucks have created a variety of recipes made to go on a stick that takes us from breakfast to after-party hunger with flavor combinations that sometimes make us wonder why we haven’t tried that before! Whether it is fresh and healthy or breaded and deep-fried, menu choices are broad and plentiful for National Something on a Stick Day.
Pull out your food stamps and celebrate National Food-On-A-Stick Day doing something creative.
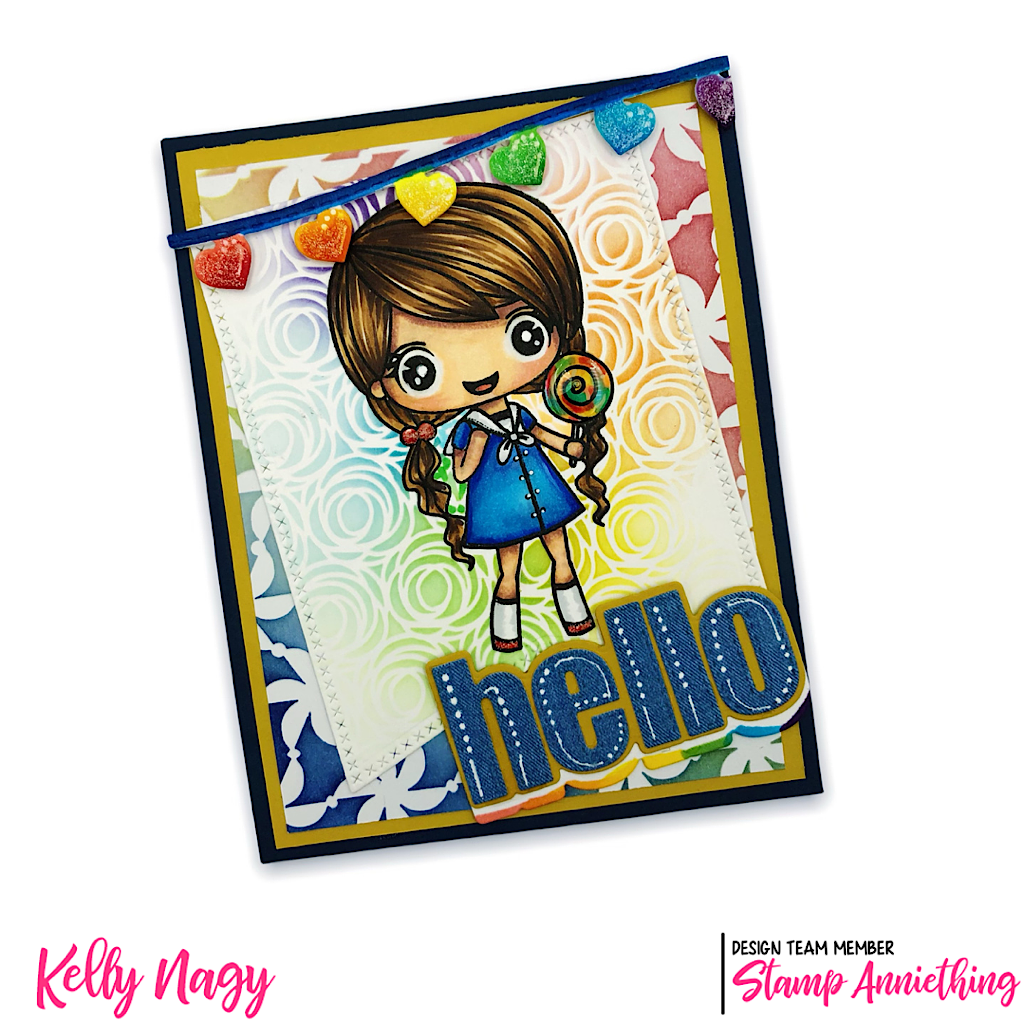
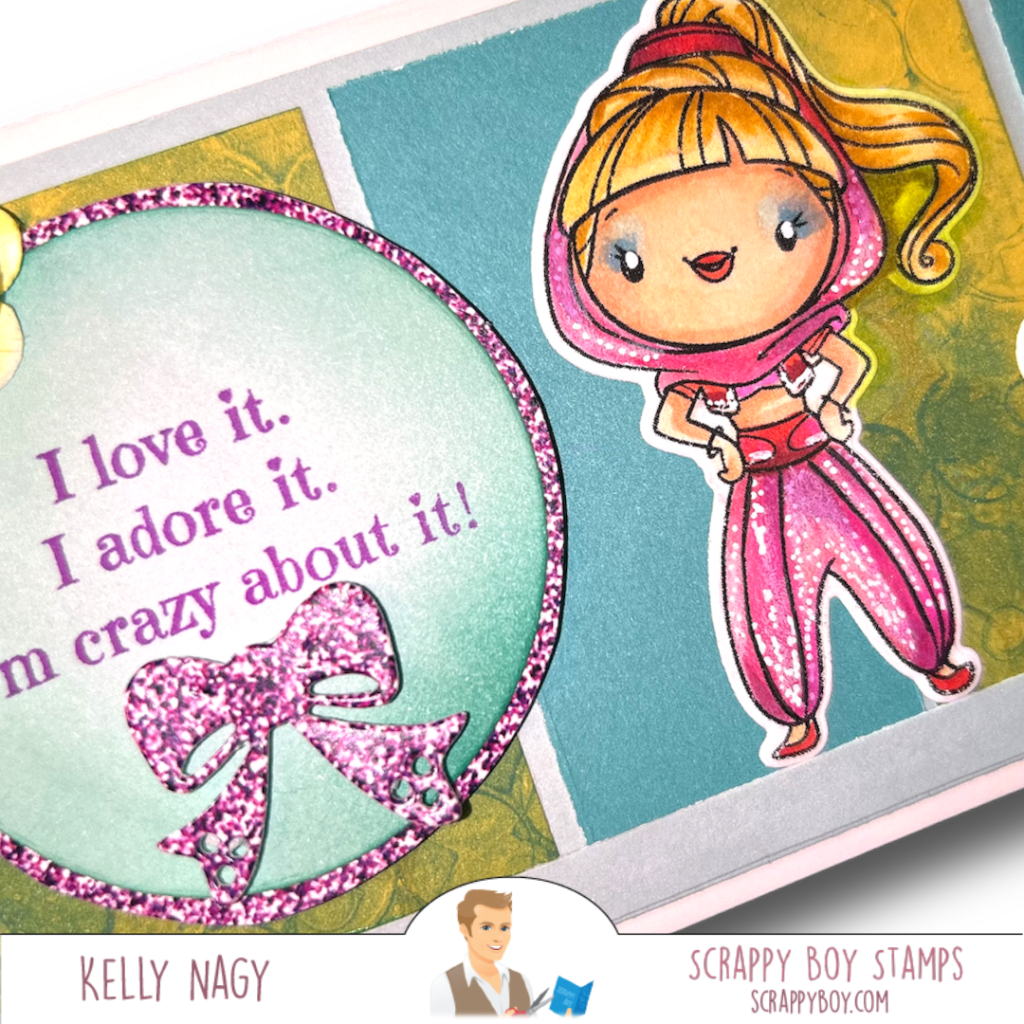
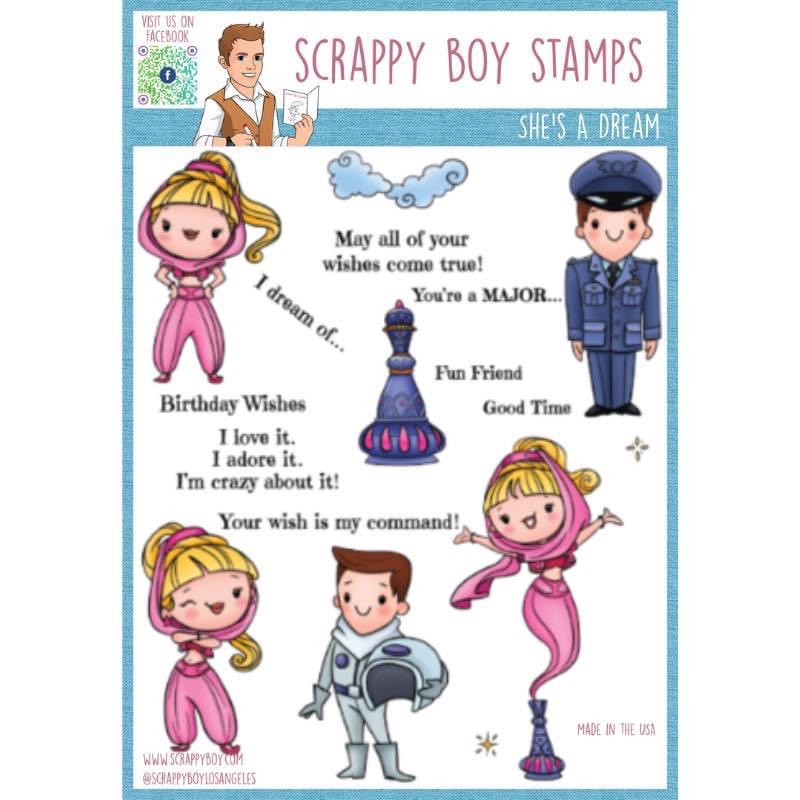
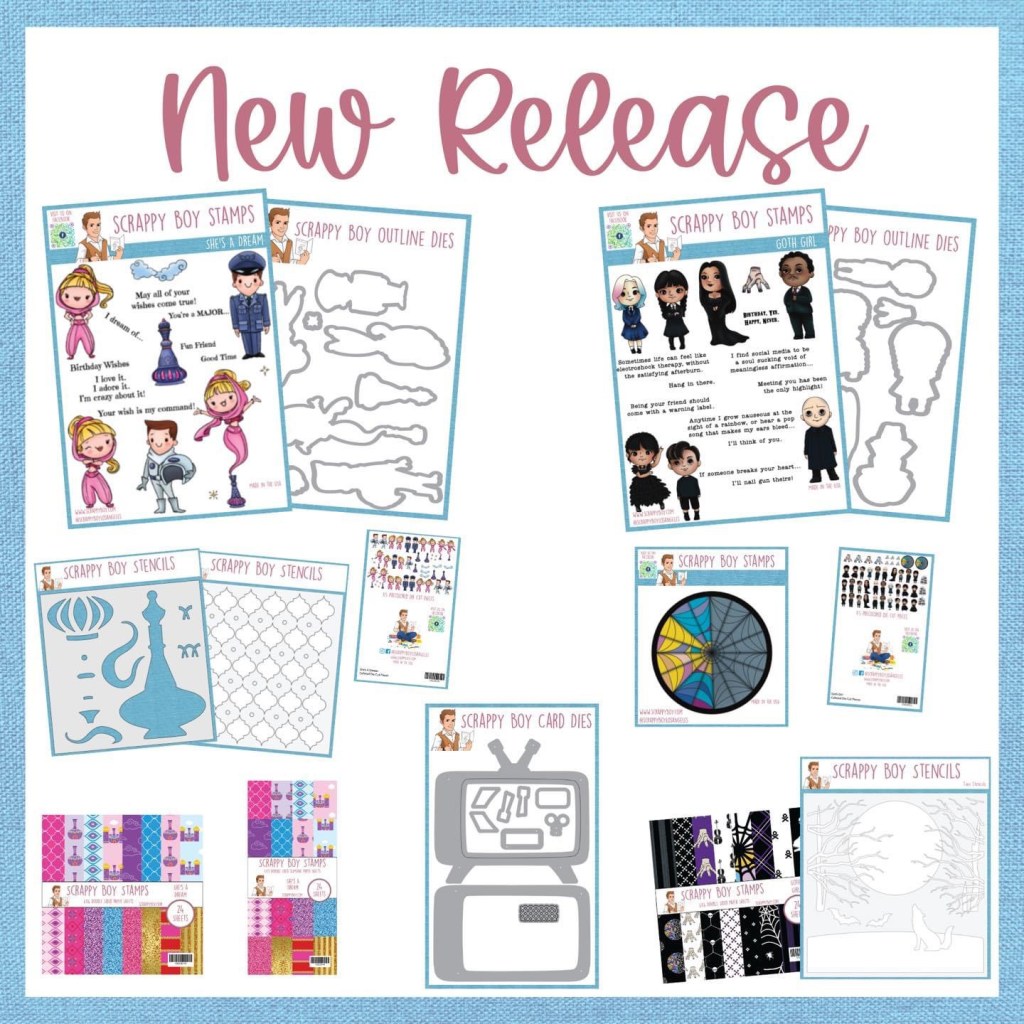
I am excited to introduce my first project using Scrappy Boy Stamps’ March 2023 Release. The new stamp set “She’s A Dream” was inspired by the classic TV show that we all love. This stamp set is a perfect addition to your collection and will surely add some whimsy to your projects.
March 2023 Scrappy Boy Release
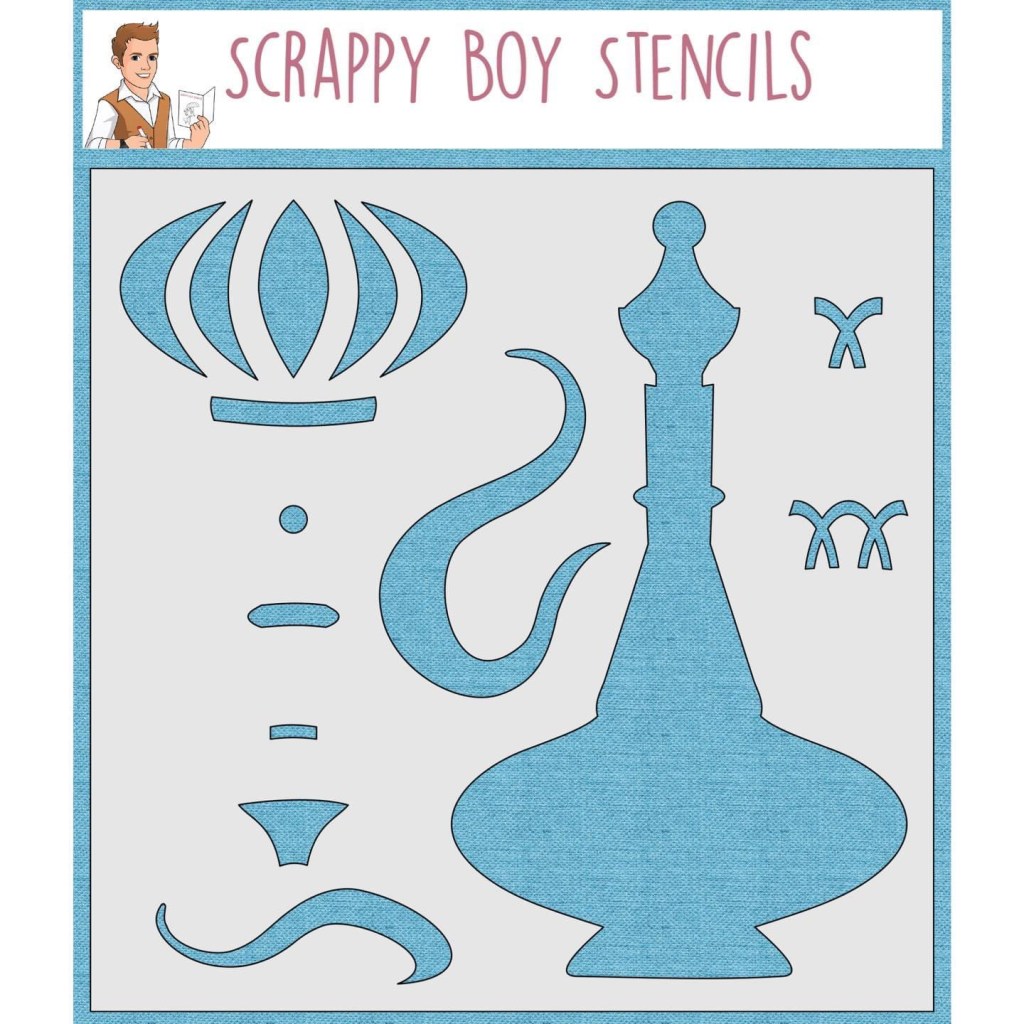
Isn’t this stamp set the cutest? Each stamp in the set has been carefully designed to showcase the magical aura of the classic TV show. The genie is absolutely adorable and brings back memories of a beloved TV character. There is a genie bottle stencil in the release that was designed to add a touch of enchantment to your projects, and another background stencil, which I used with my gel press to create an abstract background, perfect for adding texture and depth to creations.
Released March 2023Released March 2023
You can make a variety of different crafts such as cards, home decor, and scrapbook pages with this stamp set. Pair the colored images with the coordinated paper pack in both 6×6 and slimline.
Overall, the “She’s A Dream” stamp set is a must-have for anyone who loves the classic TV show and wants to add a touch of magic to their projects.
Thank you for joining me in this creative journey, and happy crafting!
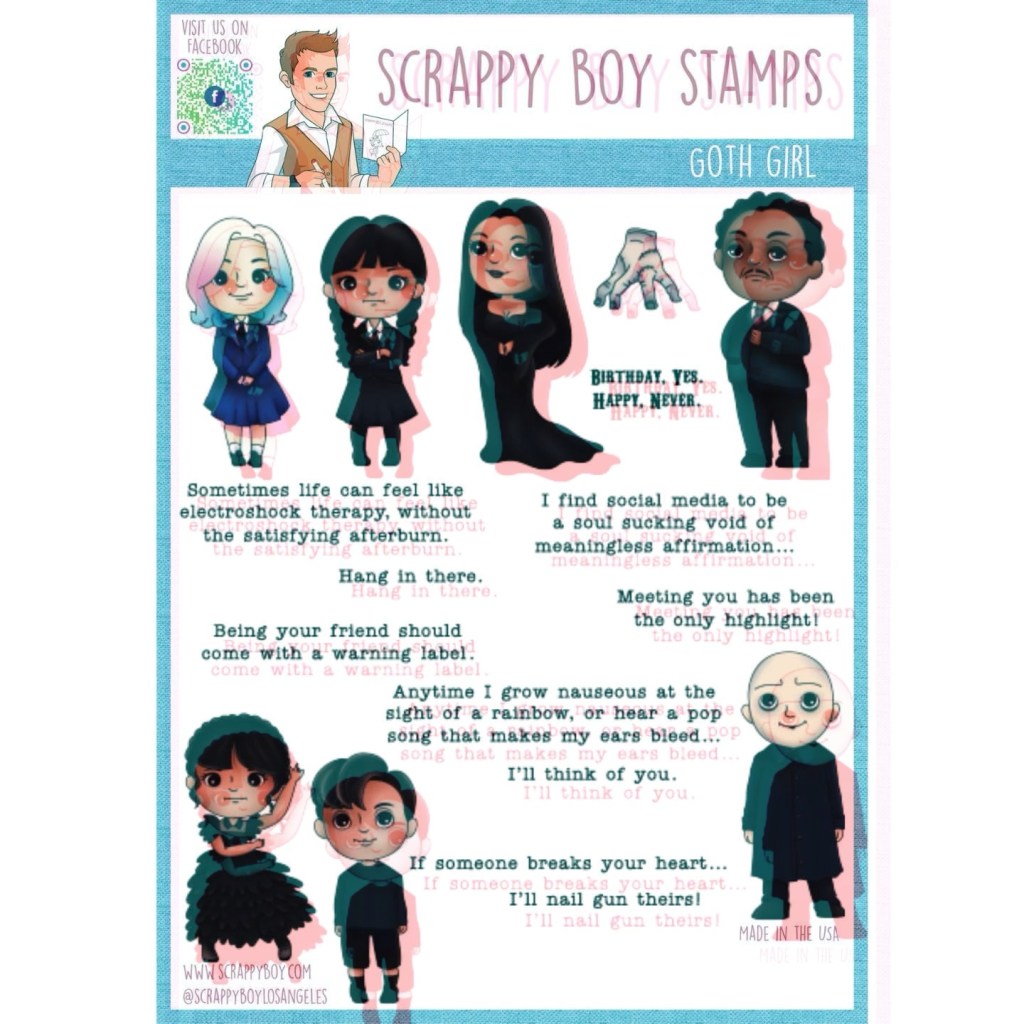
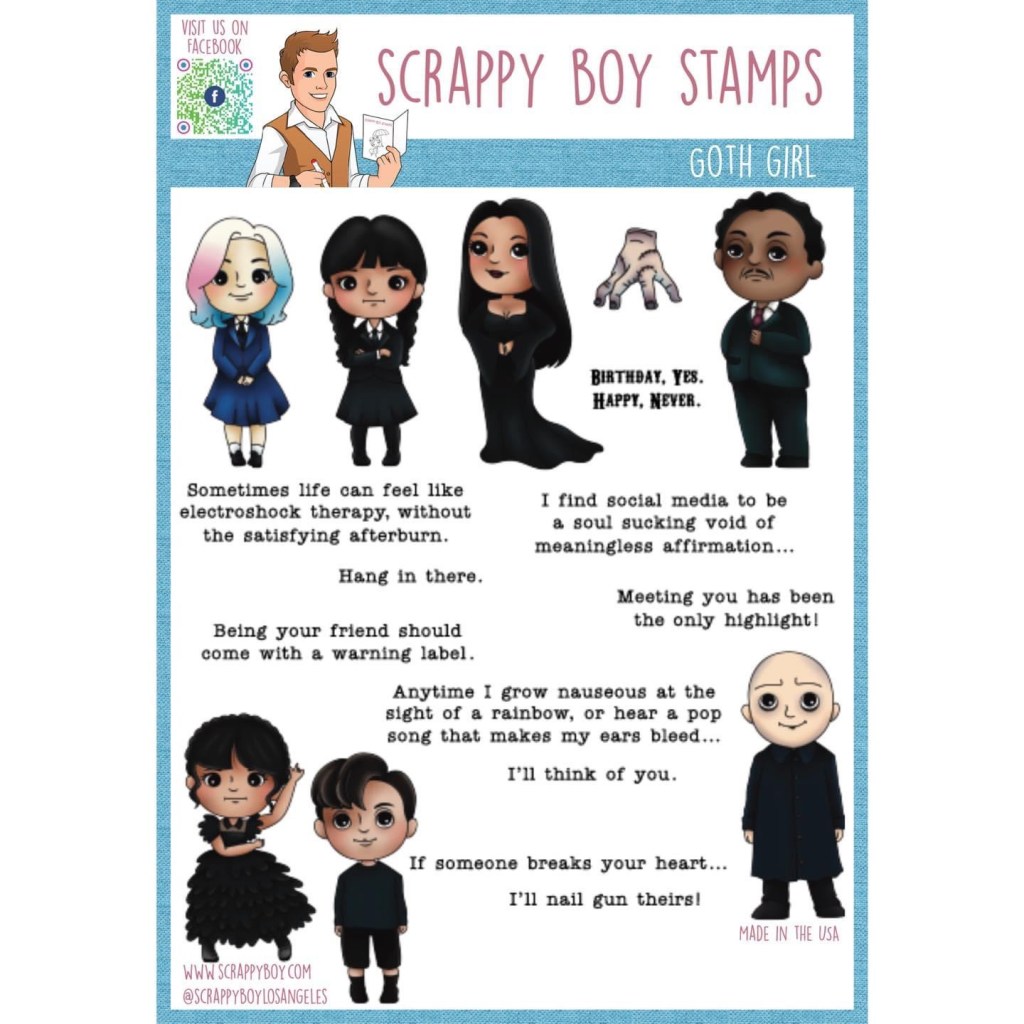
Hey Scrappyboy Fans, have you seen the latest release of the Cute Girls Goth Girl stamp set?! This set is perfect for anyone who loves the darker side of life and wants to add a bit of edge to their paper crafting projects. Inspired by a popular cult classic cartoon turned TV show and dark comedy, this stamp set is the perfect way to pay homage to your favorite anti-hero, while creating a enchanting and unique card.
Image intentionally blurred to prevent digital theft
One theme that we can all relate to is a broken heart. Whether it’s a recent break-up or a lingering heartache, we have all experienced the pain of love lost. This is where the Cute Girls Goth Girl stamp set comes in. With this set, you can create a project that both acknowledges your pain and celebrates your strength. I chose to make a memorydex card. There are several styles of memorydex dies available at Scrappyboy.com. I layered over top of the memorydex card base. I also pulled in some of the coordinating cardstock, too. I stay within a 4 in x 4 in margin so I can use in my carousel style memorydex holder.
Photo blurred to prevent digital theft
To start, choose a dark colored card stock as your base, whether it is a greeting card or a memorydex, as I did here. This can be black, dark purple, or even burgundy. Use the stamp set to create a scene using images from the Cute Girls Goth Girl set and adhere to the center of the memorydex card. I used the older man and woman (couple) and stamped on Hammermill 100# paper with Momento Tuxedo Black Ink and colored up using COPIC markers. For the characters in this set, don’t forget that you can customize their hair, outfits, and accessories to fit whatever scene you want to create. It’s a versatile set and can also be colored up to be bright and glamorous; however, if you are going for a dark theme, don’t forget to accentuate the characters’ eyes with some eyeliner and little dark lipstick to really give your card a gothic vibe.
Now, to address the broken heart theme in my card, I used a sentiment from the set that reads “If someone breaks your heart, I’ll nail gun theirs.” The sentiment perfectly captures the pain of a break-up, while also celebrating the idea of self-care and moving on with the help of loved ones.
Image intentionally blurred to prevent digital theft
Finally, I added some embellishments to the memorydex card to really make it pop and tie things together, by cutting a heart from the Memorydex Essentials Die Set (pictured above) in half and then putting it back together on the dex card. I then added several small silver flat-backed gems on top to emulate nail gun studs. Whatever you choose, make it personal and make it yours. Think outside of the box and mix and match from what you already have in your stash. If you want to purchase coordinating products in this release, there are lots of options.
6×6 paper packBackground Builder StencilWindow Stamp (die not available)
The Cute Girls Goth Girl stamp set and coordinating products in this release are fantastic additions to any paper crafting project. It’s perfect for those who love the darker side of life, and want to add a bit of edge to their projects. Whether you’re mourning a broken heart or just looking to create something unique, this stamp set is perfect for you. So go ahead, embrace your inner goth, and head on over to http://www.Scrappyboy.com and check out all of the amazing products Sean has to offer and start creating!
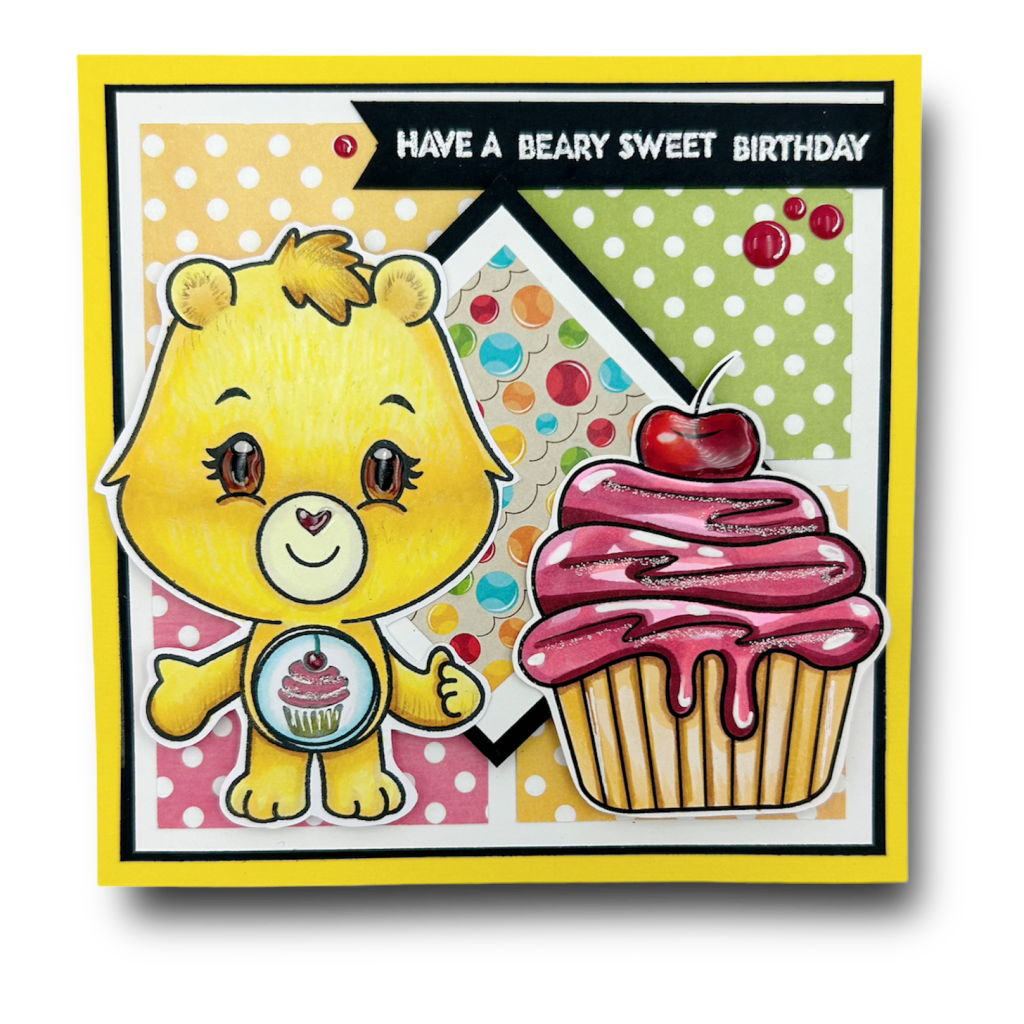
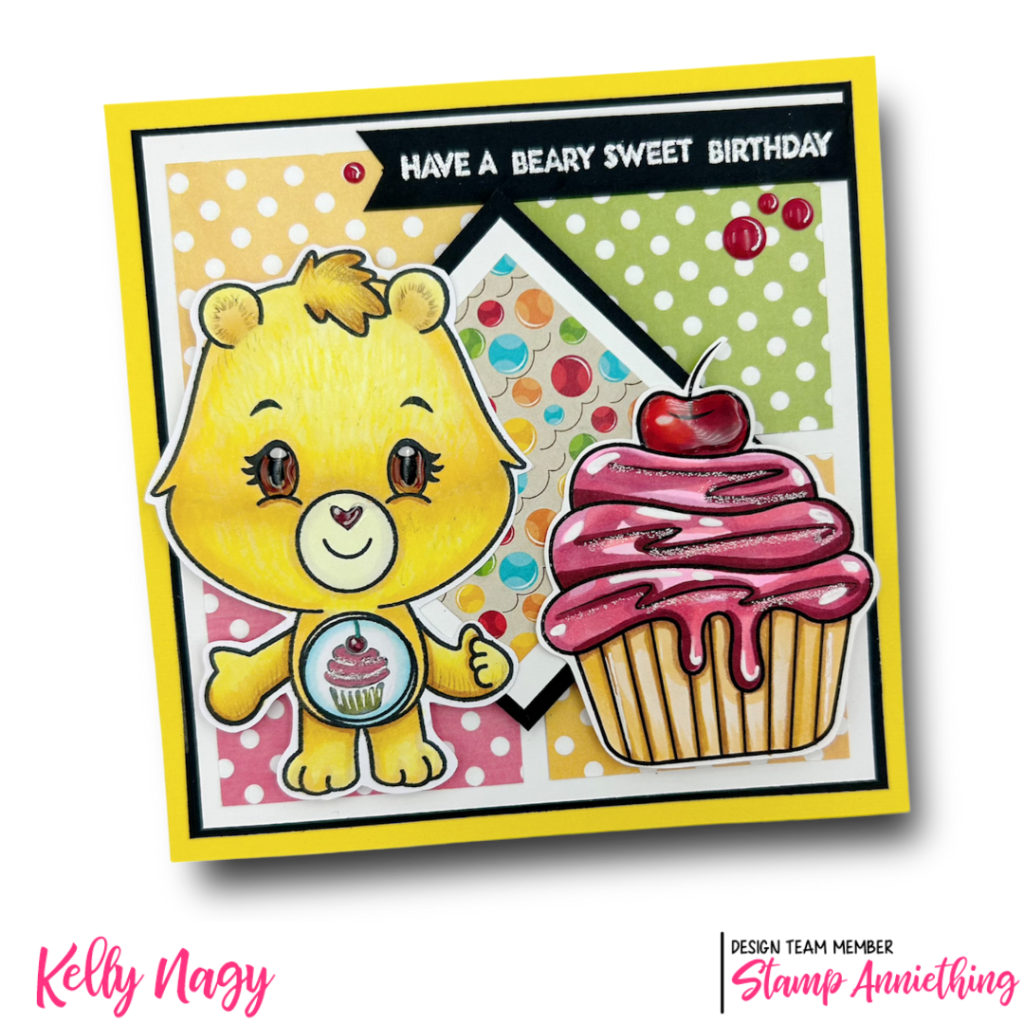
Card features Build A Caring Bear Limited Edition Set by Stamp Anniething
The art of gift-giving isn’t just about what’s inside the box. Adding a personal touch to your greeting card can make all the difference, especially when it’s for someone very special. That’s why I’m excited to share with you this really cute new set from Stamp Anniething that can be customized for any occasion and recipient.
Image is DISTORTED on purpose to prevent theft
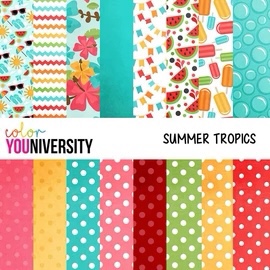
I created a birthday card using the Build A Caring Bear set, as well as patterned paper from the SUMMER TROPICS pack as a background. So, let’s dive in and see how to make this versatile square card.
The first thing you’ll need is a 5 1/4 in square card base. This size will provide enough space to showcase your creativity while still being efficient enough to mail. Next, you’re going to create your characters using the Build A Caring Bear set. The great thing about this set is that you can mix and match the different elements like faces, arms and belly tag to create your unique bear. I decided to go with a Happy Cupcake Bear because I wanted to create a festive and colorful birthday card.
Once I BUILT my bear, I started creating a fun birthday scene. To do this, I downloaded a free digital image that coordinated with the image on my bear’s belly. It’s easy to do and it provides a great way to add a personal touch to your card. I went with a cupcake!
I wanted to create texture on the card, so I used patterned paper from the SUMMER TROPICS pack to make the background. The bright colors and versatile patterns are perfect for a celebration and it compliments the bear image well. I cut a total of four (4) two-and-a-quarter inch squares and a 2 1/2 inch square in white and a 2 3/4 inch square in black to frame and then place in center on the diagonal using double-sided foam tape. I had a small square scrap I added from the Pets Grab & Go Box (no longer available), that I added to the center of the square.
6×6 paper pack – 24 pages
Finally, I added a sentiment to the top right of the card, wishing the recipient a BEARY sweet birthday. It’s simple, but heartfelt, and it ties everything together nicely. Added some Enamel Dots from Stamp Anniething to repeat the pops of color in a triangular pattern, to draw your rye from the sentiment to the cherry on the cupcake and back to the sentiment again.
Build A Caring Bear Birthday Card
In conclusion, with little effort, anyone can make a sweet, personalized birthday card using the Build A Caring Bear set and Summer Tropics patterned paper. You can change the occasion, color scheme or even switch out the face, belly badge and arm positions to create a unique design tailored to whomever you’re giving it to. It’s a thoughtful gesture that shows you care, and the recipient will surely appreciate the time and effort put into it. Happy creating!
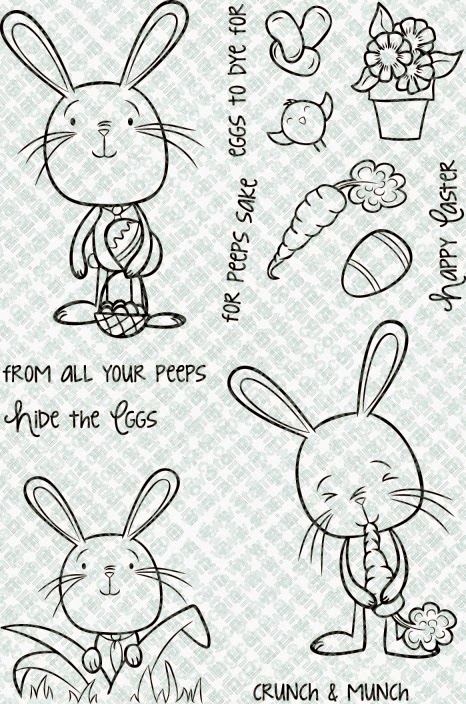
Happy Easter card featuring Stamp Anniething classic: For Peeps Sake
Dusting off old stamp sets always brings about a wave of creativity and nostalgia. With Easter fast approaching, I decided to take out an older stamp set from Stamp Anniething called “For Peeps Sake”. This set was released before the immensely popular Chibi line but still has the same cute and fun aesthetic that Stamp Anniething is known for.
I started by stamping the bunny in the grass, bunny holding Easter egg and basket, carrot, egg, flowerpot and chick from the set onto white cardstock using Memento Tuxedo Black ink. I then colored them in with Copic markers, sticking to a soft pastel color palette to keep with the Easter theme. I also used a white gel pen to add some highlights and details to the images. I fussy cut the images and also removed the flowerpot from the flowers do I could embellish the sentiment a bit by popping flowers and sentiment up with double-sided foam tape.
For Peeps Sake by Stamp Anniething
For the background, I wanted to create a simple and whimsical scene. I used Distress Oxide inks in shades of blue and green to blend a sky and grass background, respectively. I also added some clouds using the clouds builder stencil by incorporating some white pigment ink. I used the grass builder stencil and ink blended in green on the bottom half of the card front. The background panel was cut from specialty paper called GEMINIO PAPER, a glossy paper that is not quite Yupo, but close. It stands up to dome fun ink and watercolor techniques and doesn’t warp or pill.
To finish off the card, I stamped a sentiment from the set onto a strip of extra ink-blended Geminino paper and this will be adhered to the top left hand corner over a banner I made using the carrot stamp and coloring up with my Copics for added interest.
Overall, I had a blast dusting off this old Stamp Anniething set and using it to create a fun Easter card. It just goes to show that sometimes, it’s worth looking back and giving some love to the stamp sets we may have overlooked from the past. Now go find a TREASURE from your stash and share what you make! Happy Crafting!
In case you haven’t heard it today, you are incredible and you matter!
Attention stamping and paper-crafting enthusiasts! Scrappy Boy Stamps has just released their much-anticipated March release, and it is now available for purchase on their website, http://www.scrappyboy.com. This month’s release features an array of adorable and whimsical stamps and coordinating products, perfect for adding a touch of charm and whimsy to your paper crafts.
Let’s take a look at some of the highlights of this month’s release:
✨✨SHE’S A DREAM ✨✨
💖She’s A Dream 6×8 Stamp Set & Dies
She’s A Dream 6×8 Stamp Set
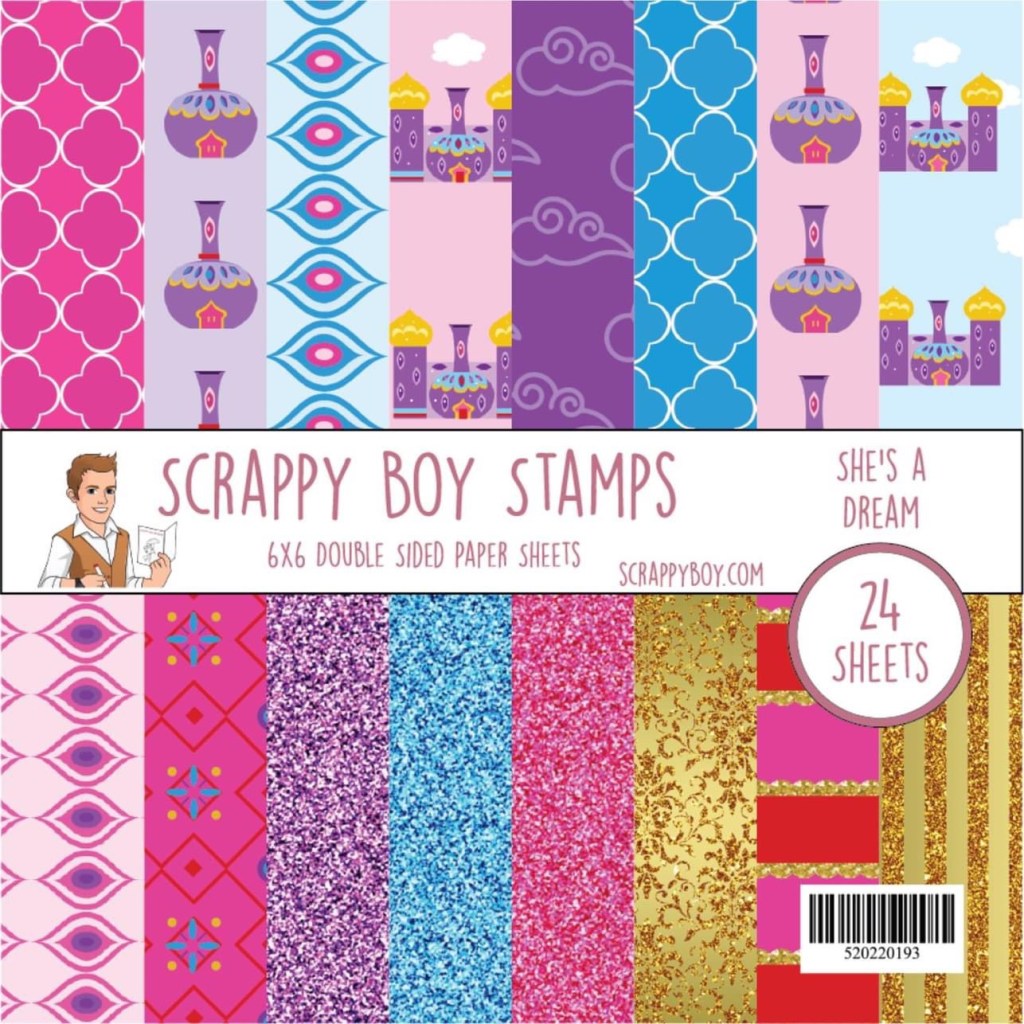
💜She’s A Dream 6×6 & 4×9 Paper Packs
She’s A Dream 6×6 & 4×9 Paper Packs
💖She’s A Dream Bottle builder Stencil
She’s A Dream Bottle builder Stencil
💜She’s A Dream Background Stencil
She’s A Dream Background Stencil
💖She’s A Dream Colored Die Cut Pieces
🕷️🕷️CUTE GIRLS GOTH GIRL🕷️🕷️
🖤Goth Girl 6×8 Stamp Set & Dies
Goth Girl 6×8 Stamp Set
🖤Goth Girl Window 4×4 Stamp set (no die)
Goth Girl Window 4×4 Stamp set
🖤Goth Girl Layered Background Stencil
Goth Girl Layered Background Stencil
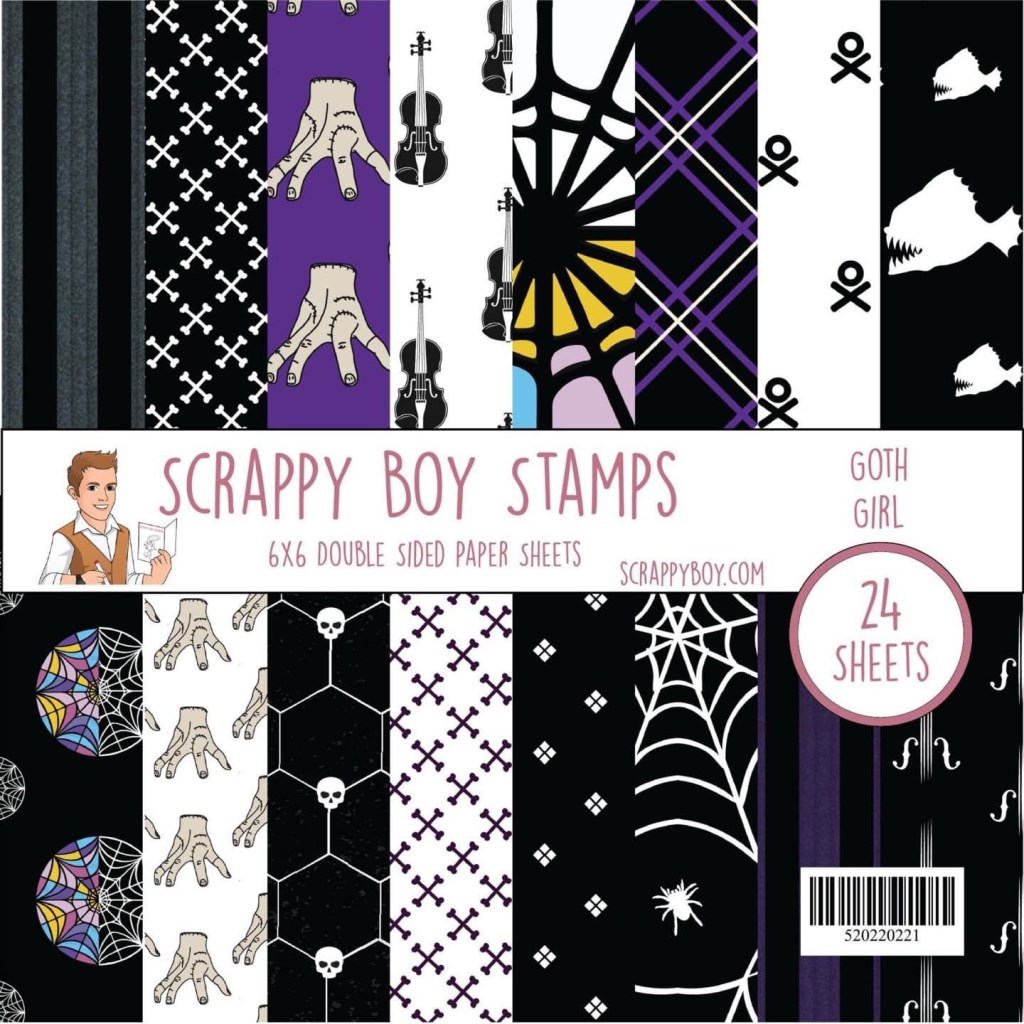
🖤Goth Girl 6×6 Paper Pack
Goth Girl 6×6 Paper Pack
🖤Goth Girl Colored Die Cut Pieces
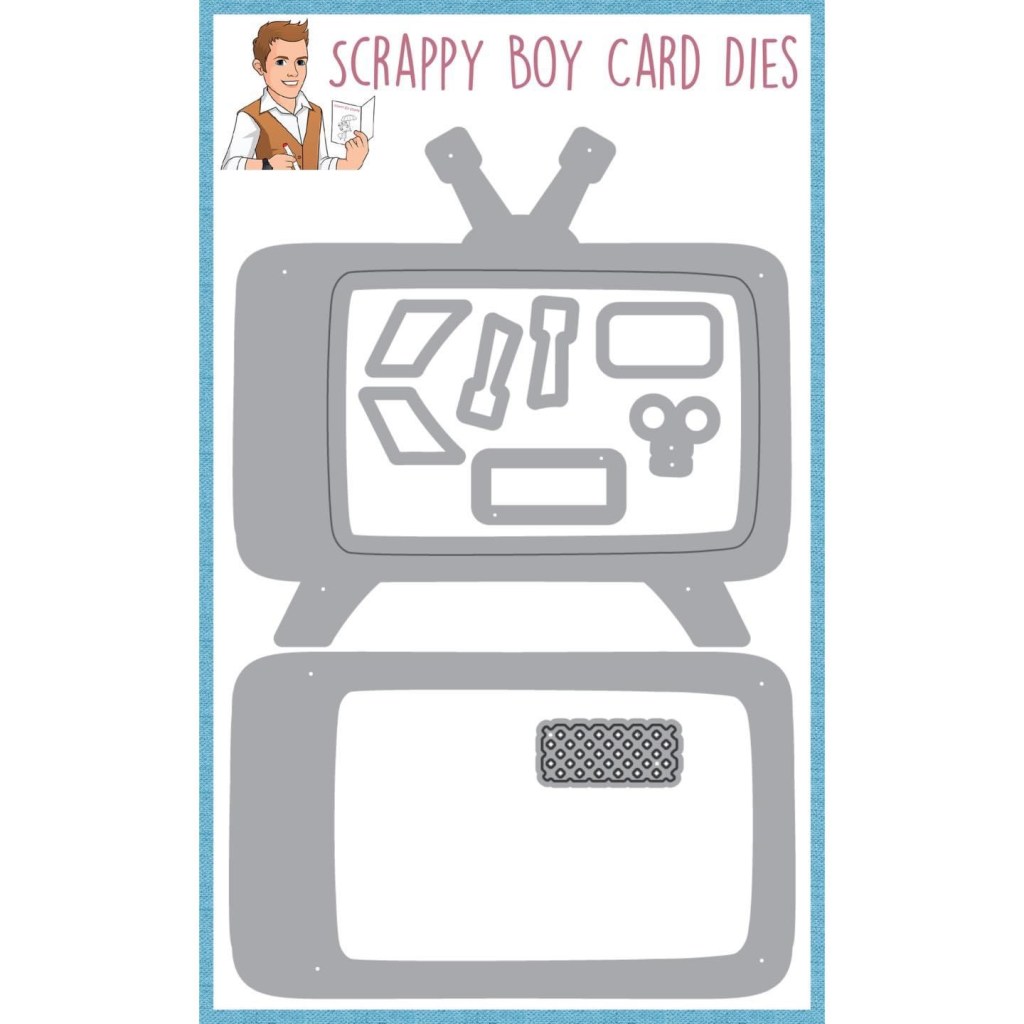
📺TV SHAKER DIE📺
These are the coordinated products included in this month’s release. Each stamp is made from high-quality photopolymer, ensuring crisp and clean images every time. Plus, they are easy to store and organize thanks to their slim design.
In addition to their stamps, Scrappy Boy Stamps also offers a variety of other crafting supplies, including dies, stencils, and pre-colored die-cut pieces. Plus, with free shipping on orders over $100, it’s the perfect time to stock up on all your crafting essentials.
So what are you waiting for? Head over to http://www.scrappyboy.com now to check out their March release and all the other wonderful products they have to offer. After that, all that’s left is to START CREATING!!
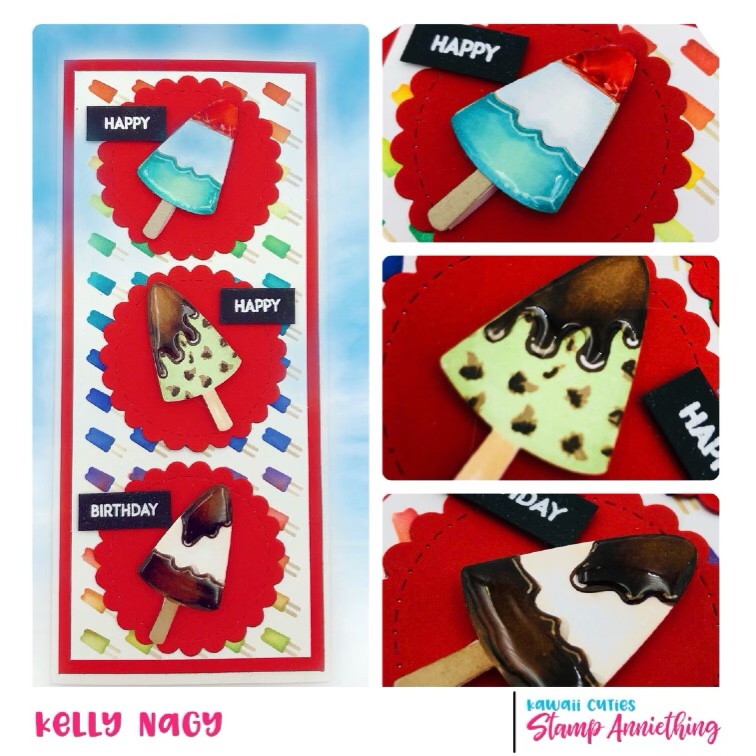
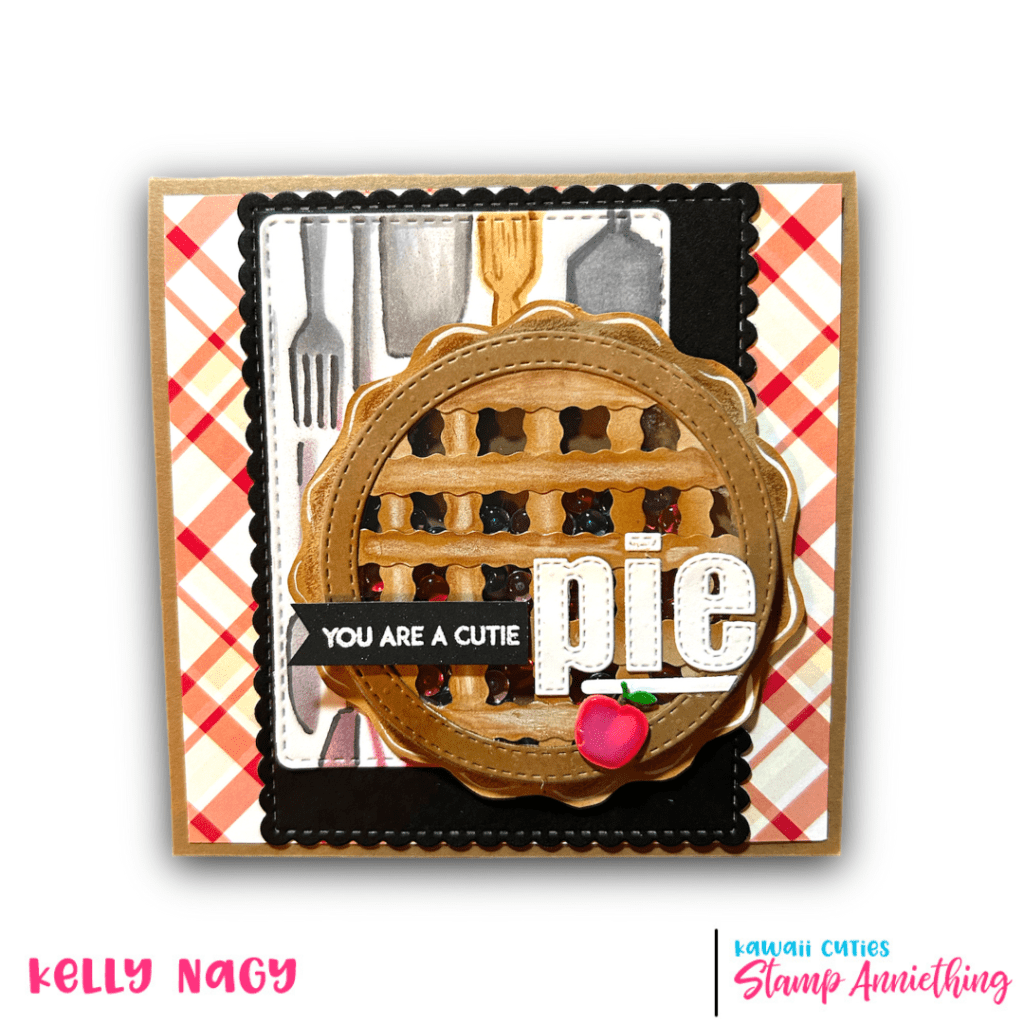
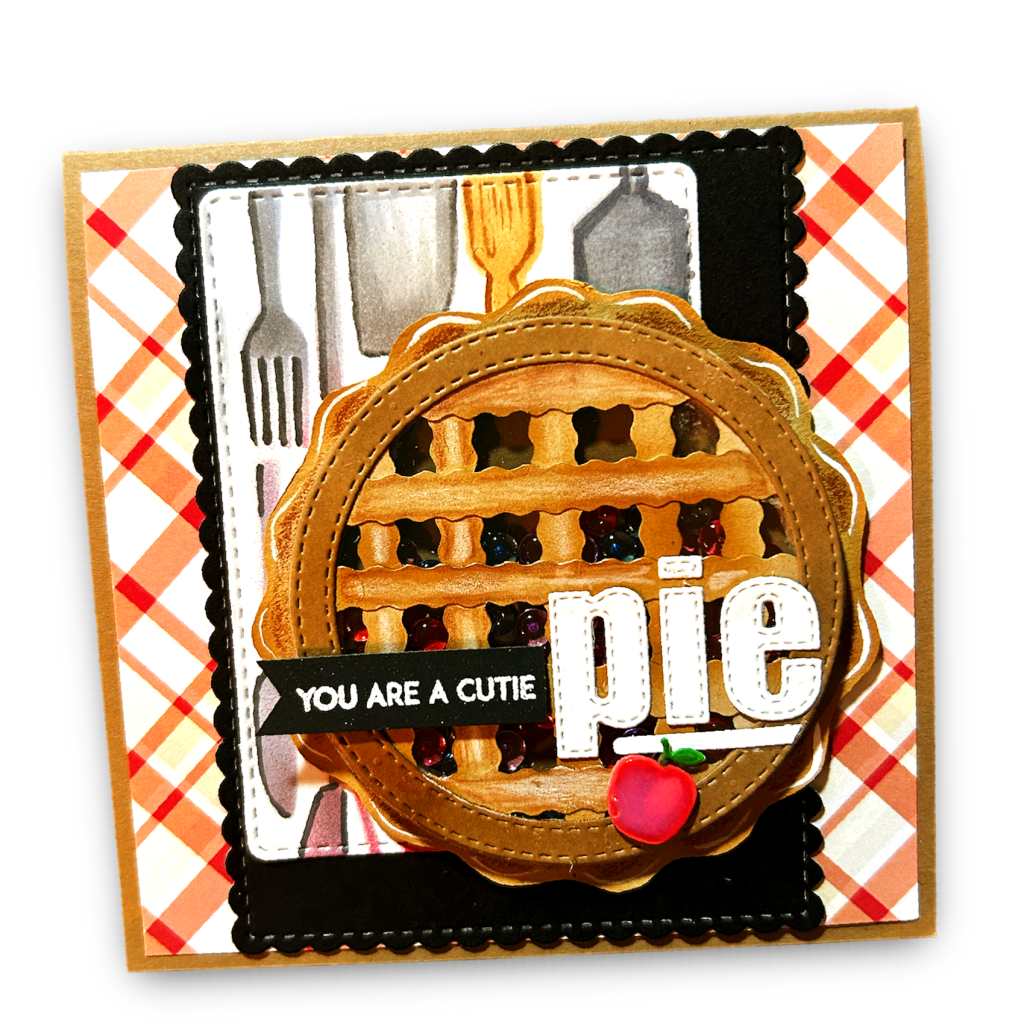
I am following up after my LIVE held on Tuesday, 3/14, International Pi Day, where I started to share how to get creative and make something fun and unique to honor the day! And what better and CALORIE FREE way to celebrate Pi Day, than by creating a pie shaker element using the Circle Shaker Basics 1 set from Stamp Anniething?
A pre-recorded video will be shared on the Stamp Anniething Stampers Facebook page shortly which will provide additional details and elaborate more on how to create this shaker element and two 5.5 inch square cards. My initial LIVE was cut short due to a family emergency and appreciate everyone’s concern. We are all good now!
Card using Pie Shaker Element
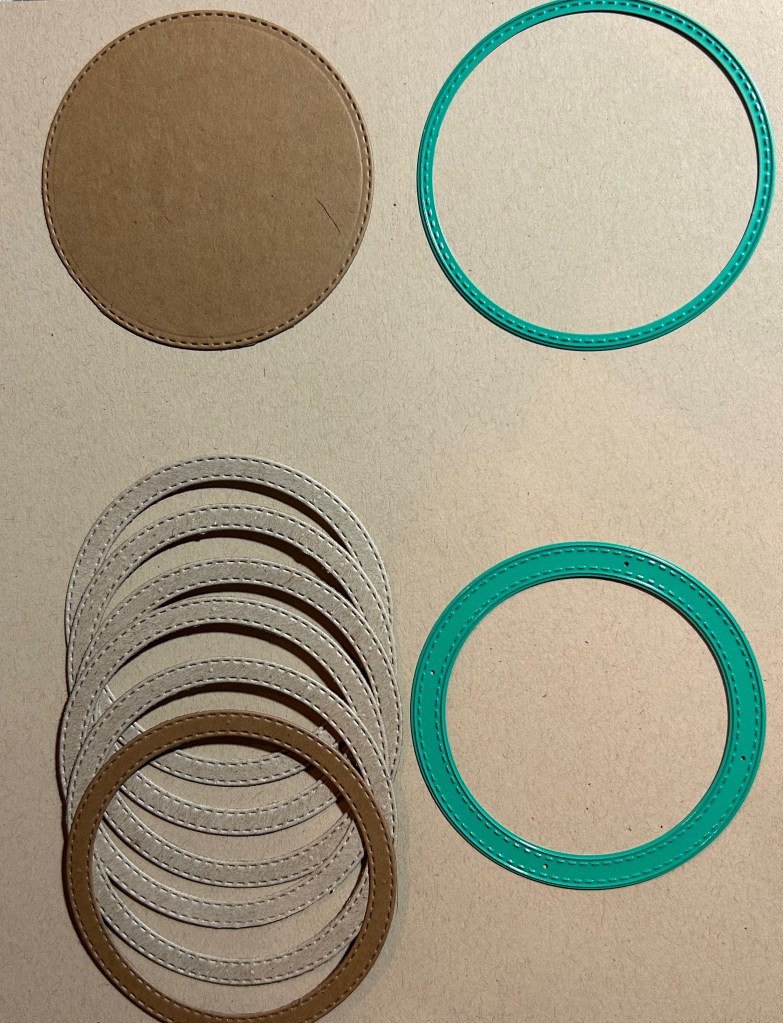
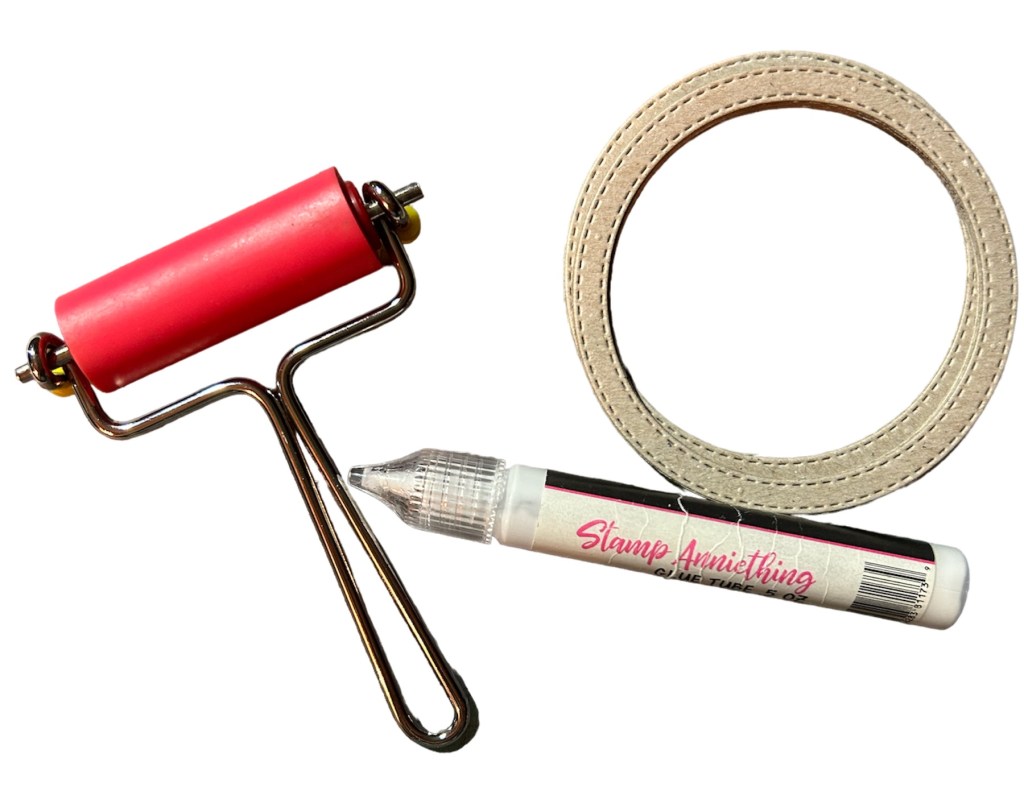
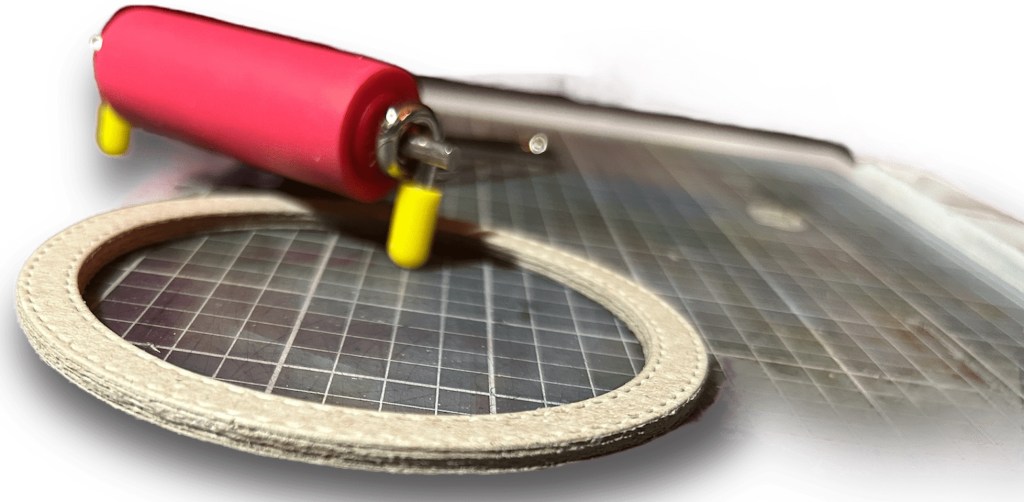
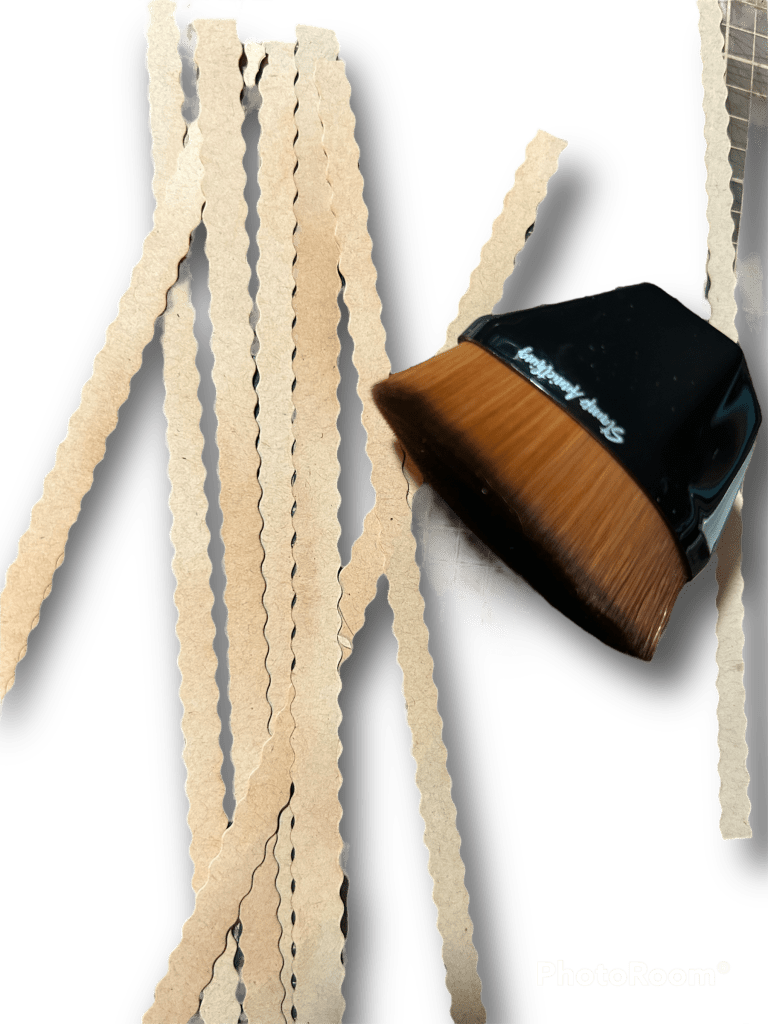
To get started, you’ll need the Circle Shaker Basics 1 set, some cardstock in your desired color, chipboard, acetate sheet, shaker bits and liquid adhesive. Begin by die-cutting 5 circles using the circle “frame” die from the set – one from cardstock and the others from chipboard. Make sure when gluing together, they match up in size.
Shaker Basics 1 from Stamp Anniething 5 chipboard & 1 card-stock – image shows which dies to use to cut. Keep negative pieces for a future project. Cut acetate sheet with the single die at the top. Later, we will use this to seal your pie and create barrier to hold shaker bits in.
Next, layer of each die-cut with the liquid adhesive and use brayer or your fingers to make sure the layers are stacked evenly and ensure there is no air or separation between layers to prevent your shaker bits from escaping.
Running brayer over each layer helps create a strong seal, keeping shaker fill where it belongs.
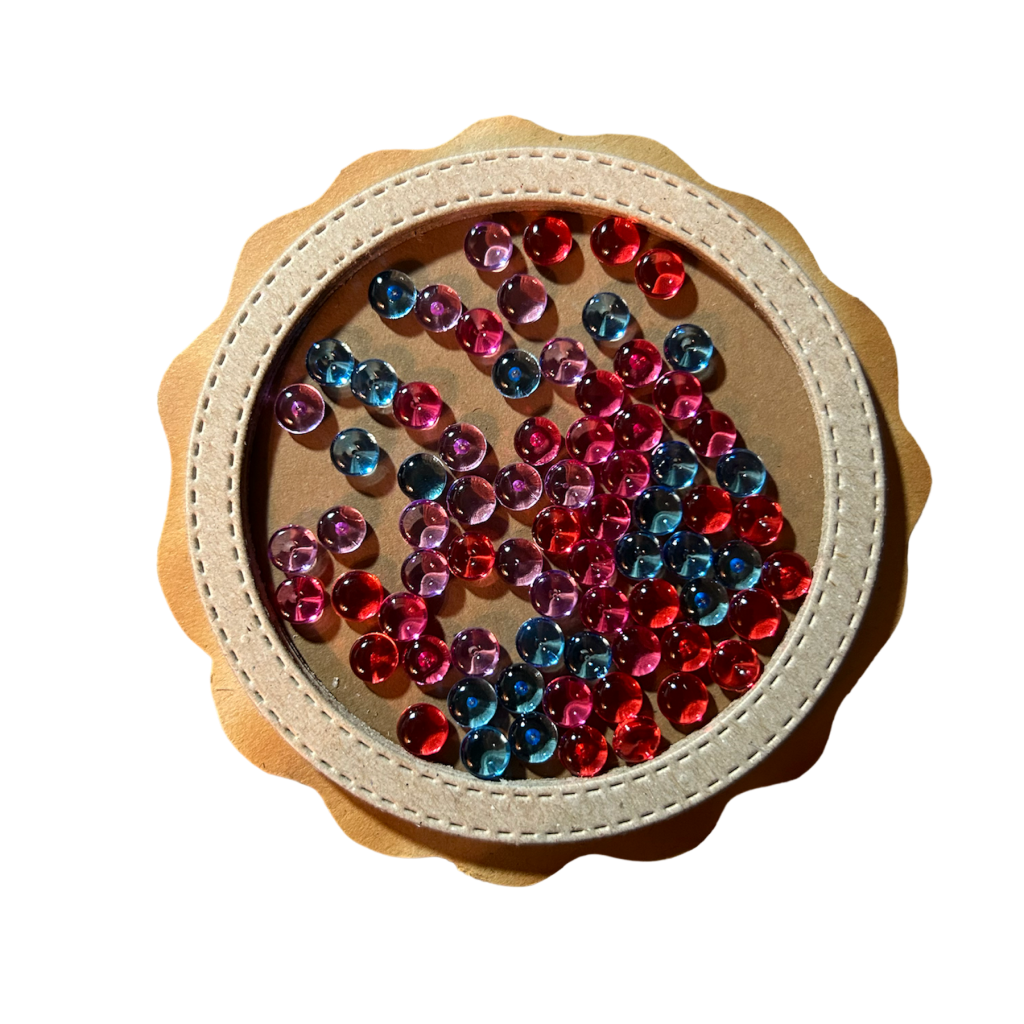
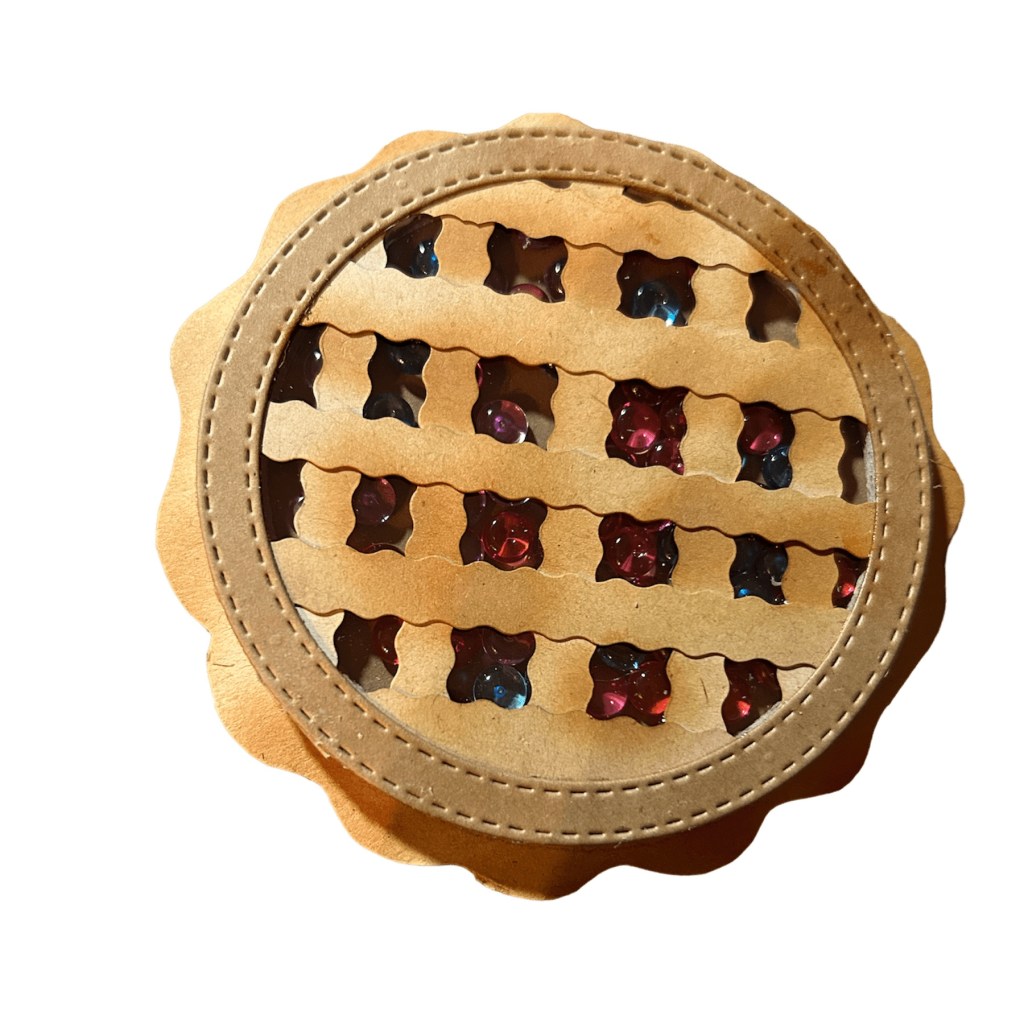
Now, add the shaker bits-on top of the cardstock circle in the well you created, as desired – you can add whatever you want to create interest (sequins, clay shaker bits, etc). I used jelly dots. You can use one color or simply mix a variety of colors for a more random look, as I have done here. Once you’re happy with how the shaker filling are arranged, carefully glue the cardstock circle onto the top on the acetate circle to seal.
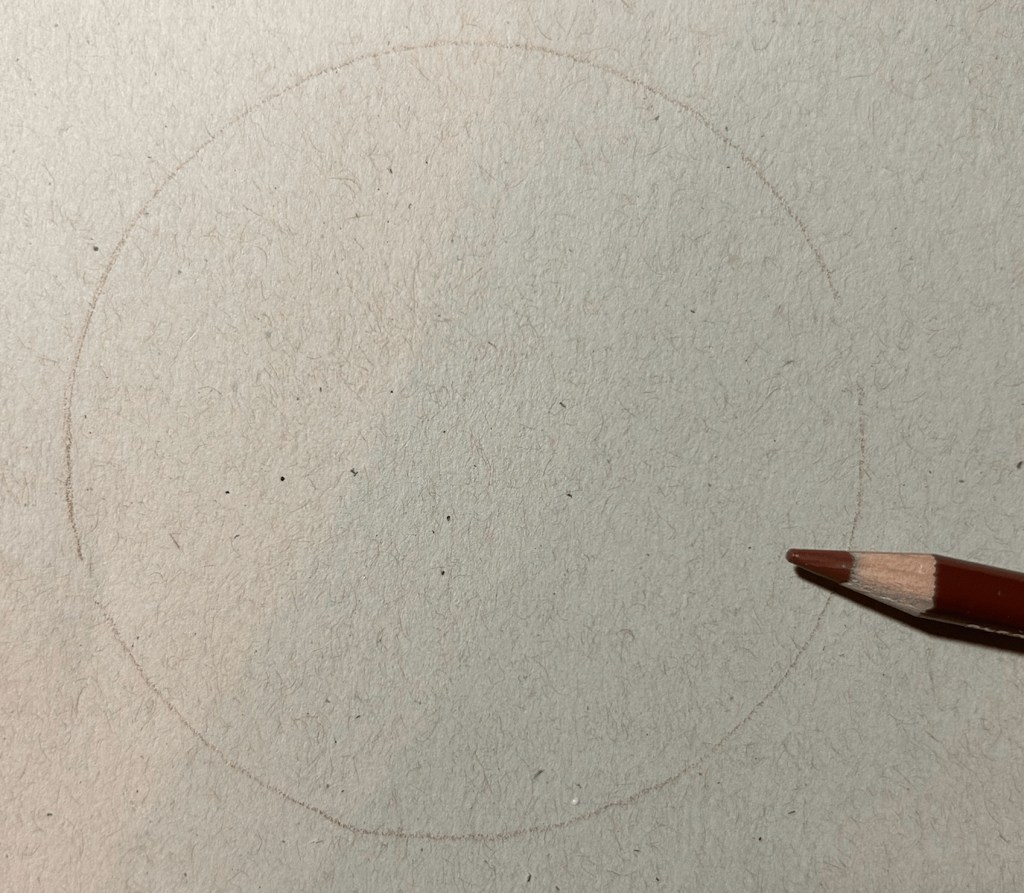
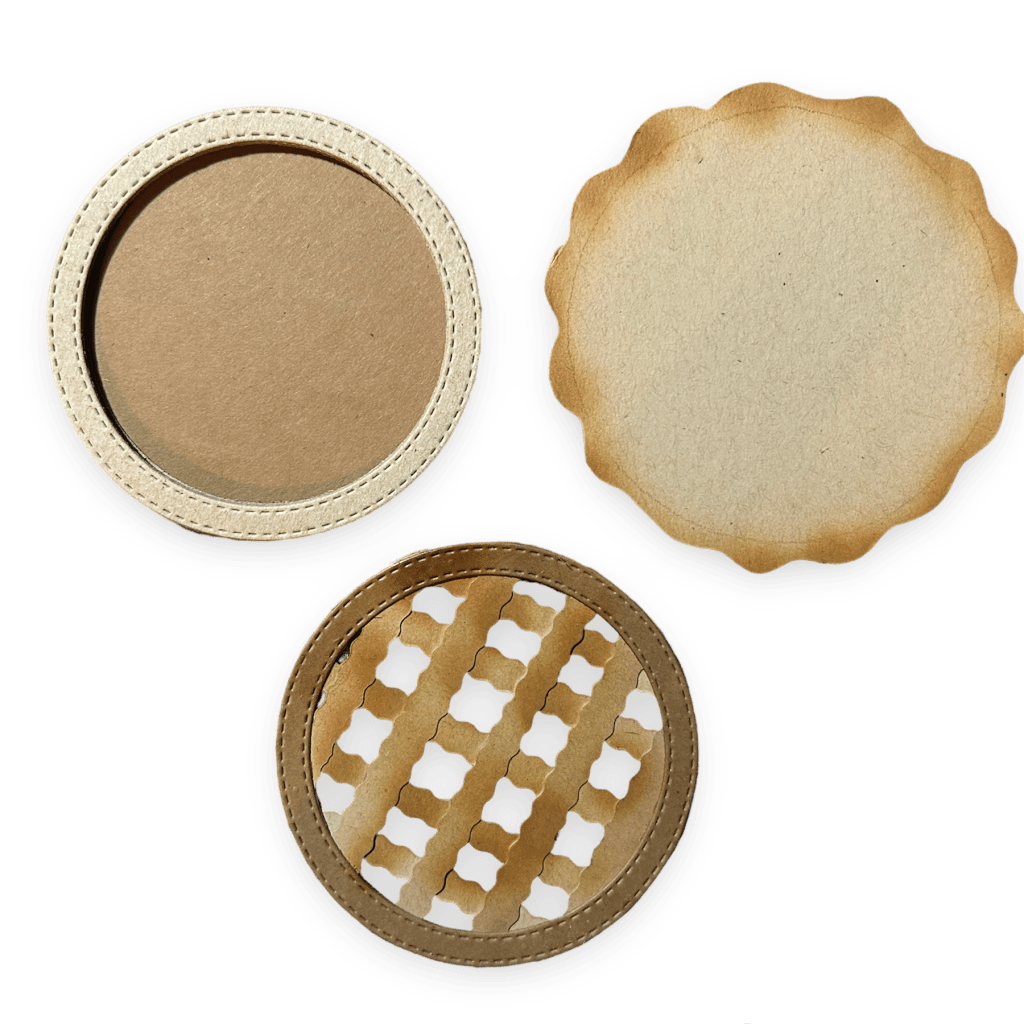
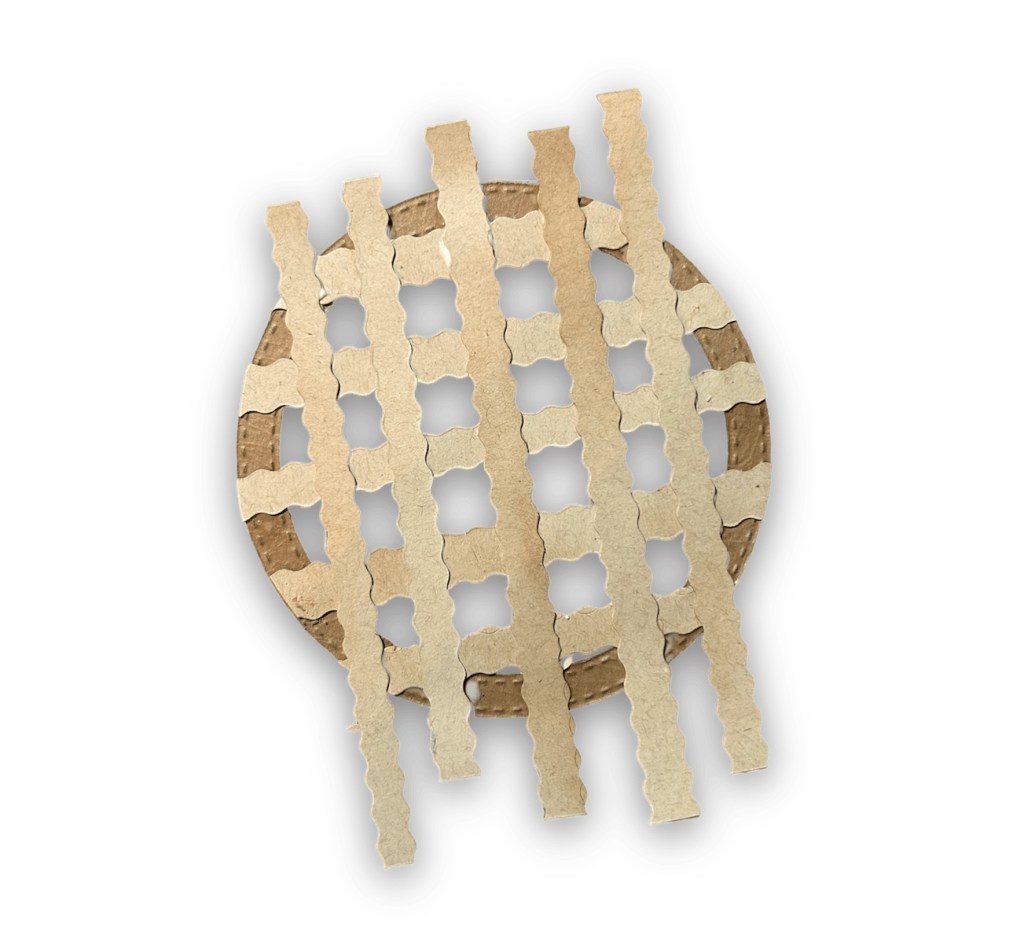
See the depth created by layering chipboard versus using foam tape.To create wavy pie crust edge, trace circle onto coordinating card stock. Then cut with scissors a curvy edge about 1/2 inch wider than the initial line drawn. Ink blend edges to look like it browned in oven and finish with white gel pen for added interest.This photo shows the different pieces that will be glued together to create pieFill well with shaker bits after gluing down to free-handed circle you traced and fussy cut to create the wavy outside of the pie crust edge. This seals one side of your pie element. Place something heavy to ensure good adhesion.
Finally, you can add some touches to make it look like a pie – for example, you can cut small strips of card stock in 1/4 in strips either with decorative scissors or your paper trimmer. Consider ink blending the edges to create a visual effect of being browned in the oven. Other options for a decorative edge could be to use the edger dies from Stamp Anniething to make it look more like rippled pastry to form the lattice crust.
Edger dies/see smaller scalloped aboveInk blend your strips and glue down in s lattice design snd then cut off any edges that hang over.Layer strips and glue down to single frame to create pie top.
And voila – you now have a pie shaker element that you can use to decorate cards, scrapbook pages, or even as a fun little trinket to give away as a gift, attached to a tag, memordex card or mini recipe album! The possibilities are endless, and the best part is that you can customize it to fit your personal style and preference.
Finished pie element
So why not get your creative juices flowing and make your own pie shaker element to not just celebrate International Pi Day, but stretch your current die stash and use your supplies in a new, unique and fun ways!?!
Example of 5.5 inch square card paired up with a chibi
Happy crafting!
Final Card Project using pie element without chibi
If you haven’t heard it yet today, YOU ARE INCREDIBLE and you matter! Happy Crafting! Please follow, like, subscribe and share
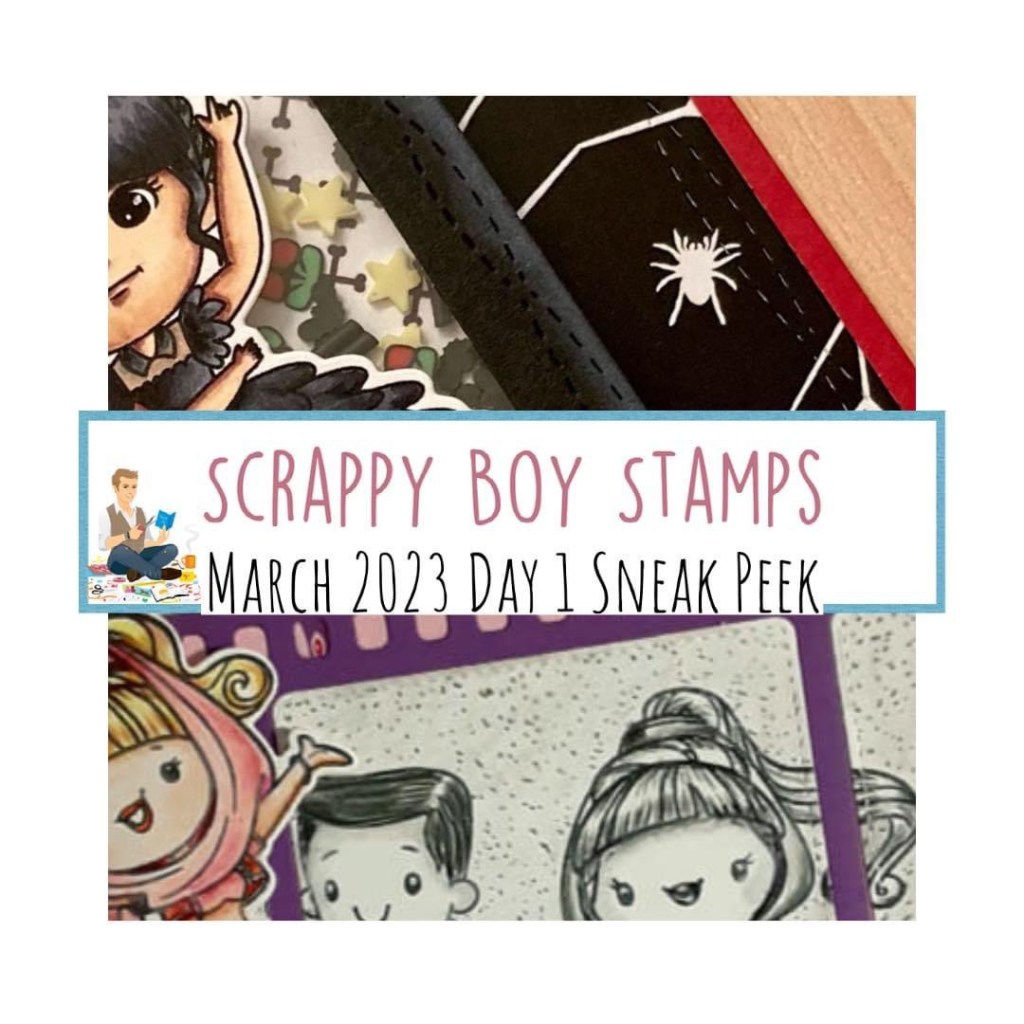
Hello, all you paper crafting enthusiasts out there!
I am excited to announce that the March 2023 Scrappy Boy release is just around the corner, and wanted to give you a sneak peek into what you can expect on the first day of this exciting release.
First on our list is a set of brand new patterned papers in both 6×6 and slimline, each one featuring bright and bold designs that are perfect for adding a pop of color to your projects. All of Scrappy Boy patterned papers are printed on high-quality card stock and are sure to make your projects stand out! The paper is so lush and vibrant, and you can feel the quality in the weight and look of each piece of the double-sided pages.
Next up, there will be coordinating stencils and pre-colored die-cuts that will help you to create stunning layouts and cards in minutes. The die-cut embellishments feature all the cute images, colored up, cut and ready to add a touch of personality to your scrapbook pages, cards, planners and other projects you are working on. The stencils can pull a background together in just minutes and are great for both beginners and experts alike!
And last but not least, there will be a new set of stamp and coordinating outline die sets featuring the fun and quirky cute girls’ line for adding a playful touch to your projects and of course the main Scrappy Boy Stamp Release that will hopefully make all your wishes and dreams come true!!! These stamps and dies are made from high-quality materials and will give you endless hours of crafting fun.
Of course, these are just a few of the exciting products that are in store for you during the March 2023 Scrappy Boy release. I can’t wait to share more sneak peeks with you in the coming days, so be sure to stay tuned and get ready to be inspired!
Thank you for choosing Scrappy Boy, and happy crafting!
If you have been inspired in some way, please consider liking and subscribing, so you don’t miss a thing. If you have not heard it yet today, you are INCREDIBLE and you matter!!


