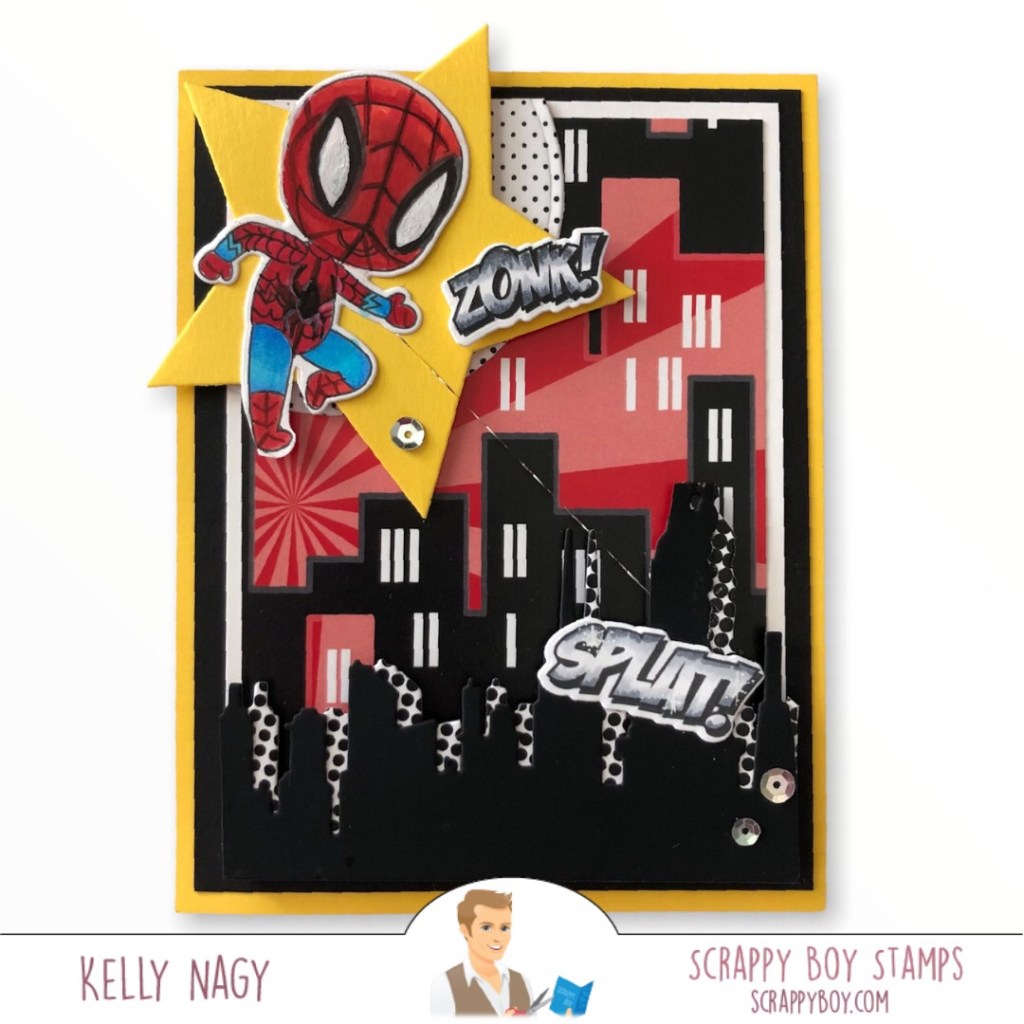
Exited to share this card where I took one image and used masking and creative color placement to creating a totally different look. In a FLASH, I created a SPIDER!!!
Here is a prior card using the same image without creative masking.
I used the the coordinating paper pack to create the primary background, as well as a skyline die from my stash. You can find the entire collection at http://www.scrappyboy.com.
I stamped the image, masking the face and certain markings on the body. You can mask with post-it notes , tape or by simply wiping off from the areas of the stamp directly.
I colored the image with Copic Markers after lightly penciling in new details to include the eyes of the mask, 🕷suggestion of a spider on the belly and the classic lines on the suit, including his feet. I also took a piece of metallic thread to create a faux web. No metallic thread, look for a piece of Easter Grass or other thread.
Featuring Scrappy Boy Stamps November 2021 Release
Approximately every 4th week, Scrappy Boy Design Team Members get to go back and pick a random set from a prior release to feature a project around. For my FLASHBACK day, I chose a set from November 2021. There are 3 stamp sets and a coordinating paper pack.
Card Base – 4.25 in x 11 in (scored at 5.5 in) in white card stock 110 lb
Black Matt – 4 in x 5.25 in
Scrap black piece for sentiment. Strip should be at least 4.25 in long.
Black and white scraps to die cut FLAG layers .
White panel to create background panel for stamping and coloring, so use by our favorite for whatever medium you are using. I used Perfect Blend Alcohol Marker Cardstock in white. Final measurement is 3.75 x 5, but I use a slightly larger piece and then cut down.
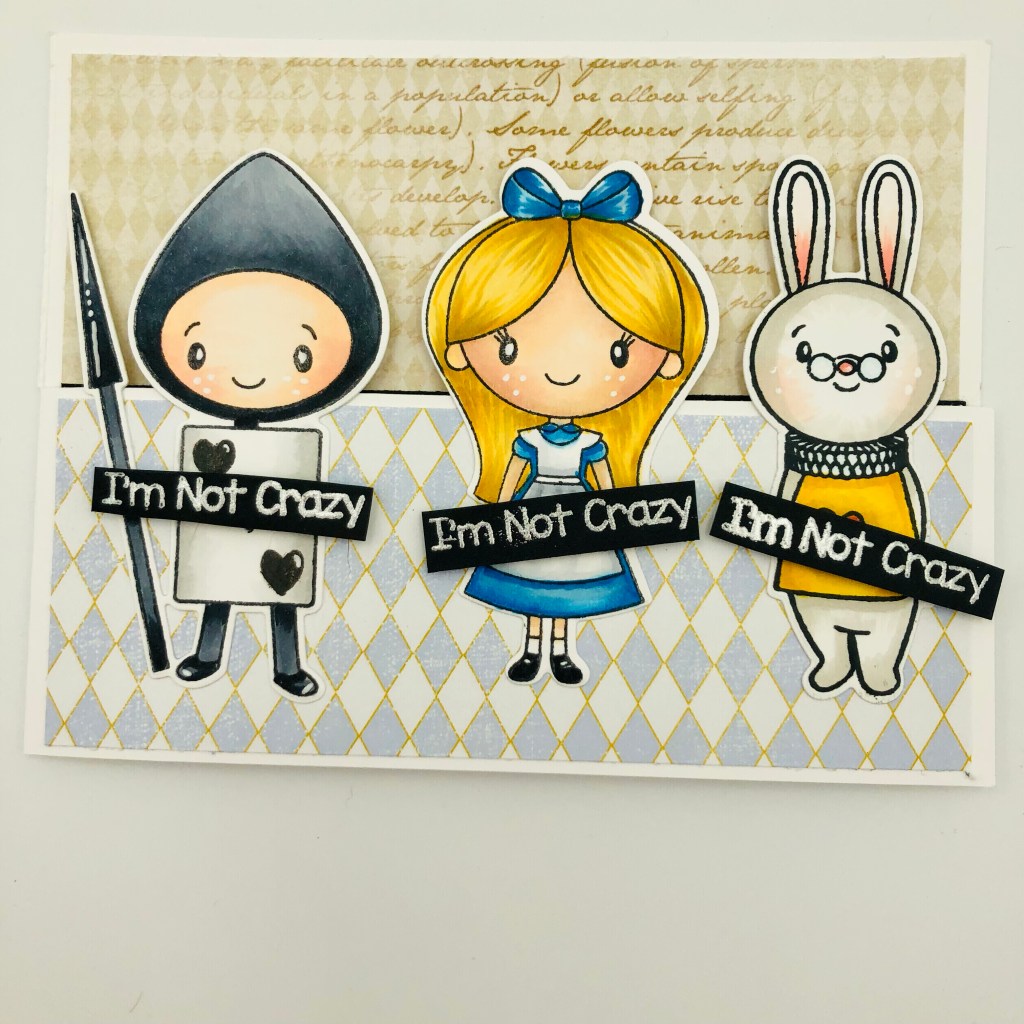
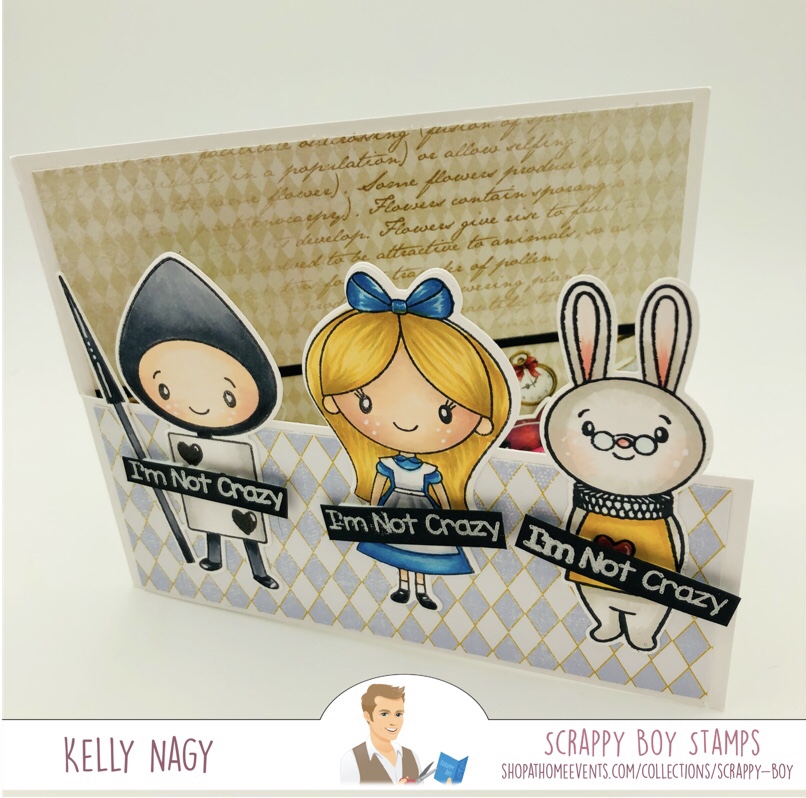
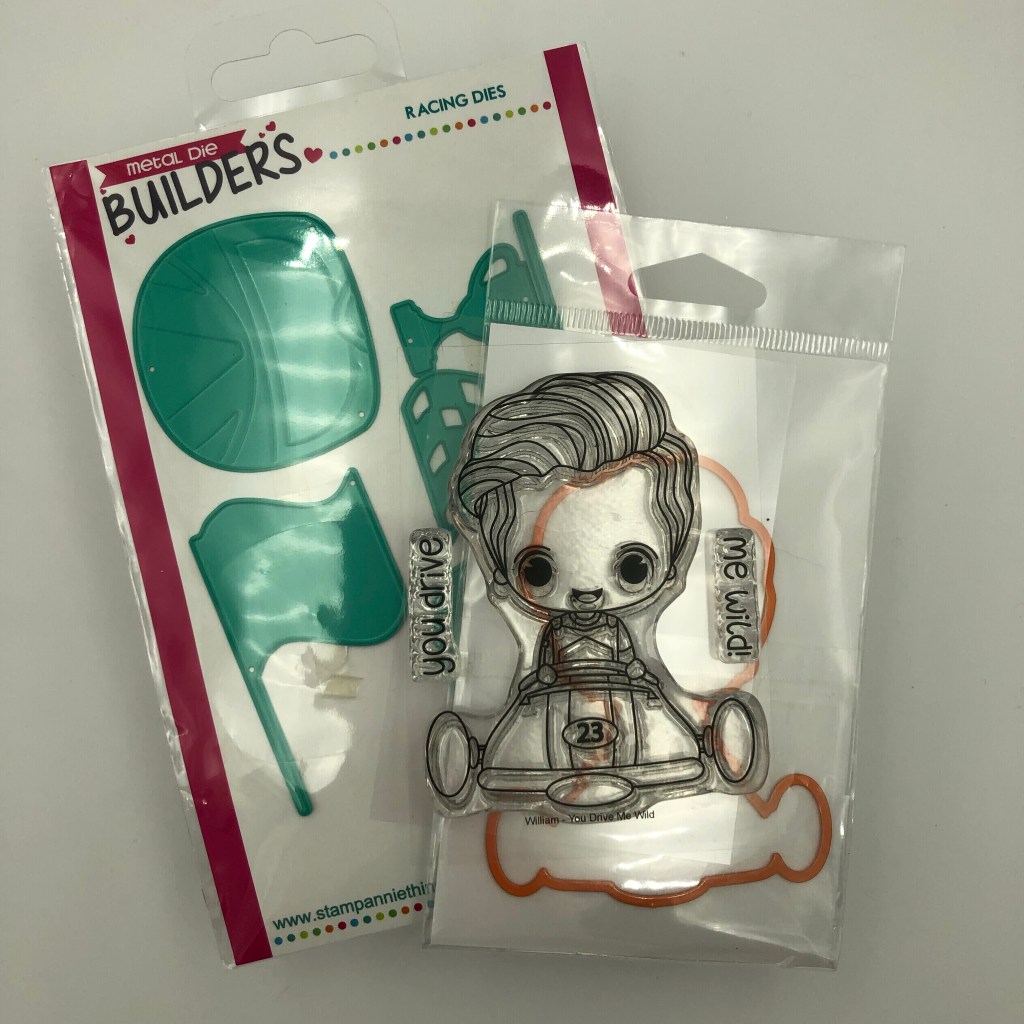
Stamp Anniething Chibi -You Drive Me Crazy
Stamp Anniething Outline Die – You Drive Me Crazy
Stamp Anniething Racing Dies
Kawaii Cutie’s by Stamp Anniething – Love You Bunches Stamp Set
Your favorite liquid adhesive
COPIC Markers
Memento Ink in Tuxedo Black
White Embossing Powder
Versamark Embossing Ink
Double-Stick Foam Tape
Perfect pearls, shimmer mist or similar product to flick on panel for added interest
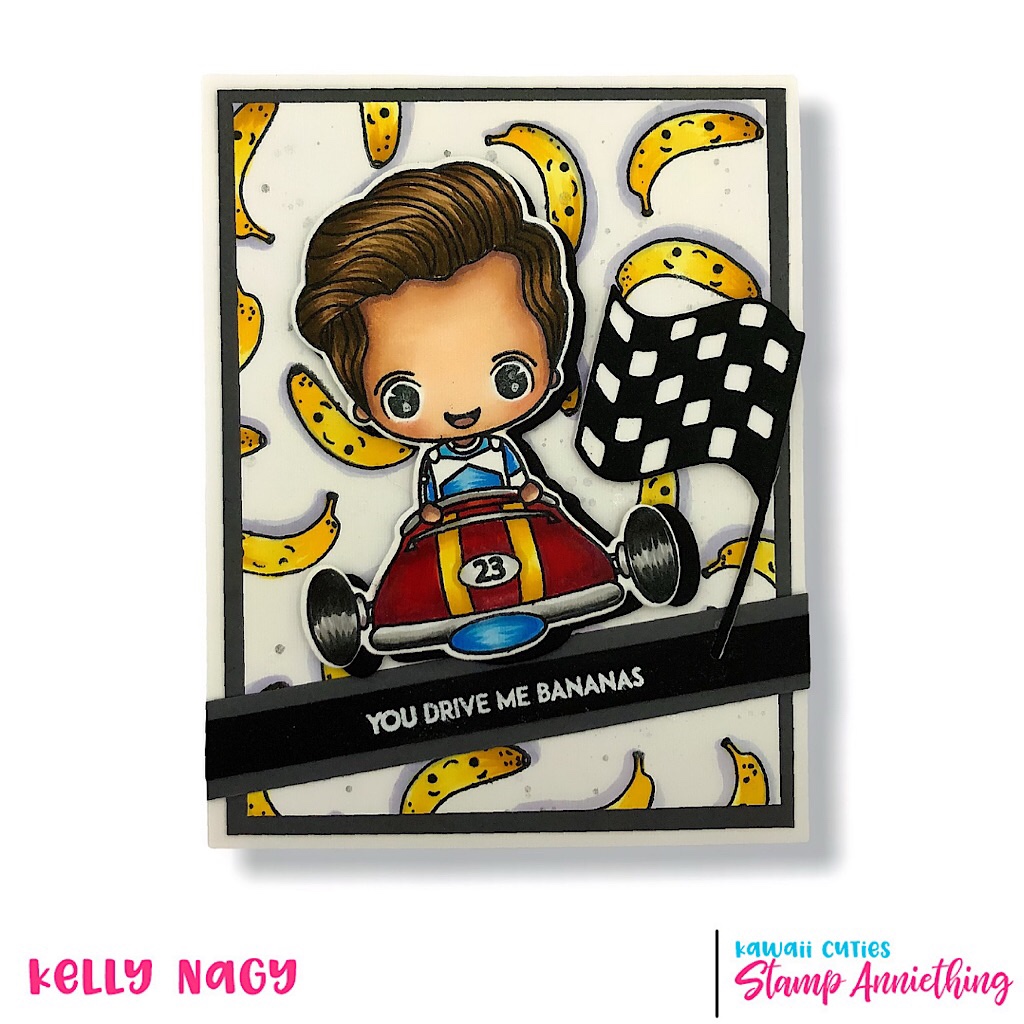
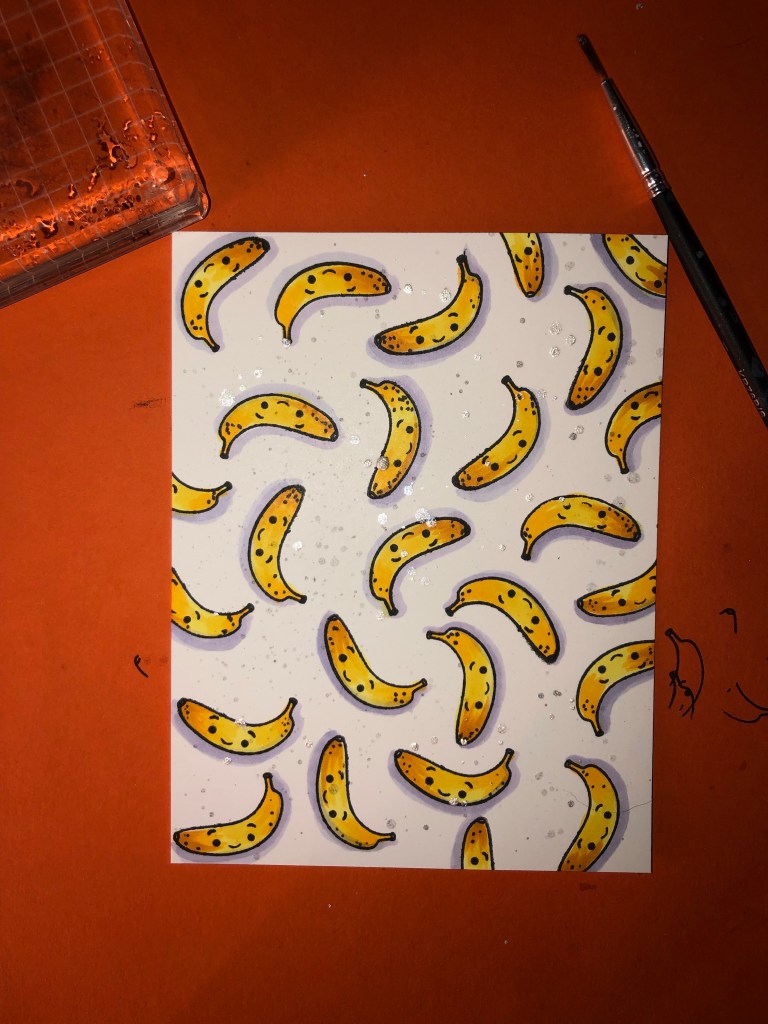
Creating this panel with just one cute little banana stamp!
Stamp banana stamp (there are 2 different ones in the set, the other is half peeled, either works)
Color banana – Y13, Y15, Y17, YR24, added spots using N4
Shadow under bananas – BV31
Flicked on watered down black ink and Perfect Pearls mixed with water for added interest and a little sparkle & shine
Meet William and some of his coordinating products from Stamp Anniething
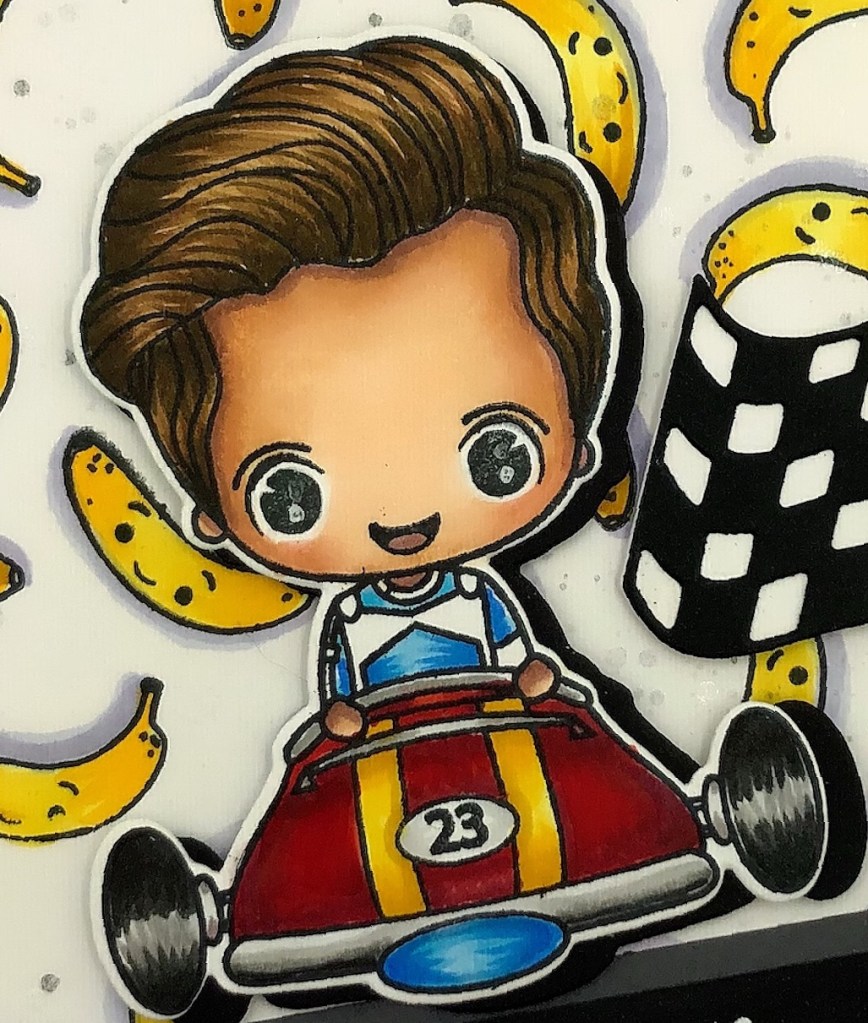
I stamped William – You Drive Me Wild on alcohol marker blending paper from Brutus Monroe. I colored image with Copic Markers and cut out with the coordinating outline die. I also cut out the flag (solid) in white and the checkered layer in black and adhered together to create the checkered flag.
William was popped up with double-stick foam tape. As well as the checkered flag and sentiment. The sentiment was heat embossed on a strip of black paper with white embossing powder using my Stamp Anniething HOT PINK heat gun and then adhered to the banana panel, I previously created, at an angle and used as a grounding or landing spot for the main image.
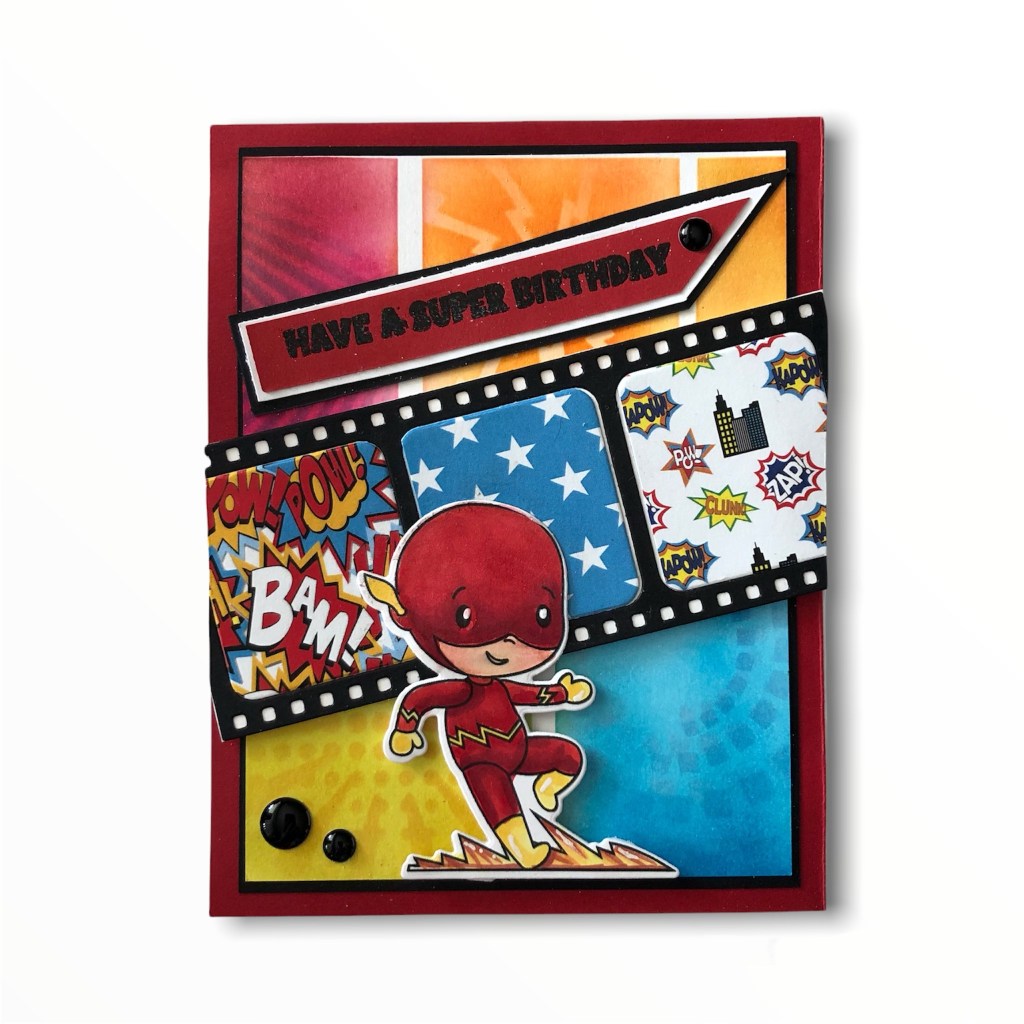
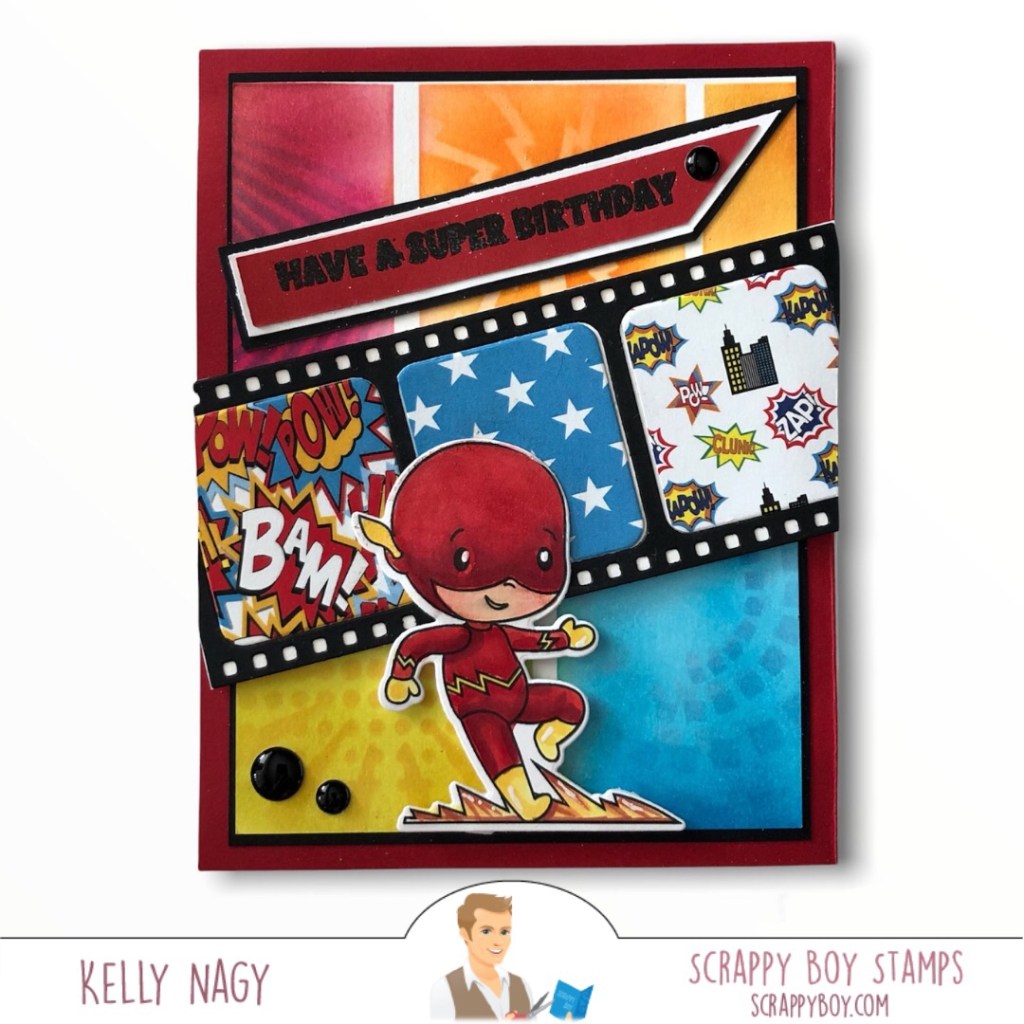
I had so much fun making this card. I wanted it to be colorful, like I remember the comic pages used to be, tucked in between the other black and white pages of the Sunday paper. I wanted there to be lots of angles and layers of tone on tone colors behind my focal point, one of the cutest little super heroes you ever did see in a stamp set from http://www.ScrappyBoy.com.
I was inspired by the divided blocks, white framing, the camera, filmstrip, reds, blues and showing movement on a page.
To make this A2 sized card, I used the following:
White Card Base – 4.25 in x 11 in, scored at 5.5 in
Red Card Panel – 5.5 in x 4.25 in
Black Card Panel- 5.25 in x 4 in
White Card Panel – 5 1/8 in x 3 7/8 in
Filmstrip diecut in black
Various Patterned Paper (use up scraps)
Scrap strips in black, red and white for your sentiment
I used Scrappy Boy Stamps’ new slimline comic strip builder frame and ink blended solid blocks of bright colors using distress ink pads in candy apple red, carved pumpkin, squeezed lemonade and peacock feathers on the white card panel. I then ink blended with the same color for a tone on tone with different patterns from a second stencil that Scrappy Boy Stamps released called Half-Tone Dots, as well as another stencil from my stash. The effect you are trying to achieve is movement and interest, so get creative.
I glued the ink-blended panel to the black panel, leaving a small frame around the edge. I then glued the black panel to the red panel and then the double-matted panel onto the card base.
I decorated the front by gluing a filmstrip diecut, after piecing patterned paper from the coordinating 6×6 paper pack called SuperHeros. This was adhered to the card front at an angle with double-stick foam tape for added dimension.
The super hero from the SUPER TEAM set was stamped with Momento Black Ink on Hammermill 110 lb white card stock, colored with Copic markers in the following combinations:
Red Suit – R20, R24, R29, R39
Yellow – Y13, Y15 and Y17
Flesh – E51, E30, E50
Cheeks -R20
Flames – Yellows and accented with red flicks using combos above.
Sentiment stamped with Black ink on a strip of white card stock treated with an anti-static powder bag in my stamp positioner. I then cleaned the stamp, leaving the strip in the positioner in place and stamped the sentiment over the original black impression with Versamark and then applied clear embossing powder and heat embossed the sentiment with my heat gun. I find that by using the positioner, I don’t have to fight with stray black embossing powder flecks and still gets a bold, shiny, black finish on my embossed images. I matted the sentiment with layers of black and red to tie everything together. I left the edges of the sentiment strip with strong, wonky angles for some playfulness. The card was finished off with embossed candy dots in black.
Thanks so much for visiting and sharing ideas on my crafting journey and supporting small business by also visiting http://www.ScrappyBoy.com.
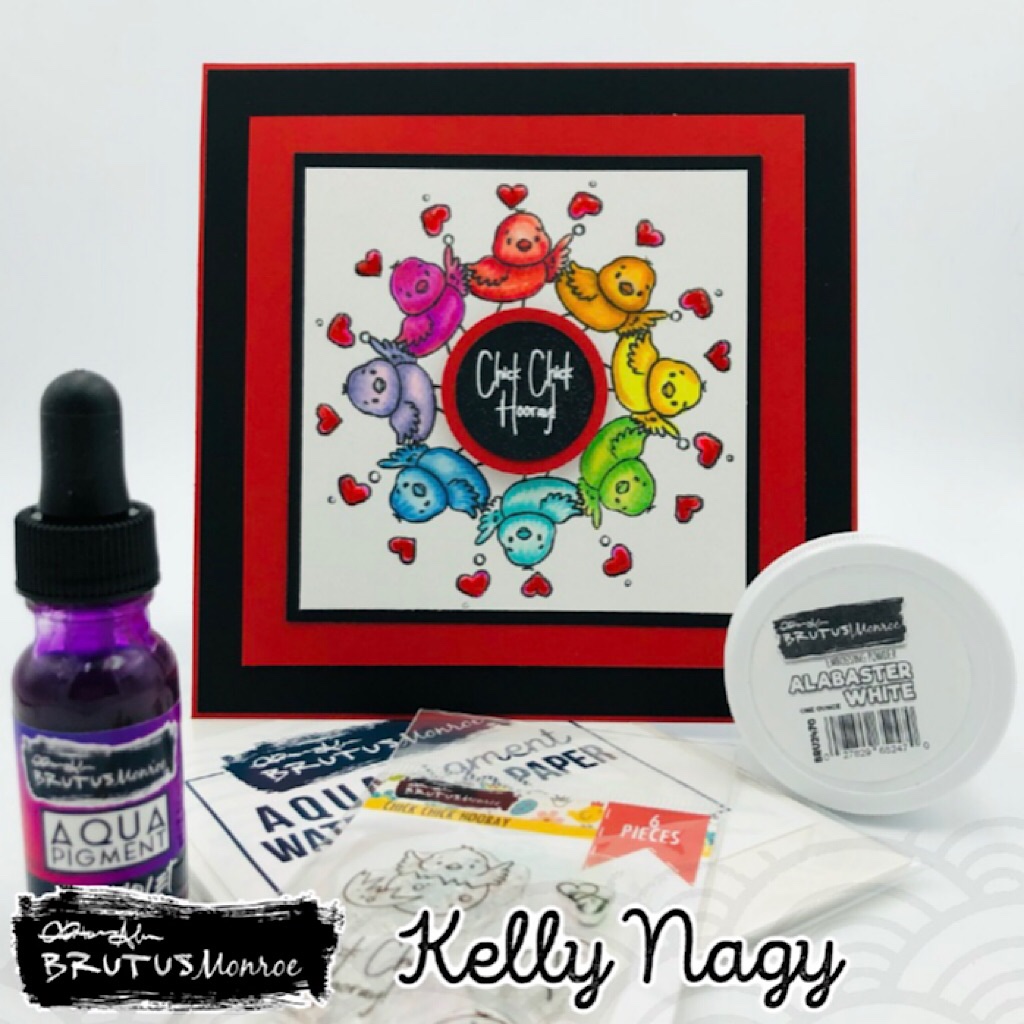
This card features a 2×3 stamp set that was one of the Stamps of the Month. You can see the entire set below.
Available at Brutus Monroe for $4.99
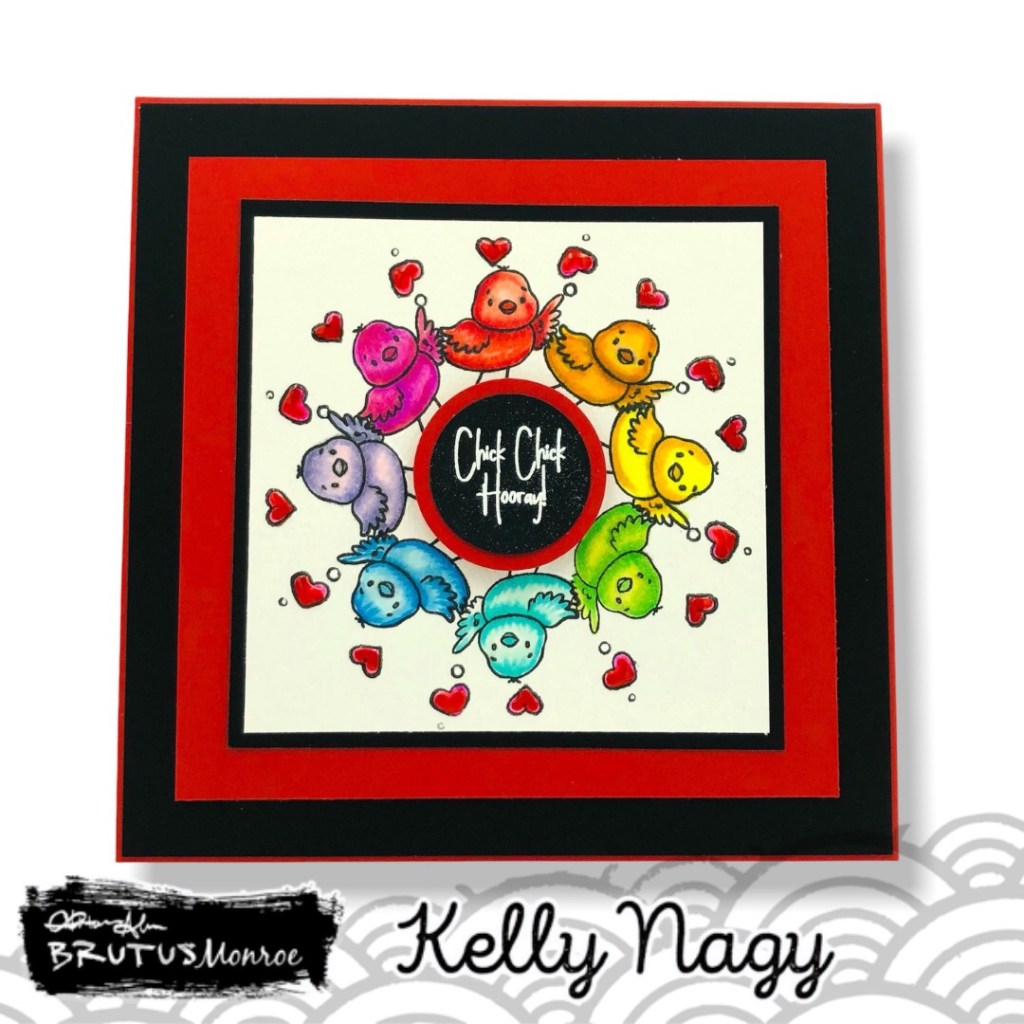
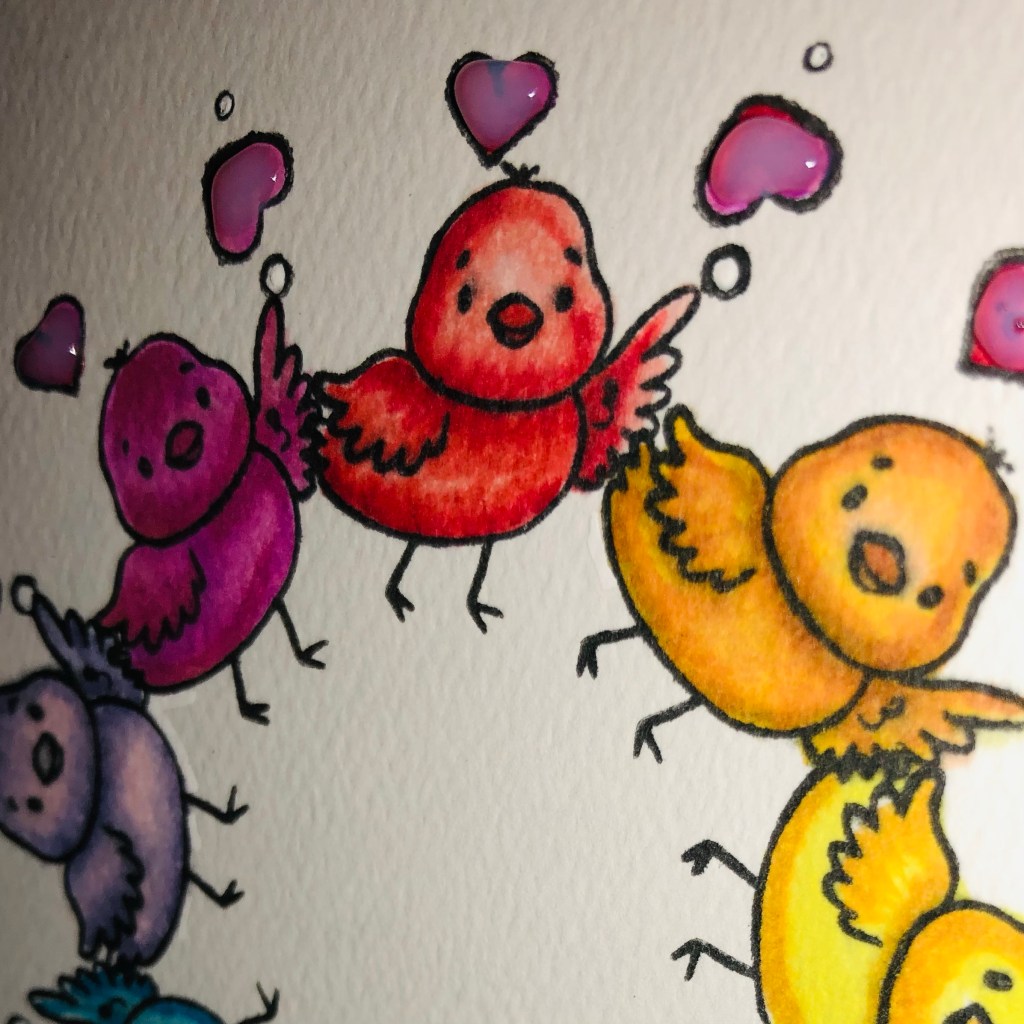
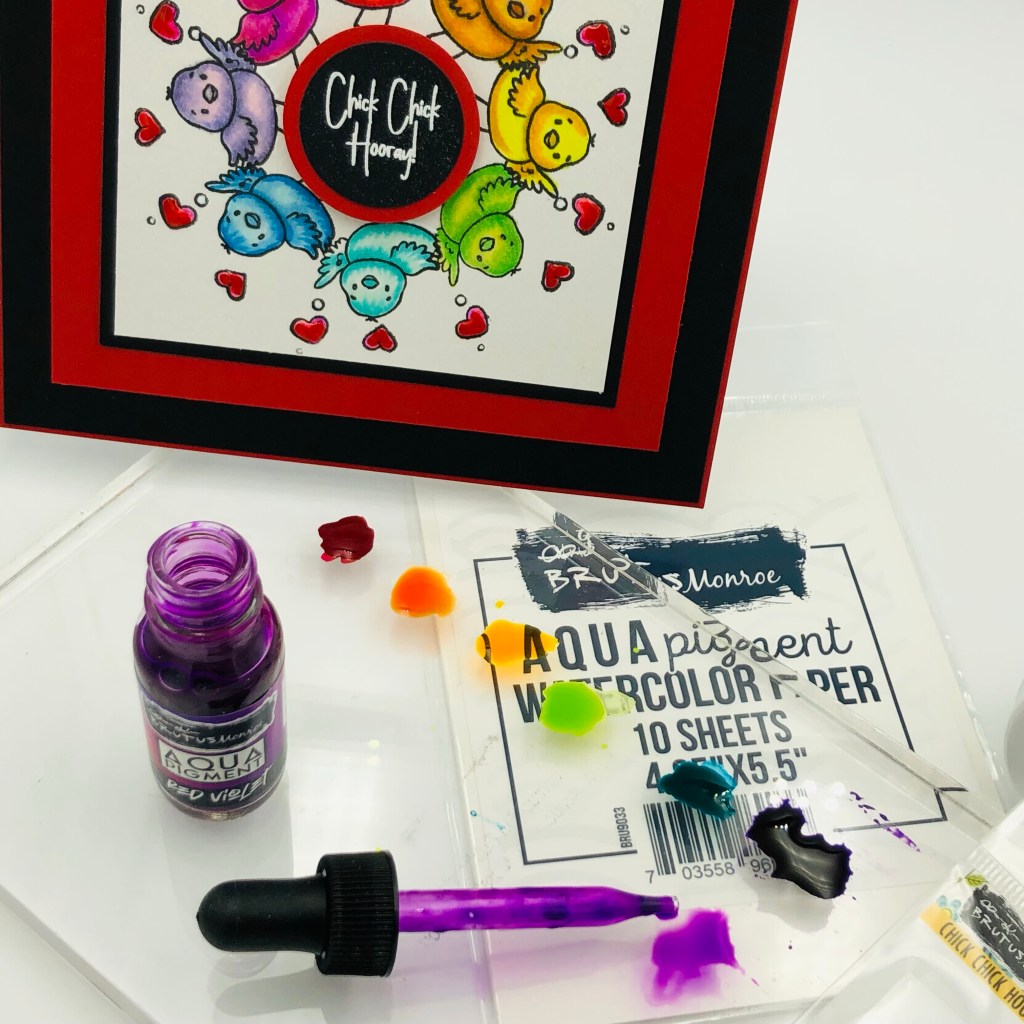
I used a stamp positioner and the Wreath Builder Stencil from Gina K Designs to create the wreath with chick images and a smaller heart stamp to create the front of my card panel.
Images stamped on Aqua Pigment Watercolor Paper and Glossy Accents added to hearts for added interest
I used a rainbow pattern of aqua pigments and colored the images as you would watercolor. I used red to color all the hearts. Once dried, I added a small amount of glossy accents to each of the hearts for added shine and dimension.
Aqua Pigments are very versatile and come in a variety of colors.
To finish my card, I matted several layers and heat embossed my sentiment on a circle punch using black glitter card stock for added interest.
Measurement of my finished card is 5.5 in x 5.5 in square.
Watercolor panel – 4.25 in x 4.25 in
Black Matt – 4 3/8 in x 4 3/8 in
Red Matt – 5 in x 5 in
Black Matt – 5 3/8 in x 5 3/8 in
Red Card Base- 5.5 in x 5.5 in (I glue a piece of lightweight white card stock or copy paper slightly smaller and adhere only at the top so you can write your message easily inside when using darker card bases.
Sentiment heat embossed with Alabaster White on black glitter card stock and matted with red to coordinate with the other layers.
Chick Chick Horray Posted on Brutus Monroe – Sunday, 2/20/2022
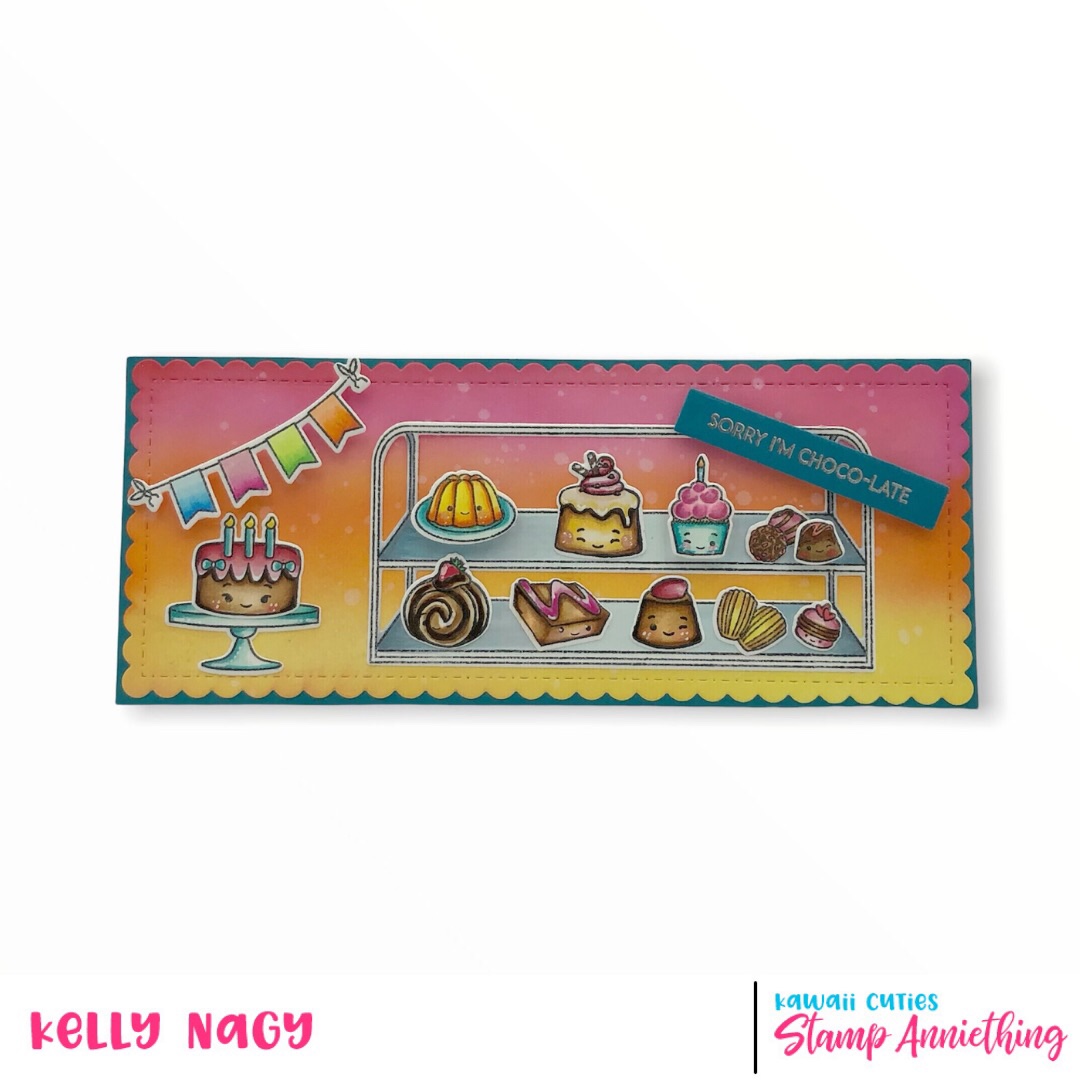
This slimline card was extremely fun to make because Kawaii Cuties from Stamp Anniething has so many images included in each set, slimline cards are how you can have enough real estate to hold ALL THIS CUTENESS!!!!!
I find myself wanting to be late sending all my birthday cards this year, because I am absolutely in love with this sentiment! How cute is the sentiment, “sorry, I’m Choco-late!”
To make this slimline card, I used one of StampAnniething’s slimeline dies. This one is a stitched scallop die. Next, I used a combination of distressed inks from my stash to ink blend the background. I used spun sugar, squeezed lemonade, carved pumpkin, and at the very top I used a little bit of barn door to deepen the pink. I flicked some fresh, clean water onto the panel, as it will cause the distressed ink to react, and leave a bleached effect. I then mounted the ink panel onto a piece of card stock in a darker teal, giving approximately a quarter inch larger than the cut panel. The teal piece measures 3.5 x 8.5.
The first quarter release from Kawai Cuties by StampAnniething has some amazing sets. They are very versatile and you can mix and match on all different projects. This particular card uses the stamp set and coordinating dies from: Life is What You Bake It and I Will Never Dessert You.
I used COPIC markers to color my images. The following combinations were used:
I heat embossed the sentiment using Silver embossing powder on the same colored card stock I matted my base with to keep everything coordinated. To finish off the card, I created a white card-base to adhere my finished panel to. Finished card size is folded, 3.5 x 8.5. The card-base was made with white 110 pound card-stock cut 7 x 8.5, scored at 3.5.
Mark your calendars for the second Tuesday of every month to get LIVE inspiration from ME on the Stamp Anniething Stampers FB page in a feature they call Mix It Up with Kelly!
Every Second Tuesday at 7 pm EST on Stamp Anniething Stampers FB Page
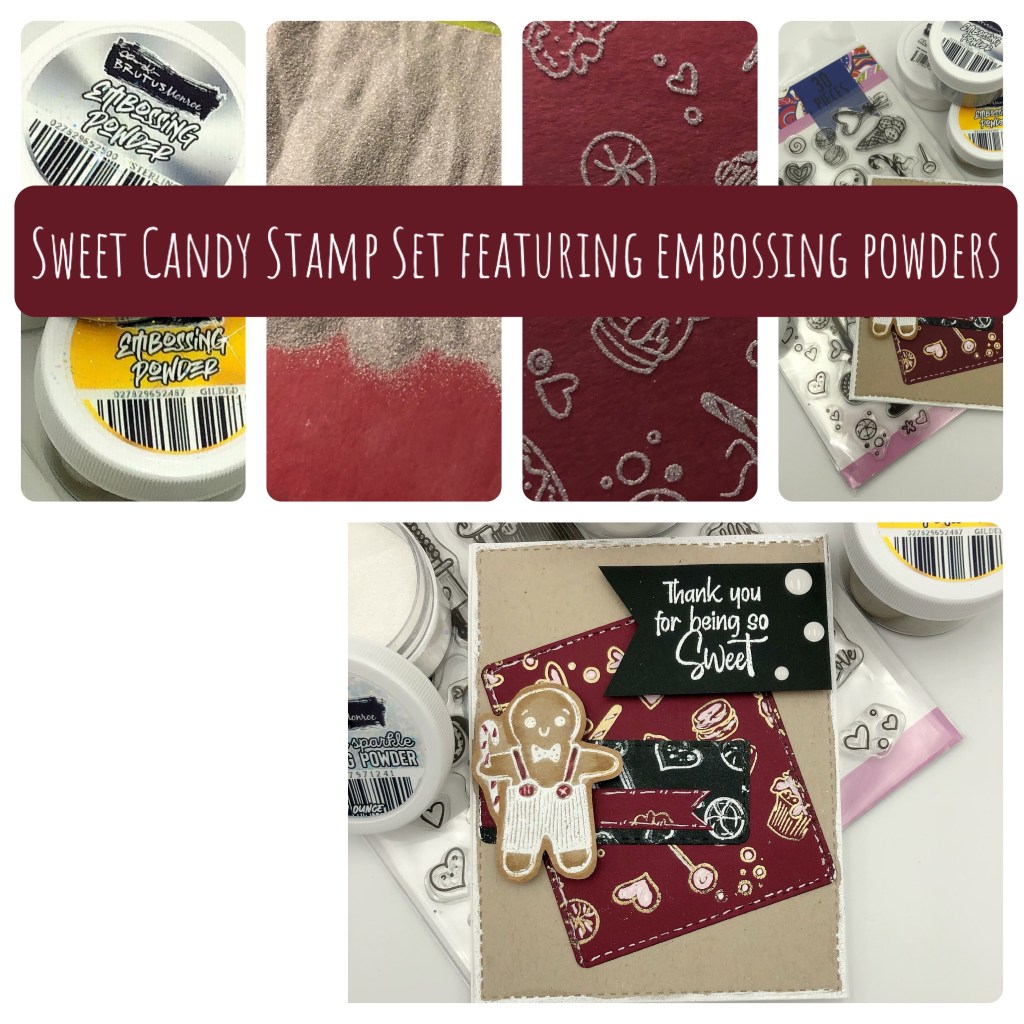
I joined the Brutus Monroe Design Team in 2022 and wanted to share my projects for January 2022. Here is my first project featuring Sweet Candy stamp set and a variety of Brutus Monroe embossing powders.
Sweet Candy Stamp Set featuring Brutus Monroe Embossing Powder
I had a lot of fun creating backgrounds and design elements, including stamping the images on lunch bag card-stock with Brutus Monroe clear embossing ink and embossing them using Brutus Monroe alabaster white embossing powder. I felt this gave the look of royal icing on gingerbread. For a special touch, I ink blended the edges to give it a an oven baked look.
I finished off the card using white embossing powder on black card-stock using a sentiment from the set, “Thank you for being so sweet.”