STOCK UP NOW WITH THIS AMAZING BLACK FRIDAY DEAL -The Must-Have for Every Paper Crafter: Dry Adhesive from TapeRunner.com

When it comes to paper crafting, having the right tools can make all the difference. One item that tops the list for every crafter is dry adhesive. Whether you’re creating stunning scrapbooks, personalizing cards, or simply wrapping gifts, dry adhesive is a necessity. And let me tell you, TapeRunner.com has the best variety to meet all your crafty needs!

Makes you a gift wrapping ninja!

Imagine tackling those last-minute gift-wrapping tasks with ease. With a few simple swipes of dry adhesive, your presents can go from plain to fabulous in no time! Plus, you can never have too much adhesive on hand—running out is simply not an option when creativity strikes.

TapeRunner.com offers several types of dry adhesives tailored for any project you can think of. From quick and easy gift wrapping to making your own post-it style notes, the options are endless! Incorporate creative masking techniques or use it to add layers and pops of color to your crafting projects; the list goes on!

Stuff those stocking with 30% OFF using KELLY10 during sale NOW through 12/3

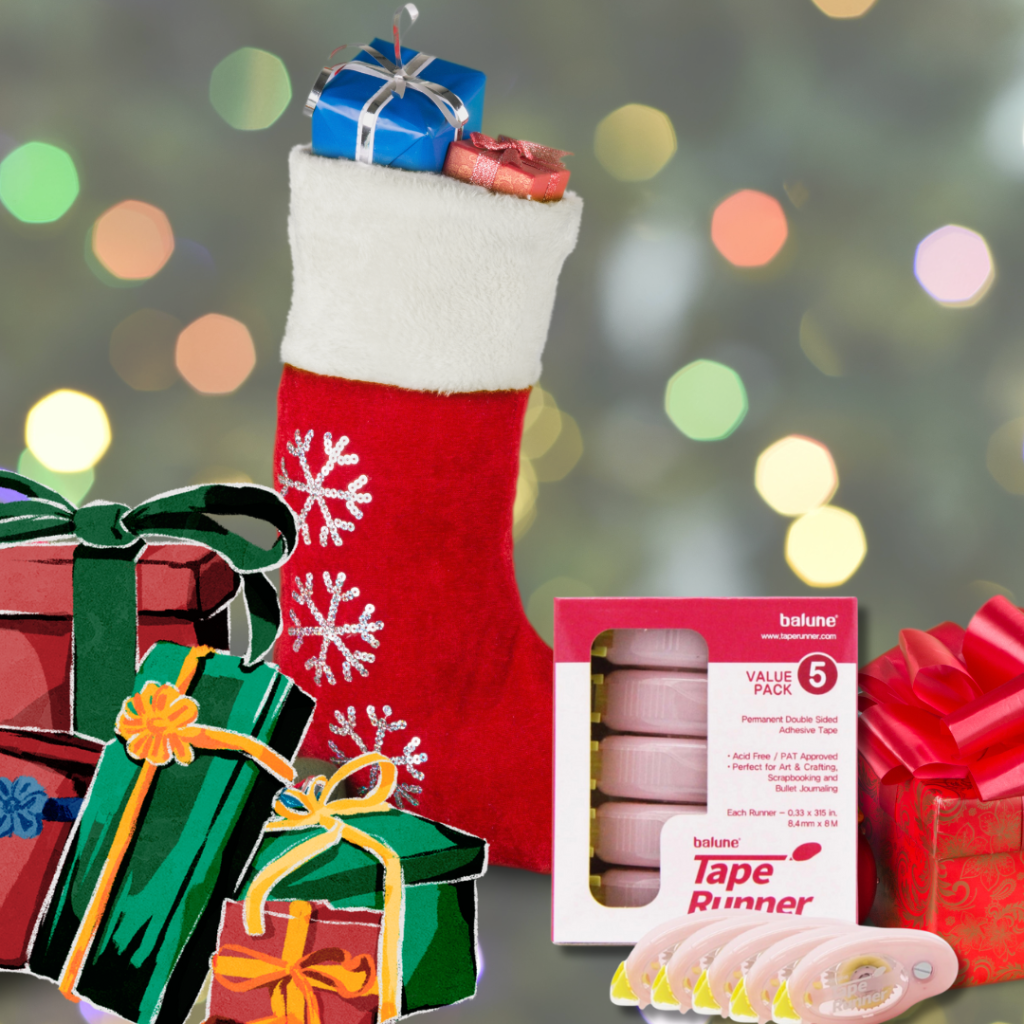
As the holiday season approaches, these dry adhesives make for fantastic stocking stuffers—not just for your crafty friends, but even for those who might not consider themselves “crafty.” Trust me, they will appreciate having the right tools to express their creativity!

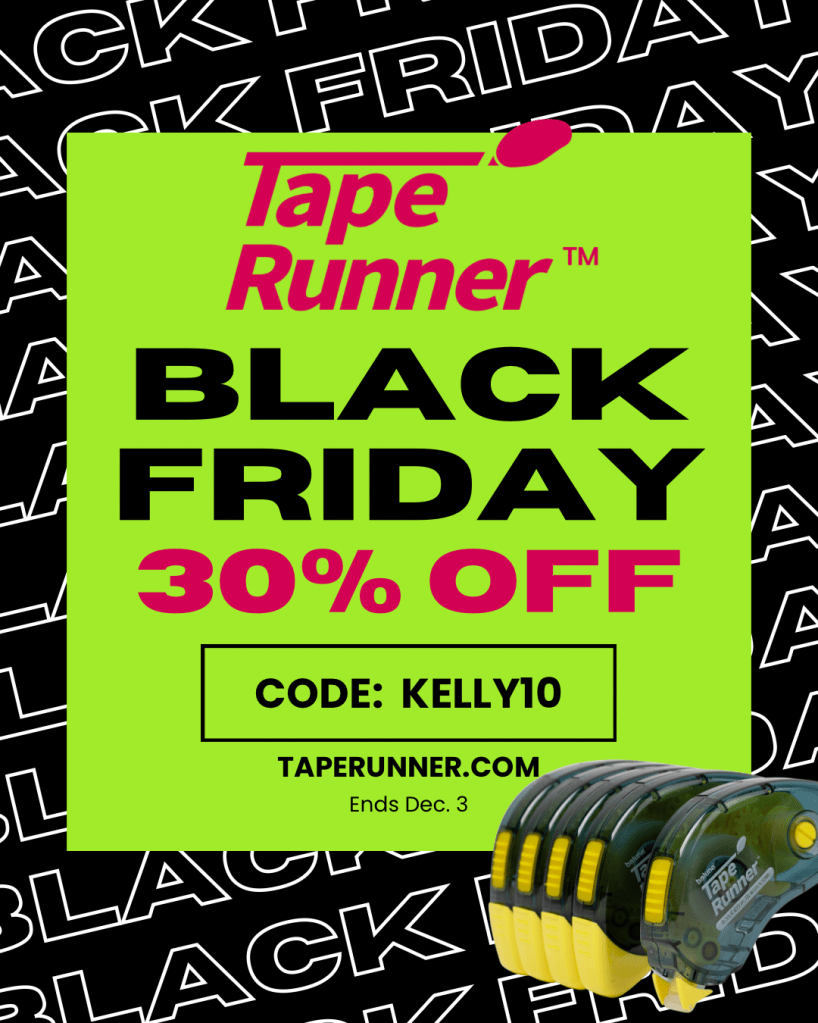
Right now, there’s an incredible sale happening at TapeRunner.com through December 3rd. You can take advantage of a fantastic 30% off your entire purchase using code KELLY10. It’s the perfect time to stock up on your favorite adhesive supplies and fill your cart from the comfort of your couch!

Don’t miss out on this opportunity—visit http://www.taperunner.com (http://www.taperunner.com) today and elevate your crafting game! Let’s make this season the most creative one yet! 🎁✨

Happy crafting!

Thanksgiving Week Cards: Savory and Sweet Themes

Shaped Cards featuring Scrappy Boy Stamps

Happy Thanksgiving Week, everyone! In the spirit of the season, I’ve created two food-themed cards that blend multiple sets with a little whimsical fun. One card features a savory backpack design with a pretzel theme, while the other is an interactive rocker card showcasing donuts.

Card 1: Savory Pretzel Backpack

For the first card, I crafted a playful backpack that highlights the savory goodness of pretzels. This design was inspired by a type of bag people buy that feature theme park snacks and I hope my creation embodies all the deliciousness a backpack can be🥨

🎨 Supplies Used:
Backpack Builder Die ↗ (https://scrappyboy.com/products/backpack-builder-die)
Mouse Backpack Add-On Die Set ↗ (https://scrappyboy.com/products/mouse-backpack-add-on-die-set)
Cute Kids Theme Park 6×8 Stamp Set ↗ (https://scrappyboy.com/products/cute-kids-theme-park-6×8-stamp-set)

Card 2: Rocker Donut Card

The second card is a rocker card that uses stitched circle dies along with donut dies. While it currently is a VALENTINE, this card can easily be customized for just about anything using Scrappy Boy’s Alphabet Dies. This design is versatile enough to transform into a festive greeting for Christmas, birthdays, or just because!

🎨 Supplies Used:
Stitched Circle Nesting Die Set ↗ (https://scrappyboy.com/products/stitched-circle-nesting-die-set)
Mouse Sprinkle Donut Die Set ↗ (https://scrappyboy.com/products/mouse-sprinkle-donut-die-set)
Alphabet Die Set ↗ (https://scrappyboy.com/products/alphabet-die-set)
Love the Mouse 6×6 Paper Pack ↗ (https://scrappyboy.com/products/love-the-mouse-6×6-paper-pack)
Cute Kids Theme Park 6×8 Stamp Set ↗ (https://scrappyboy.com/products/cute-kids-theme-park-6×8-stamp-set)


Biggest Sale of the Year!

And just in time for the holiday season, the biggest sale of the year is happening now! Check out the above flyer for all the details on fantastic deals—don’t miss out!

If you want to see more details about the techniques used in these card designs and how to customize them, be sure to follow me on Facebook and Instagram @stampedbykelly

Happy crafting, and enjoy a wonderful Thanksgiving! 🍩🥨🎉

Crafting Joy: A Whimsical Card Creation 🎄✨

🎉✨ Meet my latest handmade card featuring a mischievous kitty on a mission to whack those Christmas ornaments! 🎄😸 Using the HIGH FIVE and RUSTIC CHRISTMAS OWL stamp sets, I created a scene that’s all about festive fun! Plus, an ACTION WOBBLER adds a playful touch to this naughty kitty.

Who else has a cat that loves to stir up holiday mischief? Share your stories below! 😻👇 #HandmadeCards #CatMischief #HolidayFun


Hello, fellow crafters! Today, I want to share a delightful project that combines two of my favorite Pajama Crafter Stamp’s stamp sets: Rustic Christmas Owl and High Five. 🦉🐱

Here is a photo using the images from RUSTIC CHRISTMAS OWL set:

I recently whipped up a fun card featuring the evergreen branch from the Rustic set, paired with the playful mouse and fish smaller images as “ornaments” and one of the mischievous cats from the High Five set. The stars are also from the HIGH FIVE set and really pop off the page! The best part? The process of mixing and matching these stamp sets to create something entirely unique!

Step by Step Breakdown

  1. Choosing the Base: I started with a lovely card base in BLACK, setting the perfect tone for a non-traditional Christmas-themed creation.
  2. Stamping the Cat: I stamped the adorable cat, coloring it up with my Copic markers, ensuring to capture all the little details that make it so charming. It sets the stage for a warm holiday vibe!
  3. Ornament Fun: Next, I added the ornaments from the High Five set, hanging them playfully from the limb I stamped onto a piece of Alcohol Marker Friendly paper using a stitched oval die. I used my Copic markers to color the branch and ornaments. I then used Diamond Stickles to add extra sparkle. Their vibrant colors really pop against the background!
  4. Making the Mischievous Cat Wiggle: No card is complete without a hint of mischief! After stamping and coloring the cheeky cat from the HIGH FIVE set, I attached an ACTION WOBBLER on the back of the cat in the middle of the back-side of the cat cutout and adhered it as if it’s ready to pounce on those ornaments. It adds a whimsical touch that’s sure to bring a smile.
  5. Finishing Touches: I added some stamped stars using a Distress Oxide ink pad in WALNUT STAIN and colored up in yellow and added white gel pen for shine.

Why Mixing Sets is So Much Fun

One of the joys of crafting is the ability to personalize every little detail. When you mix and match different stamp sets, you’re not only saving time, but you’re also sparking creativity in ways you might never have imagined!

I love how the Rustic Christmas Owl branch turns this non-Christmas set called HIGH FIVE, into a warm and light-hearted holiday-themed card with a classic feel, while the playful elements of the High Five set give it a modern twist. It’s like creating a whole new story on each card, filled with charm and cheer!

Press the arrow to see ACTION WOBBLER in action

Have you tried mixing different stamp sets? I’d love to see your creations! Share your thoughts in the comments below.

To find all of these awesome products, please click here 👉🏻 https://pajamacrafterstamps.com/STAMPEDBYKELLYBLOG

Need a great dry adhesive? Try TAPE RUNNER! 👉🏻www.taperunner.com

USE CODE: KELLY10
BEFORE 12/3 get 30% OFF – Black Friday Special
After 12/3, code will still give 10% OFF

Happy crafting! 🥳


Exciting November Projects Featuring Scrappy Boy Stamps


I’m thrilled to share five brand-new projects featuring the Scrappy Boy Stamps November release! Each project is unique, and I’ve included additional photos to showcase how they were put together. Let’s dive in!

Project 1: Make a Splash A2 Card

I used no line water coloring to create a swimming scene versus a ballerina. I created a pool using the oval stitched nested dies as well as a white gel pen over patterned paper to create a visual illusion of moving water. The colored image is popped up using an action wobbler and adds an extra fun interactive touch to my card. The background is made using Distress Ink Sprays using a watercolor panel in a rainbow pallet.

The following Scrappy Boy Stamps’ products were used:

  • Butt-Cracker Suite Stamps
  • Undersea Water Scene Builder Dies
  • Stitched Rectangle Nested Dies
  • Stitched Oval Nested Dies

Project 2: Happiest Memories on Earth Shaker Card

The following card is the result of creative usage of my scraps. I had some panels left over and created a shaker card featuring some of the fun shaker bit panel dies from scrappy boy stamps. I also used the mouse head die from the mouse pizza builder die set. Mouse heads and swirl from a different set. It’s fun to mix a match and create something special and unique, especially when the die is used in a way that it was not originally intended. Imagine this card using reds and greens and creating a Christmas holiday themed card or pinks, reds and whites for Valentine’s Day. Your creativity is only limited by your imagination. Have fun and I can’t wait to see what you make.

The following Scrappy Boy Stamp products were used:

  • Rectangle Stitched A2 Nesting Dies
  • Mouse Pizza Builder Die Set
  • Mouse Embellishment Lollipop Die Set

Project 3: Let’s Ketchup A2 Card

I created this A2 size card featuring the large and small burger from hamburger embellishment die set. I thought it was fun to use an actual toothpick to create a flag with a sentiment from my stash to make it a fun way to display the sentiment on the card. Another fun thing I found out while using my scraps was the bits that get popped out of the gloves on any of the mouse hands or gloves are perfectly shaped sesame seeds for your buns. I like to cut my dies out in white and then use my Copic markers to color them. I think it gives them a totally different look and I really loved the outcome. 

  • MOUSE HAMBURGER EMBELLISHMENT DIE SET
  • PATTERNED PAPER FROM SCRAPPY BOY STAMPS 

Project 4: You Make Life A Walk In The Park

I created this A2 card wanting to stack multiple scoops of ice cream. I was able to achieve this by cutting the different scoops out and then stacking them. I covered them up using my Copic markers and giving them texture. I also used glossy accents on the glaze and white gel pen to help give a glossy hot fudge dripped look. I used some of the shaker bits from the shaker bit panels and added some crystal effects on top which created a very candy like appearance.

I use the following Scrappy Boy products;

  • MOUSE ICE CREAM EMBELLISHMENT DICE SET
  • SCRAPPY BOY, STAMPS PATTERN PAPER
  • MOUSE HEAD SHAKER BIT PANEL DIE
  • Stitched circle dies

Project 5: The Christmas Carol Tiny Tim Card

I used the Christmas Carol stamps and coordinating pattern paper available from the November 2025 release Scrappy Boy Stamps.


Thank you for checking out this week’s projects from the November Scrappy Boy Stamps’ Release! I hope you feel inspired to try these designs.


🍪 November Kicks Off with Crafty Inspiration! 🎉

Happy Monday my crafty friends! As we dive into November, the season of baking, holiday cooking, and ramping up our cherished traditions is upon us! Just like cookie cutters shape our delightful treats, dies are the perfect tools for creating beautiful paper crafts. So why not pull out your dies and start playing? 🎨✂️

Get ready for even more inspiration featuring Scrappy Boy’s latest releases! Here are some of the fun projects I created.

Featuring Flip Open Present Die
Featuring The Christmas Carol Stamp & Paper Pack
  • The Christmas Carol – Main Release
  • The Cute Kids Final Release Set
  • Die Set Cotton Candy
  • Die Set Gift Card
  • Popcorn Die Box
  • Mouse Sprinkle Donut Die
  • Circle and Oval Nested Stitched Dies

🥳 I absolutely love creating cards using just dies or using them as a foundation for my colored images, and I’m excited to share some fun ideas with you!

Folds Flat / A2 Sized Fun Fold Card

For my latest project, I pulled out the Marquis Die from a previous release to take advantage of the smaller font on my potty training fun fold card. This card features the fun patterns from the Butt Cracker Fairies 6×6 Paper Pack! 🎓🚽 By pairing the marquis sign set with the popcorn card gift die and the adorable mouse heads, I was able to create some quirky glasses that enhance the design perfectly! I even used the smaller stitched circle die to create a hole in my potty seat—how fun is that?! 🍿🤓🚽

Color up die cut images cut in white cardstock
Mix & Match dies – create something totally new!

Stamps Used:
➡️ Butt Cracker Suite (https://scrappyboy.com/products/butt-cracker-fairies-6×8-stamp-set)
➡️ The Christmas Carol (https://scrappyboy.com/products/bundle-christmas-carol-stamp-outline-dies)

Dies Used:
➡️ Marquis Sign (https://scrappyboy.com/products/marquee-sign-die)
➡️ Stitched Ovals (https://scrappyboy.com/products/stitched-oval-nesting-die-set)
➡️ Stitched Circles (https://scrappyboy.com/products/stitched-circle-nesting-die-set)
➡️ Gift Card Die (https://scrappyboy.com/products/flip-open-present-die-set)
➡️ Popcorn Gift Card Die (https://scrappyboy.com/products/3d-mouse-popcorn-box-die-set)
➡️ Cotton Candy Die (https://scrappyboy.com/products/mouse-cotton-candy-embellishments-die-set)

➡️Mouse Sprinkle Donut Die – https://scrappyboy.com/products/mouse-sprinkle-donut-die-set

➡️Scrappy Boy Alphabet – https://scrappyboy.com/products/alphabet-die-set

Remember, the sky’s the limit when it comes to creativity! So grab your dies, get crafty, and have a blast! ✨🎈 I can’t wait to see what you all create!

ScrappyBoys #DieCutting #CardMaking #CreativeInspiration #FunFoldCards #stampedbykelly #pottytraining #lovethemouse #giftcard