Happy Easter Card featuring Stamp Anniething Classic

Happy Easter card featuring Stamp Anniething classic: For Peeps Sake

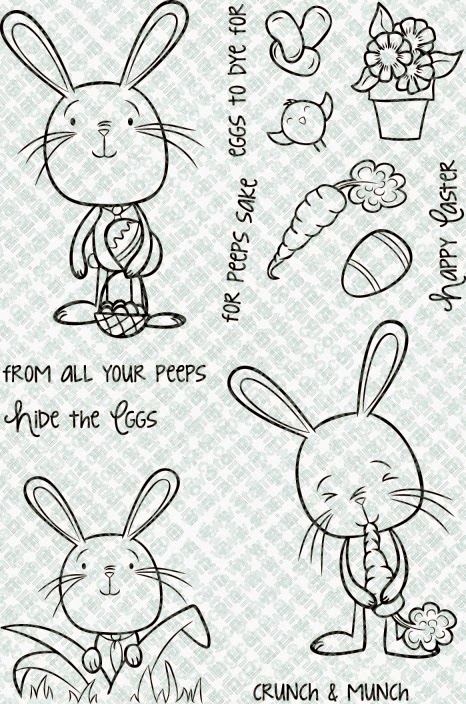
Dusting off old stamp sets always brings about a wave of creativity and nostalgia. With Easter fast approaching, I decided to take out an older stamp set from Stamp Anniething called “For Peeps Sake”. This set was released before the immensely popular Chibi line but still has the same cute and fun aesthetic that Stamp Anniething is known for.

I started by stamping the bunny in the grass, bunny holding Easter egg and basket, carrot, egg, flowerpot and chick from the set onto white cardstock using Memento Tuxedo Black ink. I then colored them in with Copic markers, sticking to a soft pastel color palette to keep with the Easter theme. I also used a white gel pen to add some highlights and details to the images. I fussy cut the images and also removed the flowerpot from the flowers do I could embellish the sentiment a bit by popping flowers and sentiment up with double-sided foam tape.

For Peeps Sake by Stamp Anniething

For the background, I wanted to create a simple and whimsical scene. I used Distress Oxide inks in shades of blue and green to blend a sky and grass background, respectively. I also added some clouds using the clouds builder stencil by incorporating some white pigment ink. I used the grass builder stencil and ink blended in green on the bottom half of the card front. The background panel was cut from specialty paper called GEMINIO PAPER, a glossy paper that is not quite Yupo, but close. It stands up to dome fun ink and watercolor techniques and doesn’t warp or pill.

To finish off the card, I stamped a sentiment from the set onto a strip of extra ink-blended Geminino paper and this will be adhered to the top left hand corner over a banner I made using the carrot stamp and coloring up with my Copics for added interest.

Overall, I had a blast dusting off this old Stamp Anniething set and using it to create a fun Easter card. It just goes to show that sometimes, it’s worth looking back and giving some love to the stamp sets we may have overlooked from the past. Now go find a TREASURE from your stash and share what you make! Happy Crafting!

In case you haven’t heard it today, you are incredible and you matter!

Scrappy Boy Stamps March Release Sneak Peek Day 1

Day 1 Teaser

Hello, all you paper crafting enthusiasts out there!

I am excited to announce that the March 2023 Scrappy Boy release is just around the corner, and wanted to give you a sneak peek into what you can expect on the first day of this exciting release.

First on our list is a set of brand new patterned papers in both 6×6 and slimline, each one featuring bright and bold designs that are perfect for adding a pop of color to your projects. All of Scrappy Boy patterned papers are printed on high-quality card stock and are sure to make your projects stand out! The paper is so lush and vibrant, and you can feel the quality in the weight and look of each piece of the double-sided pages.

Next up, there will be coordinating stencils and pre-colored die-cuts that will help you to create stunning layouts and cards in minutes. The die-cut embellishments feature all the cute images, colored up, cut and ready to add a touch of personality to your scrapbook pages, cards, planners and other projects you are working on. The stencils can pull a background together in just minutes and are great for both beginners and experts alike!

And last but not least, there will be a new set of stamp and coordinating outline die sets featuring the fun and quirky cute girls’ line for adding a playful touch to your projects and of course the main Scrappy Boy Stamp Release that will hopefully make all your wishes and dreams come true!!! These stamps and dies are made from high-quality materials and will give you endless hours of crafting fun.

Of course, these are just a few of the exciting products that are in store for you during the March 2023 Scrappy Boy release. I can’t wait to share more sneak peeks with you in the coming days, so be sure to stay tuned and get ready to be inspired!

Thank you for choosing Scrappy Boy, and happy crafting!

If you have been inspired in some way, please consider liking and subscribing, so you don’t miss a thing. If you have not heard it yet today, you are INCREDIBLE and you matter!!

You Sure Are Spiffy

Featuring Images and Stair Builder Die from
June 2022 Stamp Release

A2 Card Base cut 4 1/4 x 11, scored at 5 1/2

Copic Blends:

  • Skin – E04, E11, E21, E00, E000 and R20 for cheeks
  • Lady’s Attire – Y28, Y23, YR24, Y21
  • Men’s Attire – T9, T7, T4 and 0
  • Stairs – suspended moon rock ink refill or comparable gray color and black (sparingly) by dropping about 3-5 drops and tgen using a skewer to swirl the ink to create a marbled look to ink. i took the stair die cut and dipped into the shaving cream, which picked up the pigment and transferred to paper. i wiped off the shaving cream and let pieve dry.
  • Blonde Hair – E44, E39, Y21 and E59
  • Brunette Hair – E89, E59, E34 and E57
  • Prismacolor pencils used to create deeper shadows, as well as white gelpen highlights.

I embossed the sentiment with white embossing powder and popped up with foam tape.

You’ve Been Granted 3 Birthday Wishes Card Project

Birthday Card Featuring Arabian Nights 6×8 Set

Please make sure to visit https://scrappyboy.com/ to see the latest release, as well as other awesome offerings you’ll be sure to fall in love with. The images are so cute, you can mix and match different sets to stretch your stash! The papers and stencils are awesome, too!

To make this 5 1/2 inch square card, I used the following supplies:

  • Magic Lamp Stencil
  • Arabian Nights 6×6 Double Sided Paper Pack
  • Arabian Nights Stamp Set & Coordinating Outline Dies
  • Coordinating Card stock | Glitter Cardstock
  • Double-Stick Foam Tape
  • Gold Embossing Powder
  • Embossing Ink
  • White Gel Pen
  • Memento Black Ink
  • 5 1/2 x 11 in heavy card base, scored at 5 1/2
  • Distress oxide inks
  • 1 1/2 in circle punch or die (straight edge and scalloped edge)
  • COPIC Markers
Saved all my scraps as I decided on a thin or thick mat.

I used The Magic Lamp Stencil on a piece of white card stock to make a background! So much fun!

Magic Lamp Stencil used with distress ink and white gel pen accents for added interest

I stamped the genie and the lamp images on white Hammermill card stock in 110 lb weight with Mememto Black Ink.

COPIC Combos are as follows:

  • Genie Hair – T9, T7, V17, V15, V12
  • Genie Face & Hairband – BV00, BV11, BV13, BV17, R22 (cheeks)
  • Genie Top – B34, B37
  • Genie Bottom – BG10, BG11, BG53, BG13 and white gel pen accents
  • Bracelets – Y13, Y15 and Y17, YR24
  • Lamp – Y00, Y11, Y15, YR23 & YR27

I used scraps to adorn my project, just looked for complementary shades from the colors in the patterned paper. Images were popped up with foam tape. Sentiment embossed with Versamark Ink on maroon card stock with Gold Embossing Powder to complete the card. THANKS for checking my project out. If you have questions, don’t hesitate to ask!

Sorry I’m Choco-LATE! Card Project – featuring Kawaii Cuties by Stamp Anniething

This slimline card was extremely fun to make because Kawaii Cuties from Stamp Anniething has so many images included in each set, slimline cards are how you can have enough real estate to hold ALL THIS CUTENESS!!!!!

I find myself wanting to be late sending all my birthday cards this year, because I am absolutely in love with this sentiment! How cute is the sentiment, “sorry, I’m Choco-late!”

To make this slimline card, I used one of StampAnniething’s slimeline dies. This one is a stitched scallop die. Next, I used a combination of distressed inks from my stash to ink blend the background. I used spun sugar, squeezed lemonade, carved pumpkin, and at the very top I used a little bit of barn door to deepen the pink. I flicked some fresh, clean water onto the panel, as it will cause the distressed ink to react, and leave a bleached effect. I then mounted the ink panel onto a piece of card stock in a darker teal, giving approximately a quarter inch larger than the cut panel. The teal piece measures 3.5 x 8.5.

The first quarter release from Kawai Cuties by StampAnniething has some amazing sets. They are very versatile and you can mix and match on all different projects. This particular card uses the stamp set and coordinating dies from: Life is What You Bake It and I Will Never Dessert You.

I used COPIC markers to color my images. The following combinations were used:

  • Banner colors – blue = FB2, FBG2, B01; pink = FRV1, RV14, RV13, RV10; Green – FYG2, G12, YG01; orange =FYR1, YR16, YR00
  • Chocolates -Anything Chocolate – B66,E79, E77, E74, E71 – add highlights with white Posca Pen
  • Pink frostings -RV10, R81,R83, R85
  • Strawberry, Hearts & Red Icings – R21,R24,R29 / G07 (strawberry leaves)
  • Madellines – Y23, YR21, YR23
  • Cinnamon Roll Frosting – E40, E42, E43
  • Jello – Y13, Y15, Y17, yR27, YR16
  • Teal (dish, cake bows, candles, cupcake wrapper) – B01, BG01, BG49
  • Display Case- C6, C4, C2, C0
  • Cheeks on items- R20 and white gel accents

I heat embossed the sentiment using Silver embossing powder on the same colored card stock I matted my base with to keep everything coordinated. To finish off the card, I created a white card-base to adhere my finished panel to. Finished card size is folded, 3.5 x 8.5. The card-base was made with white 110 pound card-stock cut 7 x 8.5, scored at 3.5.

Products used can be located at https://stampanniething.com/

Mark your calendars for the second Tuesday of every month to get LIVE inspiration from ME on the Stamp Anniething Stampers FB page in a feature they call Mix It Up with Kelly!

Every Second Tuesday at 7 pm EST on Stamp Anniething Stampers FB Page