I’m thrilled to announce that Pajama Crafter Stamps has launched their August Release, featuring SIX brand new stamp sets! These designs perfectly blend the excitement of Back to School with the early sparkle of Christmas, making it the ideal time to get crafting! 🌟📚🎄
Whether you’re looking to create cheerful classroom cards or start your holiday projects early, these new sets will surely inspire you! 🎁💌
Join the Instagram Hop for a Chance to Win!
Don’t miss out on the chance to win a $25 store voucher! Here’s how to participate:
Leave a comment and a like at each stop in the hop.
Follow both me and @pajamacrafterstamps on Instagram.
Make sure to enter by August 19 at 11:59 PM EDT, as the winner will be announced on August 20! 🏆
Please note: This hop is in no way sponsored, administered, or associated with Instagram or Facebook. By entering, entrants confirm they are 13+ years of age, release Instagram and Facebook of responsibility, and agree to their terms of use.
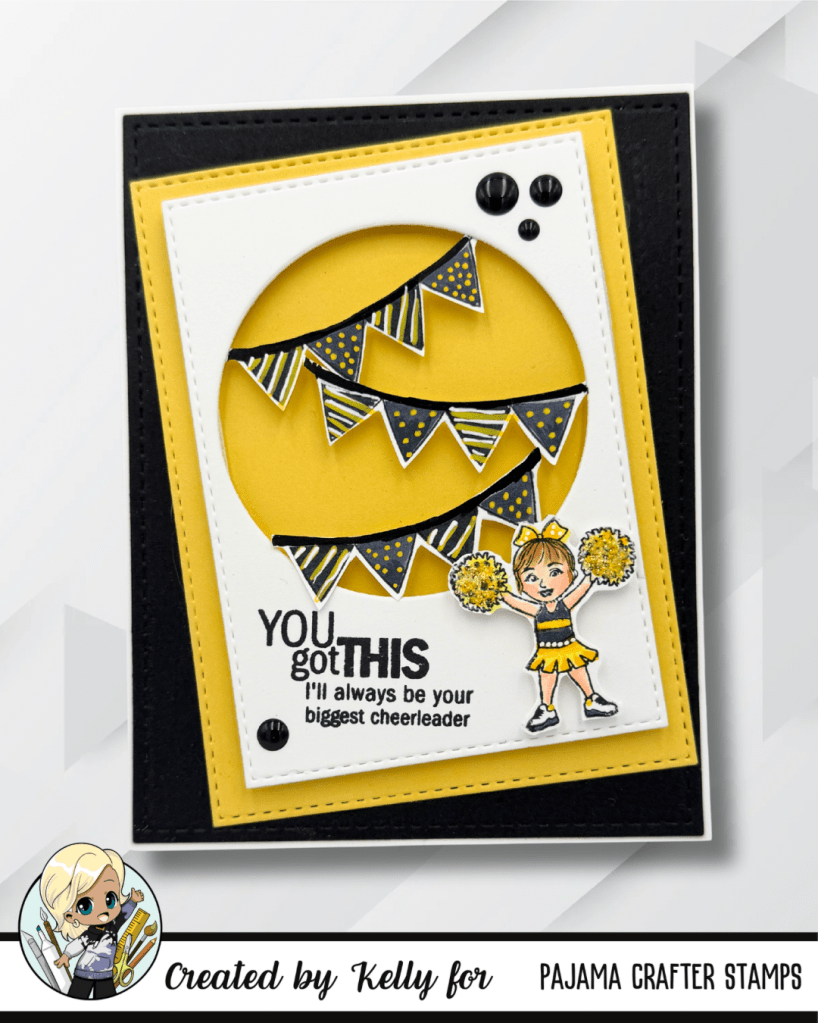
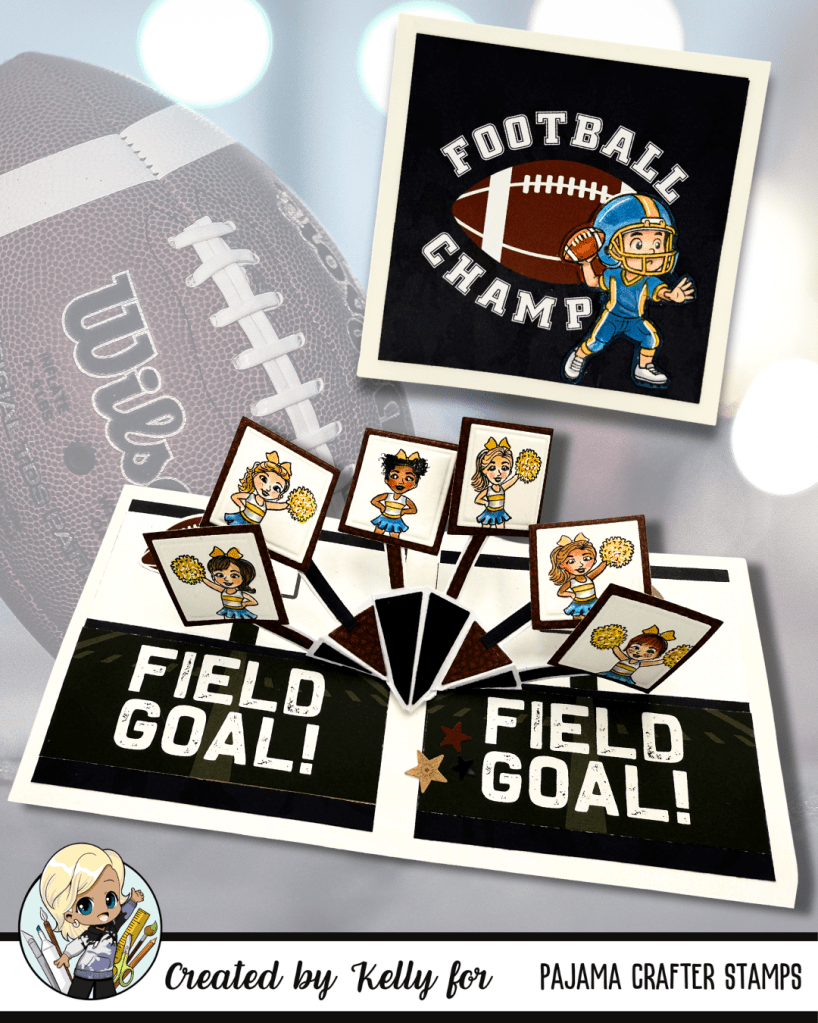
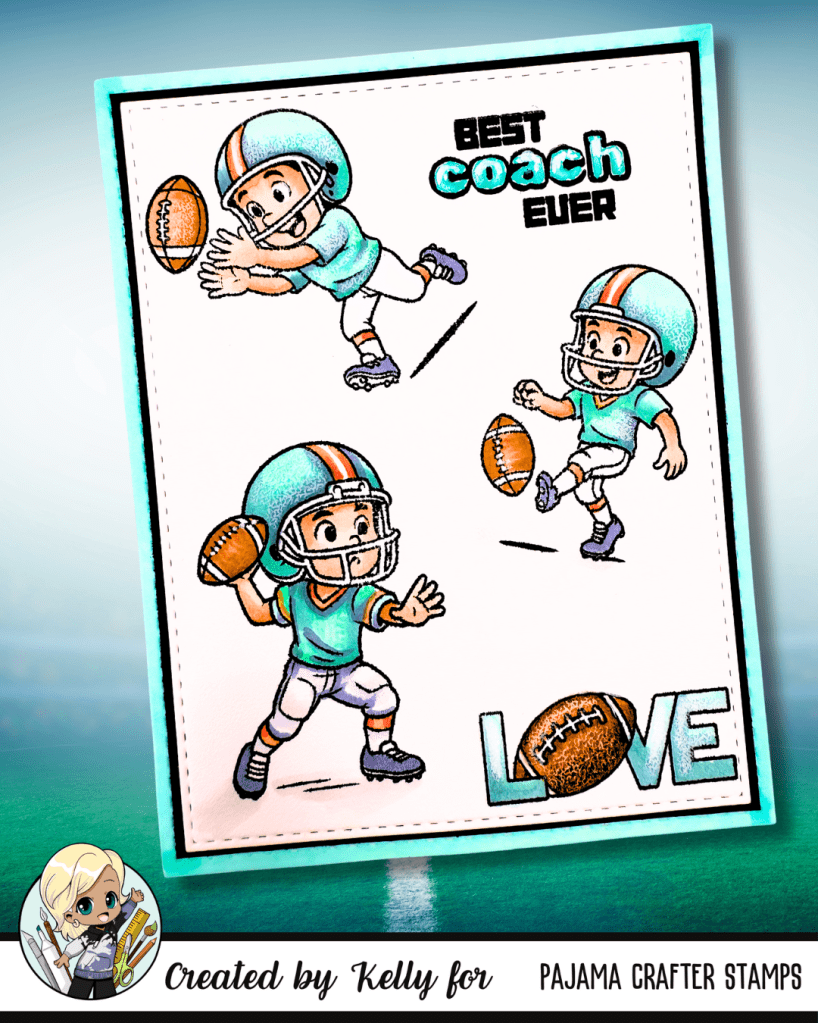
Today, I am sharing 4 projects, using 3 of the 6 newest stamp sets!
Here are the incredible new stamp sets you can explore:
Featuring CHEER YOU UP stampsFeaturing CHEER YOU UP stamp set.Featuring FRIDAY NIGHT LIGHTS stamp setFeaturing RUSTIC CHRISTMAS OWL stamp set
Don’t forget to HOP on the Pajama Crafter Stamps’ Instagram page and flow the directions on each DT’s Instgram, for your chance to win a FABULOUS prize!
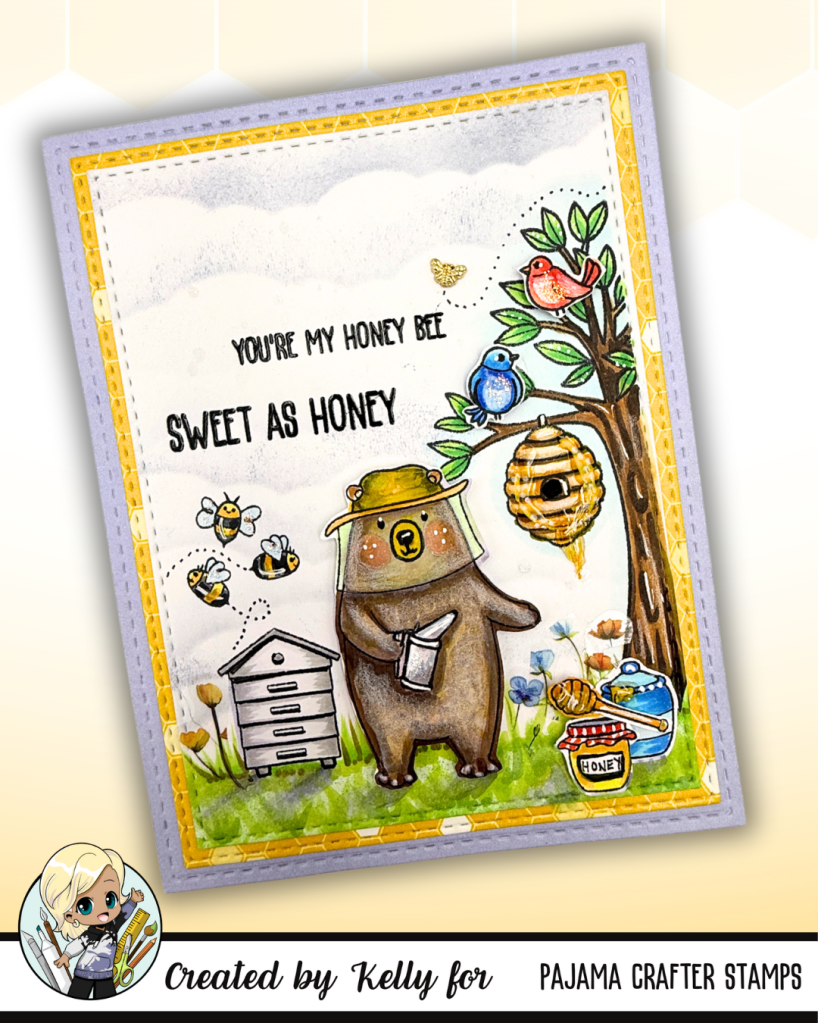
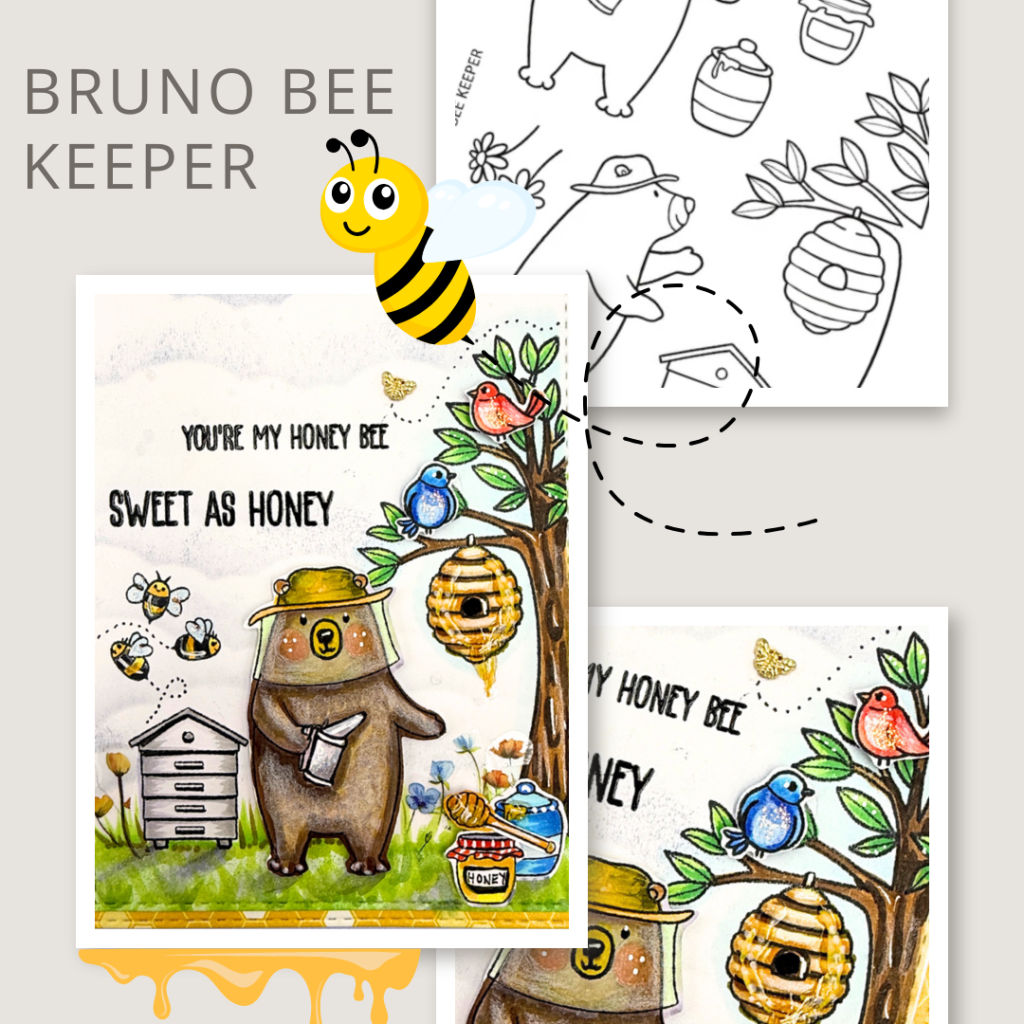
Featuring Bruno Bee Keeper & The Bees Knees Paper Pad
I am absolutely buzzing with excitement to share my latest creation with you all—a vibrant A2 sized card using the adorable “Bruno Bee Keeper” stamp set! This set is simply a delight, packed with charming bears, lovely flowers, and a host of other fun elements that bring a sweet touch to any project.
Card Details: For this card, I chose a sunny yellow honeycomb paper from the coordinating 6×6 pattern paper pack. It’s just as cute as it sounds, featuring 24 double-sided sheets that include the most delightful bee and honeycomb designs! 🐻🍯
The stamp set includes various images, such as:
Cute bears 🐻
Flowers 🌸
Birds 🐥
Bees 🐝
A bee house 🏠
A tree with a beehive 🌳🍯
I added some sparkle to the bee’s wings using Stickles and created a soft cloud background with a stencil. For extra shine, I used Crystal Effects Glaze on the honey drips from the jar and the hive. The result is a card that truly shines, just like honey! ✨
Sweet Sentiments: The “Bruno Bee Keeper” set also includes lovely sentiments like “Bee Brave” and “You’re My Honeybee,” which add a personal touch to every card. 💖 These messages are perfect for showing support and affection to friends and loved ones.
Join the Buzz! Your support means the world to me! 💕 Please take a moment to like or comment if you enjoy what you see—it really helps me know that my designs resonate with fellow crafters and friends.
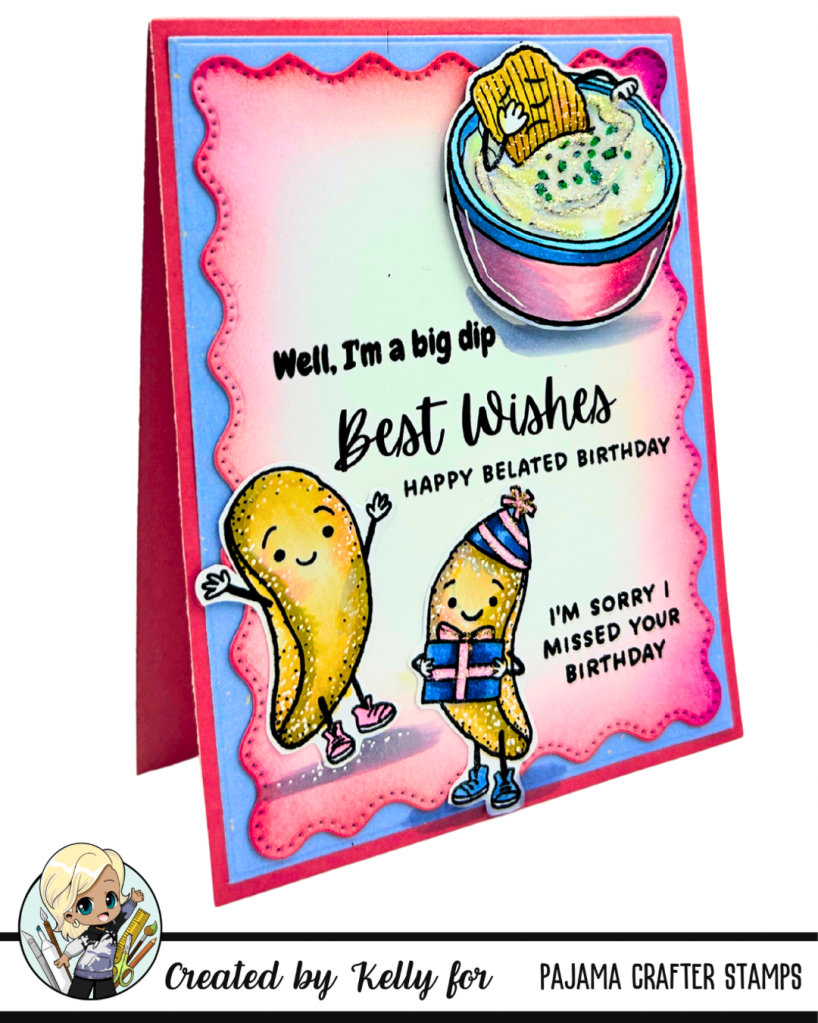
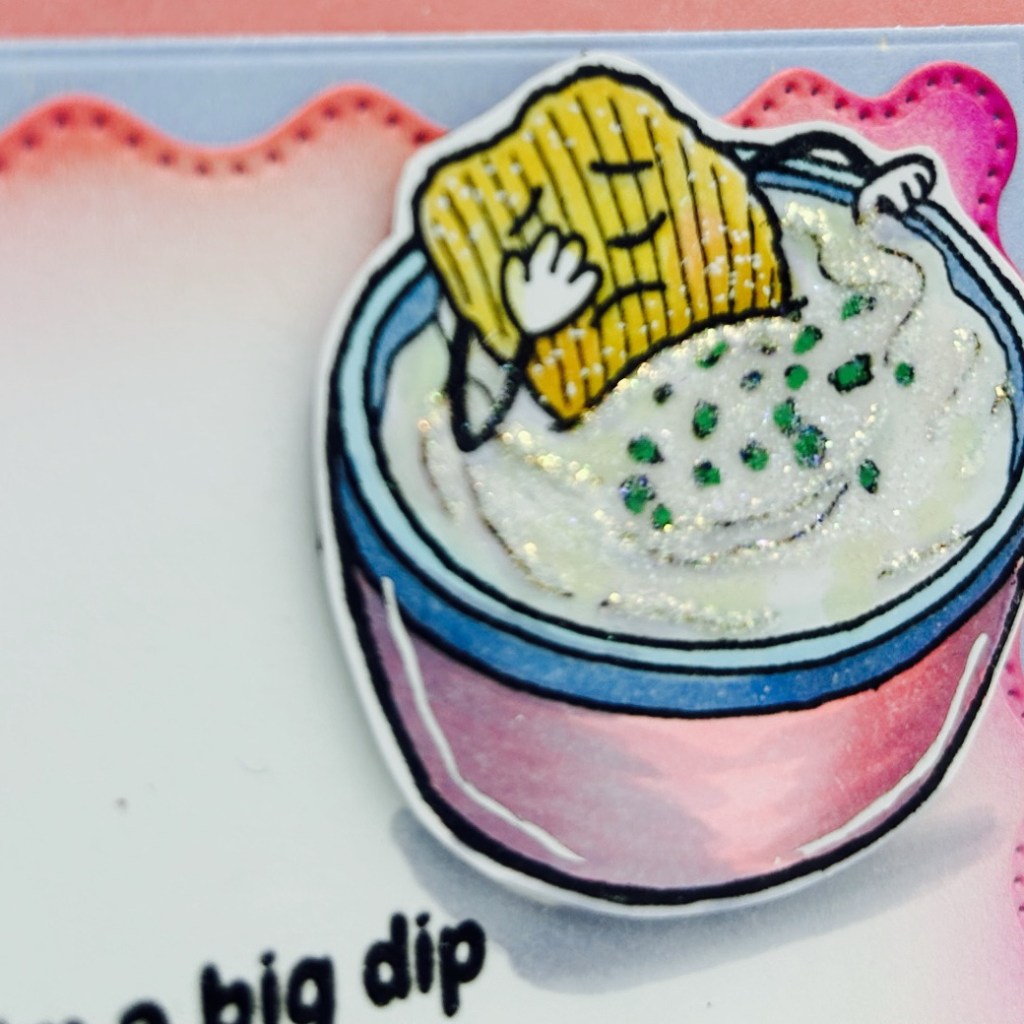
I’m thrilled to share a card I created featuring the adorable CHIP CHIP HOORAY stamp set from Pajama Crafters Stamps! 🦜✨ This set is just perfect for crafting fun and lighthearted cards, and I couldn’t resist using this FUN belated birthday sentiment ! 🎈🎂
Add details like white gel pen, Stickles and Crystal Effects
Hello, fellow crafters! As a passionate card maker and a huge fan of all things papercrafting, I’m thrilled to share all the excitement surrounding the latest release from Pajama Crafter Stamps! 🌈 If you love whimsical stamp images and adorable coordinating products like I do, you’re in for a treat!
Pajama Crafter Stamps is celebrating summer with their vibrant new collection, perfect for bringing some sunshine into your crafting. From fresh stamp sets to beautifully designed papers and stencils, there’s something to inspire every creative spirit. Each product is designed with love and whimsy, making them a delight to use in your projects.
A2 card front featuring Pajama Crafter Stamps
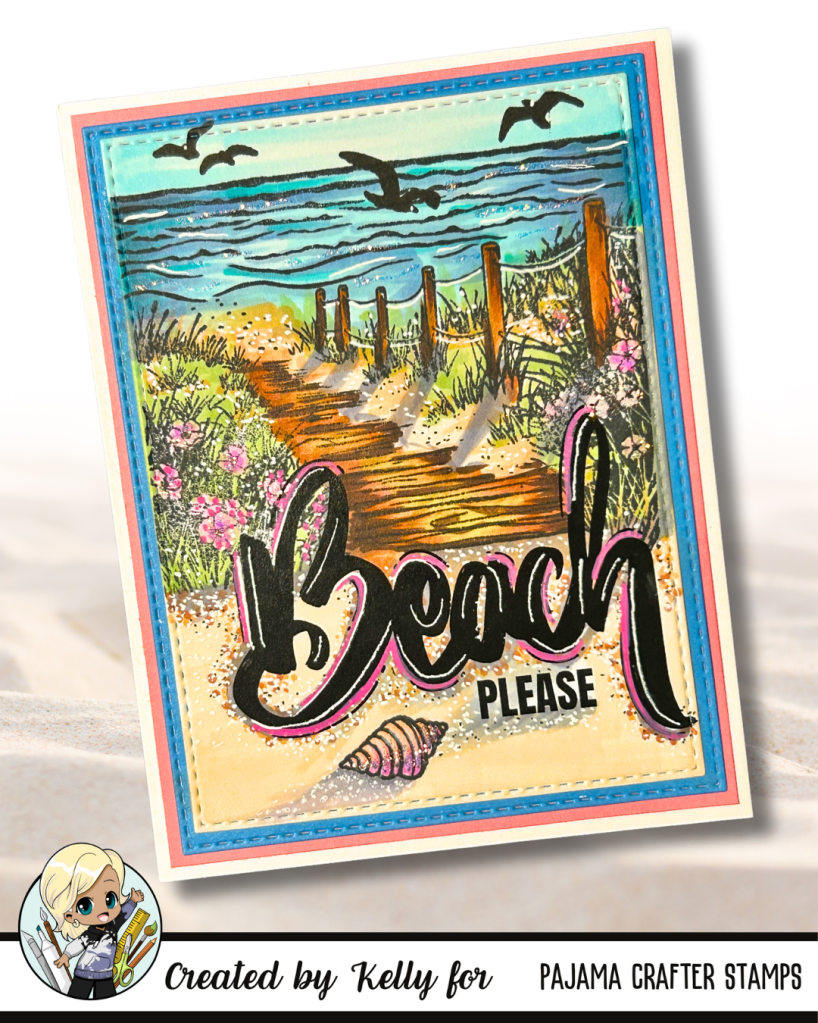
For my recent card creation, I used a panel from the lovely Beach Retreat Flash Cards, which are such a fantastic way to add colorful scenes to my crafts! With 24 unique designs in each pack, these cards can be used either as is or to explore fun foiling techniques. They allow for so much creativity! 🎨
The standout for me this season is definitely the new “Sea You Soon” stamp set! Its playful imagery captures the essence of summer perfectly. I’ve had a blast stamping and coloring to create dreamy beach scenes that instantly transport me to sun-kissed days.
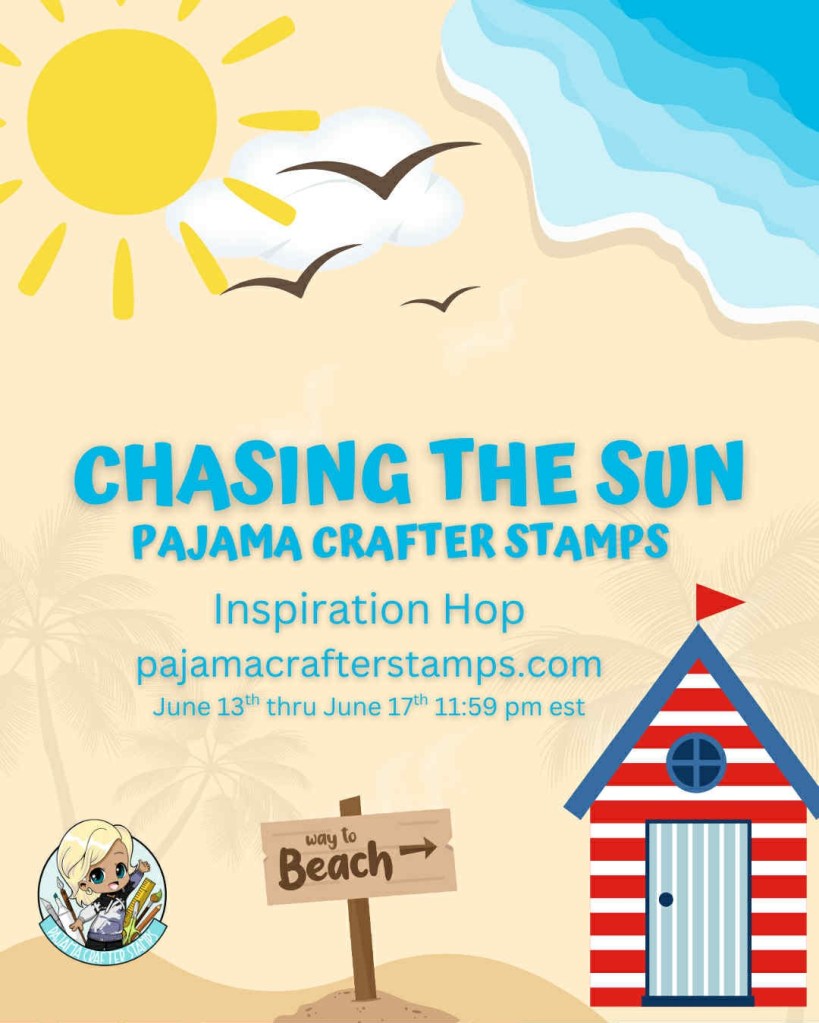
June 2025 New Release – Pajama Crafter Stamps
Creating with these adorable products is always a blast, and it’s wonderful to support a small family business that pours so much heart and soul into all they do. For anyone looking to add some cute, whimsical flair to their card-making arsenal, I wholeheartedly recommend checking out Pajama Crafter Stamps! There is also an INSTAGRAM HOP going on to celebrate the NEW RELEASE. Check it out!!!
Join me in celebrating sunshine and summer creativity as we continue to explore and enjoy the wonderful world of papercrafting. Happy crafting, everyone! 💖🌟
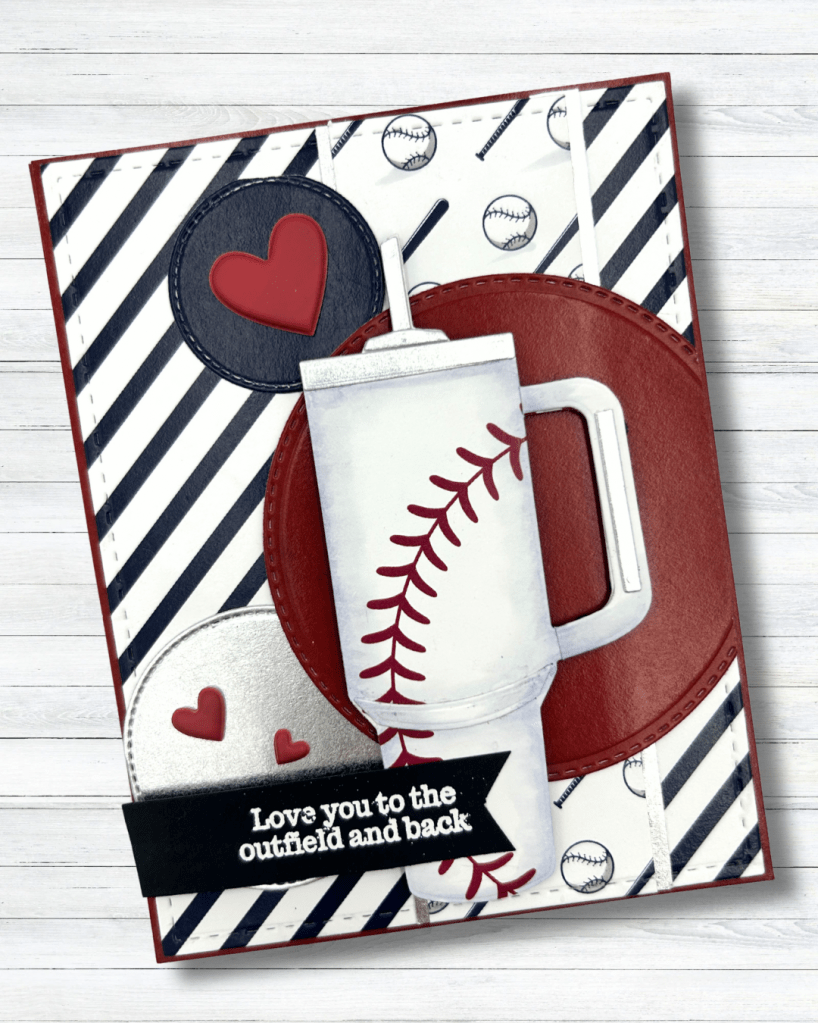
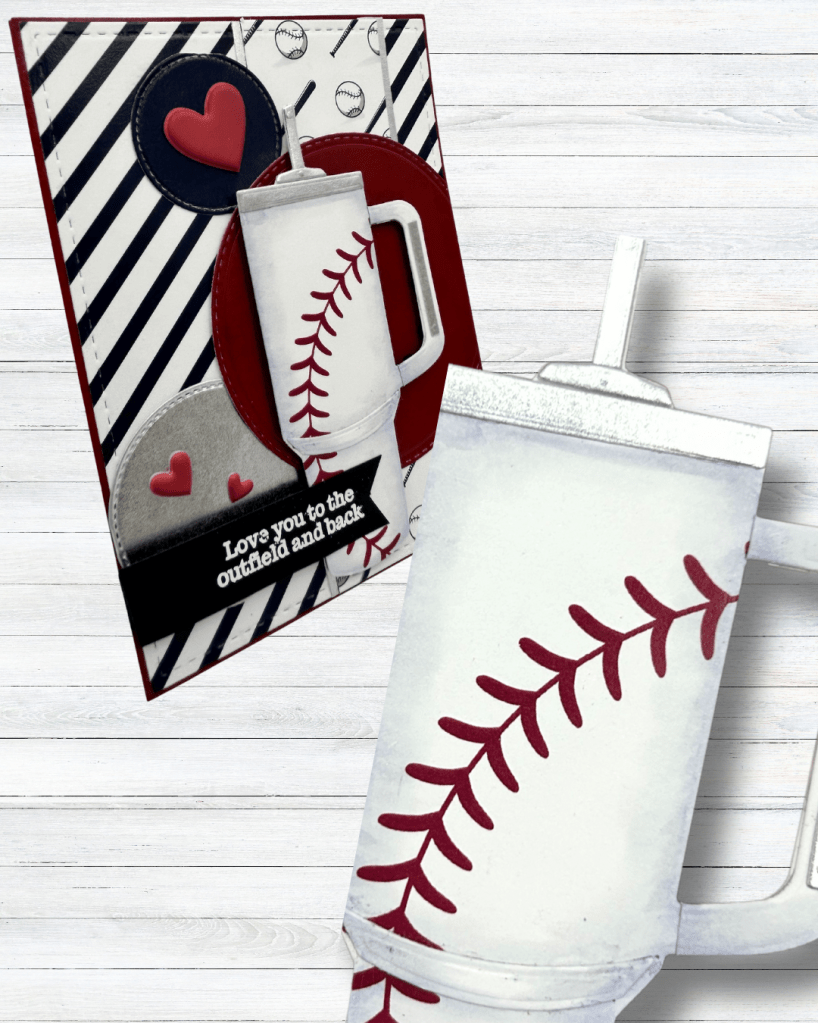
I’m excited to share this A2-sized card project that’s perfect for baseball fans and can be customized for any occasion! Using the fantastic “Adult Sippy Cup” die and the “Let’s Play Ball” 6×6 paper pack from Pajama Crafters Stamps, I was able to whip up a fun and engaging card that truly showcases the versatility of these products.
One of the best aspects of the “Let’s Play Ball” paper pack is its thoughtful design. It features a delightful mix of baseball-themed patterns along with solid reds and blues, as well as stripes on the back. This adds an extra layer of versatility that makes the pack ideal for not only Father’s Day cards but also for upcoming patriotic holidays and a variety of other occasions. The combination of patterns allows for endless creative possibilities!
For this card, I played around with different colors and patterns from the pack to create a unique look. It’s not just a Father’s Day card; it can also serve as a simple “thinking of you” note or a celebration of any baseball-loving person in your life. The “Adult Sippy Cup” die is not only fun but also an essential addition to your crafting stash, allowing you to create custom cards with whatever paper designs you already have on hand.
I invite you to explore how many different papers from the “Let’s Play Ball” pack you can spot in my card! Want to get creative? Don’t hesitate to use your own patterns and colors to make a card that’s uniquely yours.
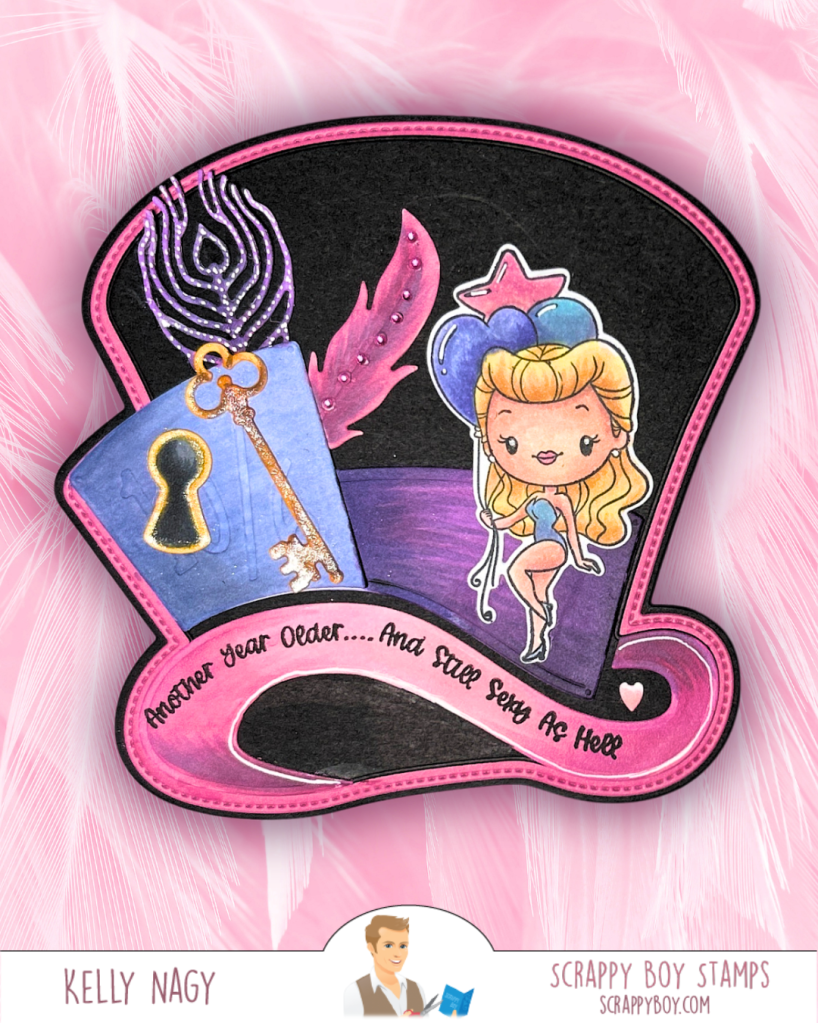
As we celebrate Memorial Day, I’m excited to showcase two unique card projects that highlight the versatility of the Mad Hatter card die set from Scrappy Boy Stamps. While this die was originally designed for whimsical, themed projects inspired by the tale of the “Mad Hatter”, I decided to take a different approach and customize it for today’s patriotic holiday.
Project 1: Patriotic Themed Card
A mash up between Scrappy Boy & Pajama Crafter Stamps
For my first project, I focused on a vibrant red, white, and blue palette to create a heartfelt card honoring our fallen heroes. By changing up the colors and incorporating relevant embellishments, I transformed the Mad Hatter die into something truly special for this occasion. The combination of thoughtful design and color allowed me to create a meaningful tribute that resonates with the spirit of Memorial Day.
Project 2: Celebrating Birthdays with Pinup Girls
Scrappy Boy Old meets New Release
In contrast, my second project features the same Mad Hatter die set, but this time paired with the brand-new Pinup Girls Birthday set that was released earlier this week. By simply adjusting the colors and the sentiment, I was able to create a fun and festive birthday card! This demonstrates just how adaptable these products can be, allowing for endless creative possibilities.
The beauty of crafting lies in the ability to innovate and personalize your projects. With a little imagination, you can repurpose any die set to fit a specific occasion or theme, proving that your creativity is your only limitation.
I hope my projects inspire you to think outside the box and explore new ways to utilize your crafting supplies!
Happy crafting, and enjoy the rest of your Memorial Day!
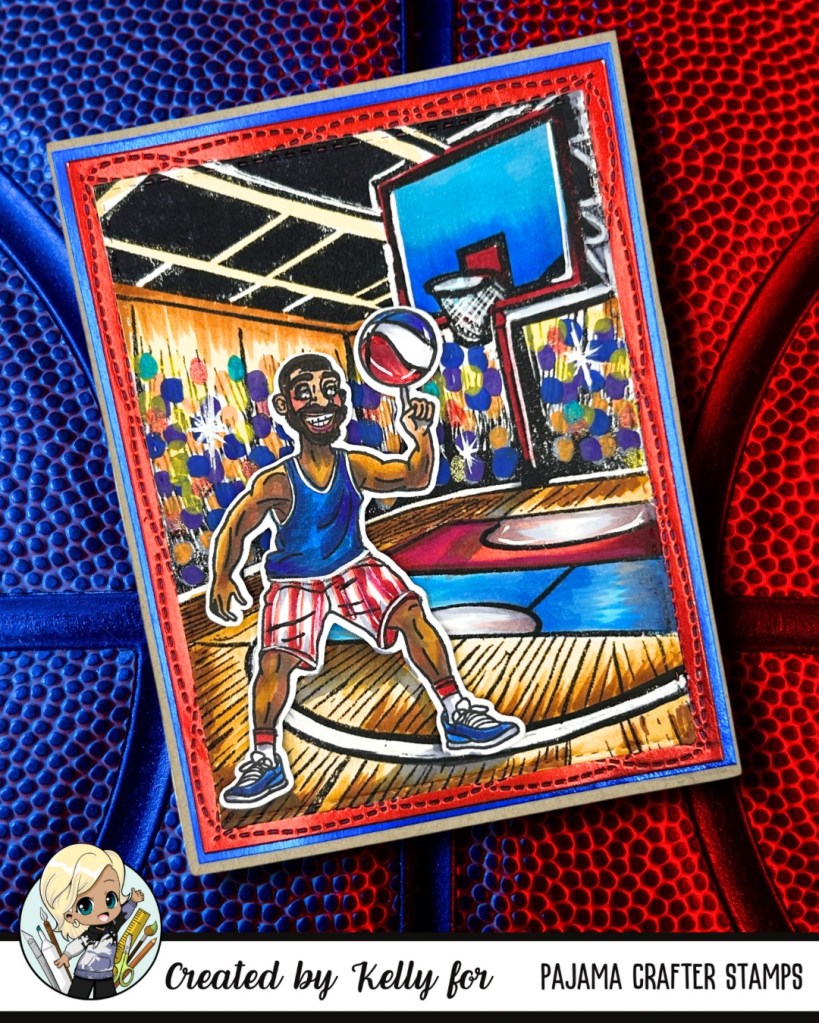
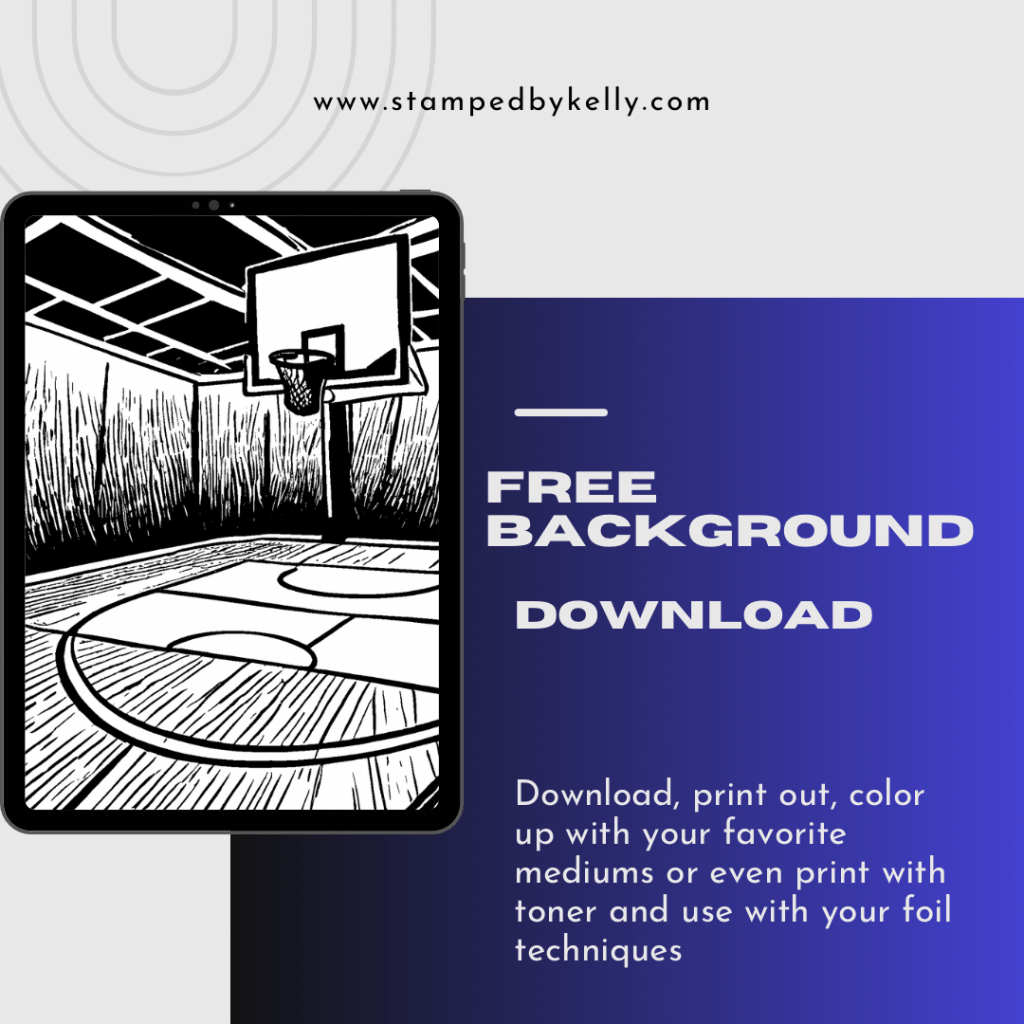
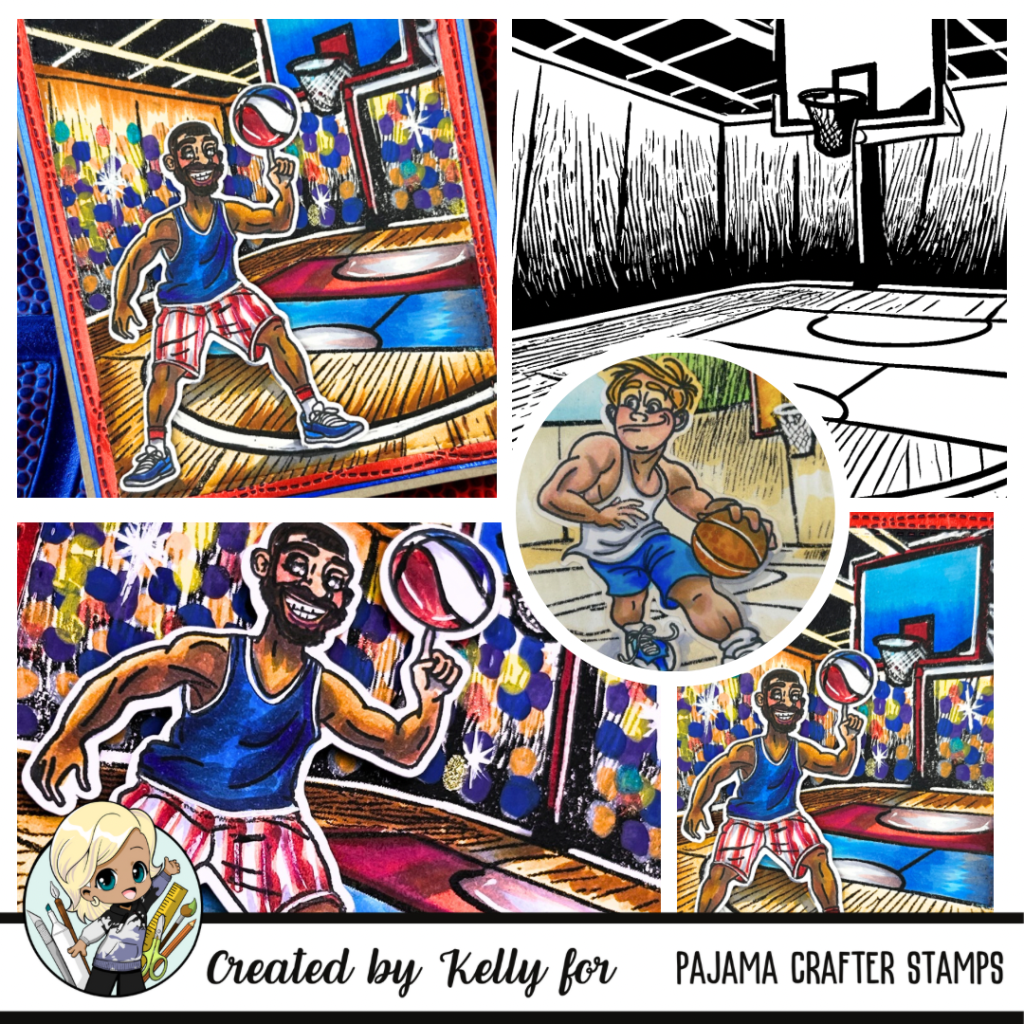
Ah, Saturday mornings! Those magical hours when cartoons lit up the screen, and the Harlem Globetrotters whisked us away on whimsical adventures filled with laughter, amazing basketball tricks, and that unforgettable theme song. 🏀✨ Inspired by those iconic episodes, I decided to craft a Globetrotter-themed card to kickstart this weekend!
Creating this card was an absolute BLAST! I had so much fun designing an A2 panel to jumpstart my crafting and create a background to bring the images to life.
I spy a different athlete and they have a girl, too.
💡 For all my fellow crafters — this isn’t just a one-size-fits-all project! You can customize your card with the delightful LET’S BOUNCE set. Celebrate a beloved player or infuse the colors of your favorite team; the possibilities are endless! To see the fun lineup, including the stamp set called LET’S BOUNCE >>>>>>>Click Here
Don’t miss out on unleashing your inner Globetrotter this weekend! Craft your unique card and let those vibrant colors and fun designs shine! Click the link above to DOWNLOAD the background to help you bring these images to life. You can download and use for FREE! Please tag me @stampedbykelly so I can see what you make!!!
Happy crafting, everyone! Please follow me on social media @stampedbykelly for my next post which will have my Copic Combos for this card updated.🌟✂️
A2 Fun Fold Stadium Card featuring Pajama Crafter Stamps
While we celebrate love today, over at Pajama Crafter Stamps, we’re kicking off March Madness!
Hop along for chance to win 2 sets from release!
🎉 That means it’s time to gear up for everything from exciting sports events to St. Patrick’s Day shenanigans—and yes, if those Stanley-style cups are your thing, we’ve got you covered!
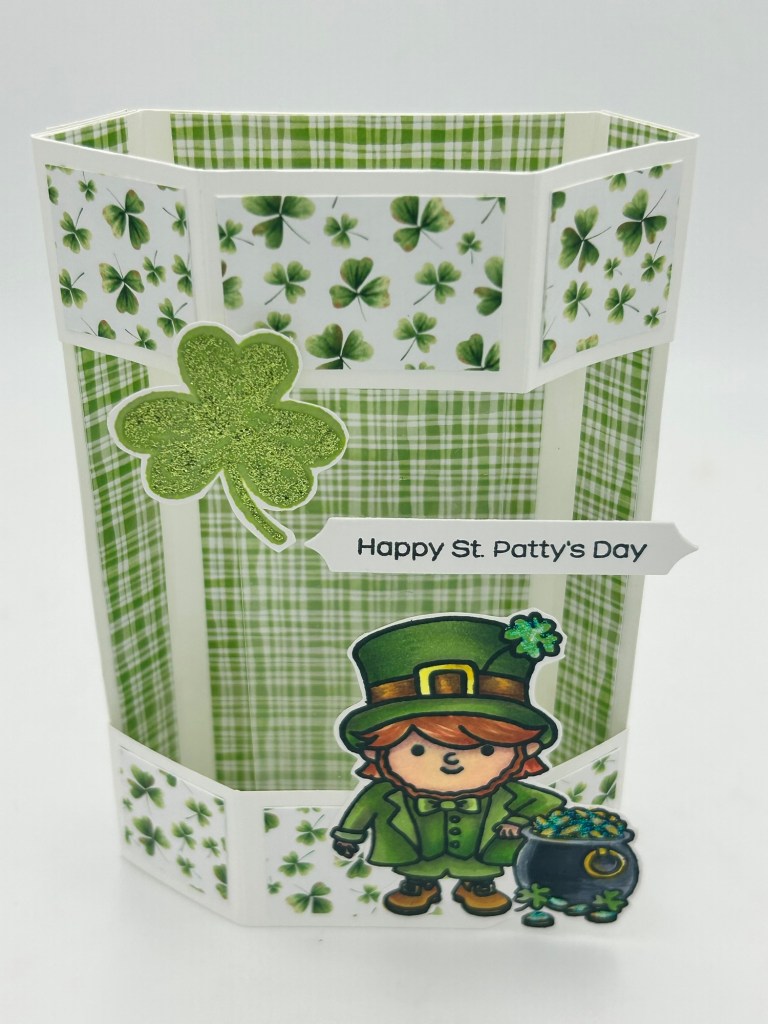
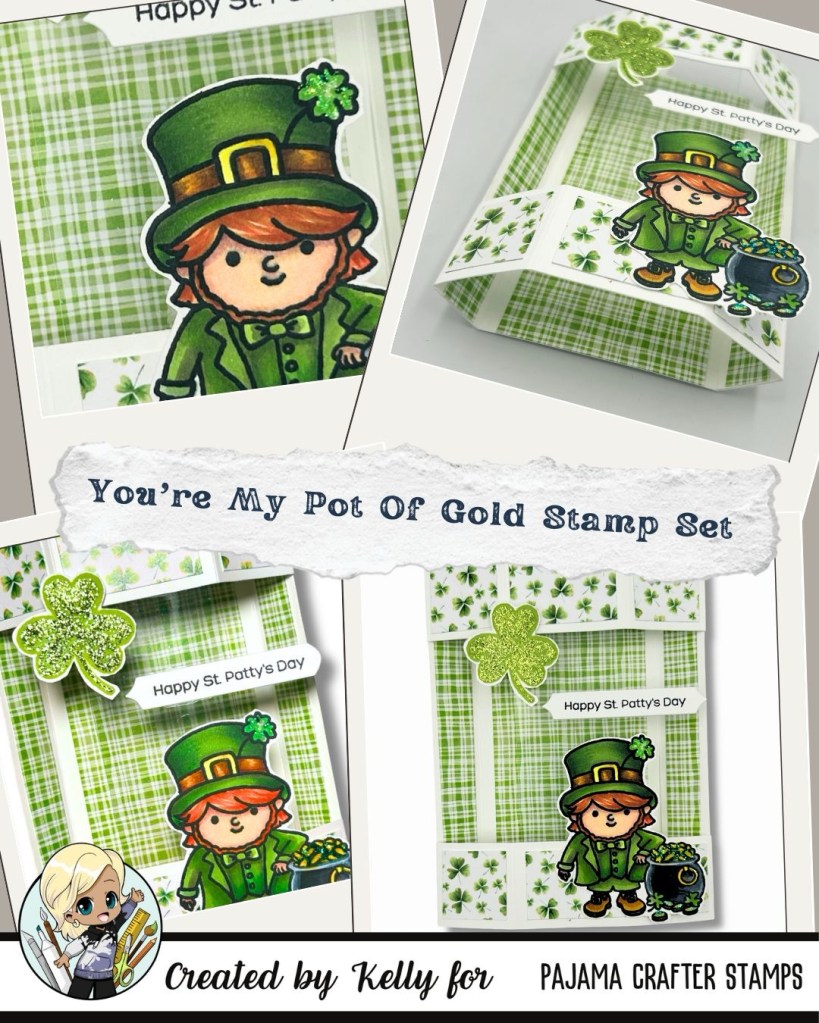
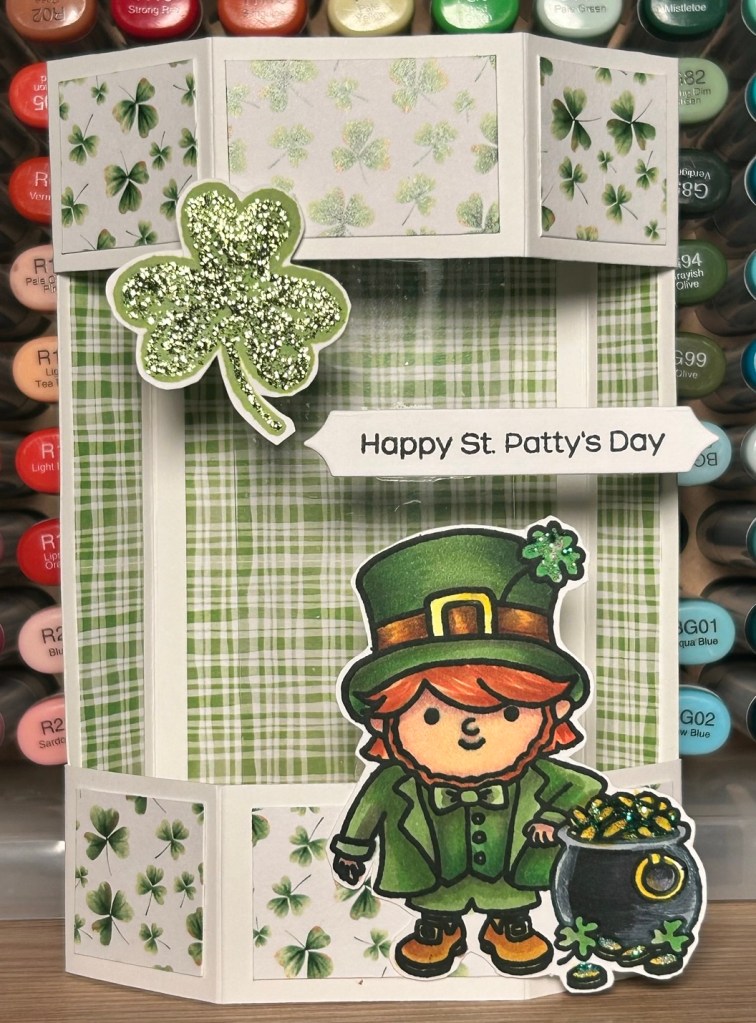
Introducing the Project: Lucky Leprechaun Fun Fold Card! 🌟
Folds & Mails Flat – A2 size card
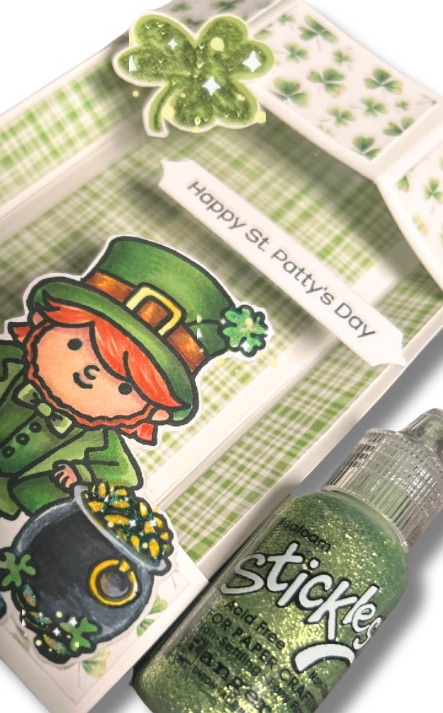
Today, I’m thrilled to share a whimsical St. Patrick’s Day card that features a fun fold technique. This A2-sized card lays flat for easy mailing but transforms into a stunning 3D display that beautifully showcases adorable patterned papers and festive images all in one delightful project! It stands majestically on a desk or shelf, ready to spread cheer and admiration.
Here’s What You’ll Need:
A selection of vibrant patterned papers that evoke the spirit of St. Patrick’s Day from the Emerald Isle 6×6 Paper Pad.
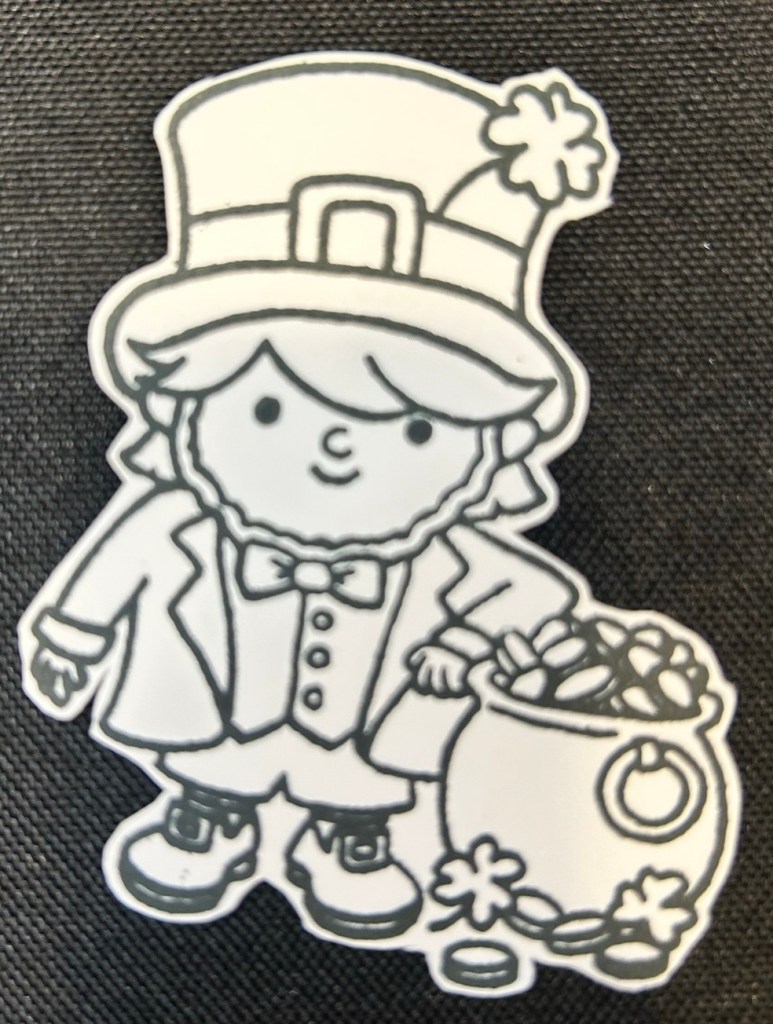
The cheerful Leprechaun, three-leaf clover and Happy St. Patty’s Day sentiment stamps are from the You’re My Pot of Gold stamp set.
Paper Trimmer, liquid adhesive, Heavy Weight white cardstock, Acetate, foam/dimensional foam popdots/tape, bone folder, scoring board, favorite coloring medium and black ink.
Crafting Details: I’ll guide you through the fun fold technique that makes this card truly special! These folds add depth and dimension to your design, making it a fantastic way to display cute patterns and playful images. Each layer tells a story, embodying the excitement of both St. Patrick’s Day and the upcoming March festivities!
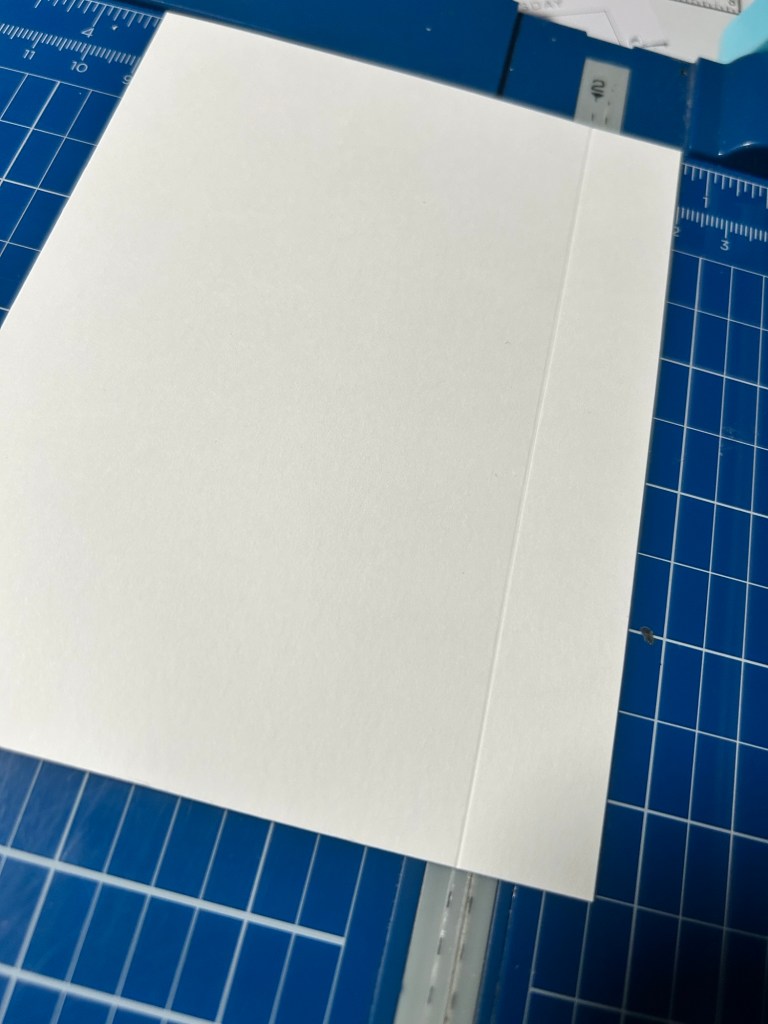
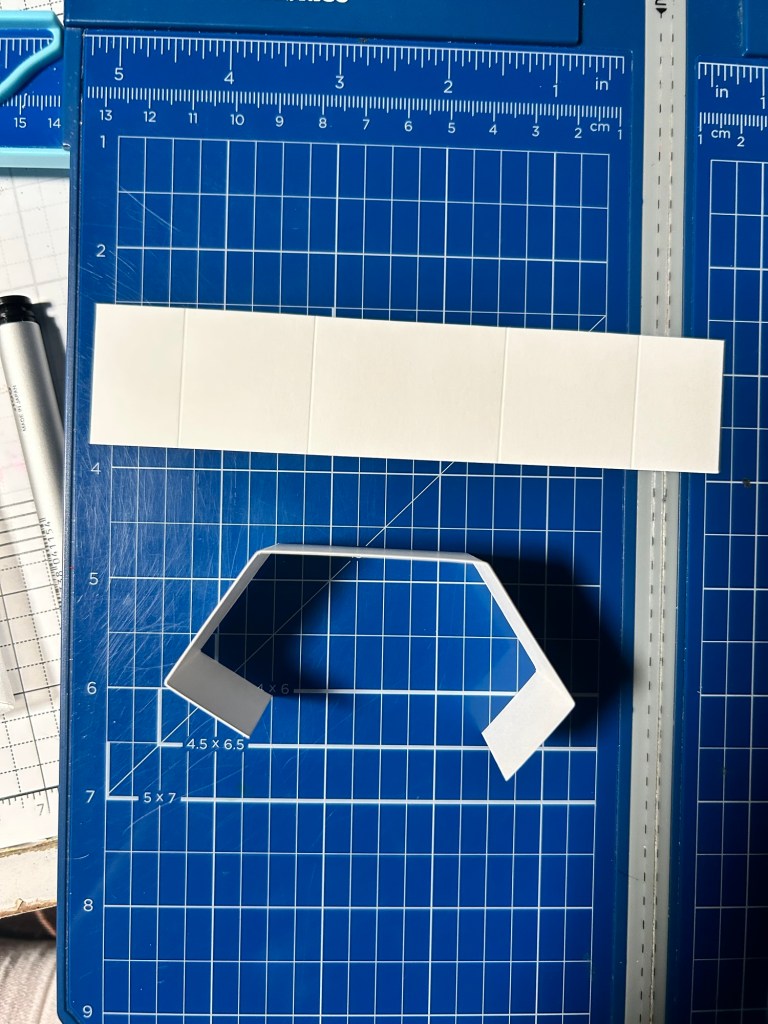
Start with your standard A2 panel- 5.5 in x 4.25 in
Next, using a scoring board or your paper trimmer with a score blade and take your panel in portrait and score 3/4 in from the left and right longer sides of the panel.
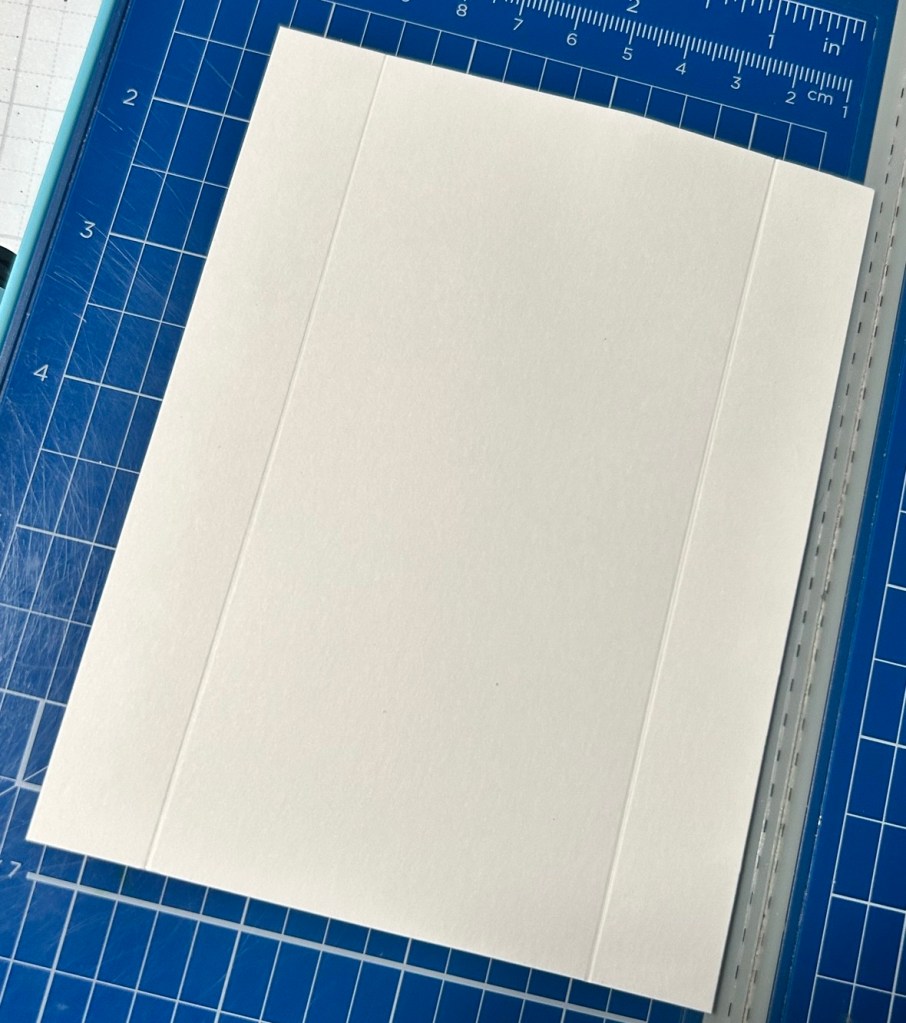
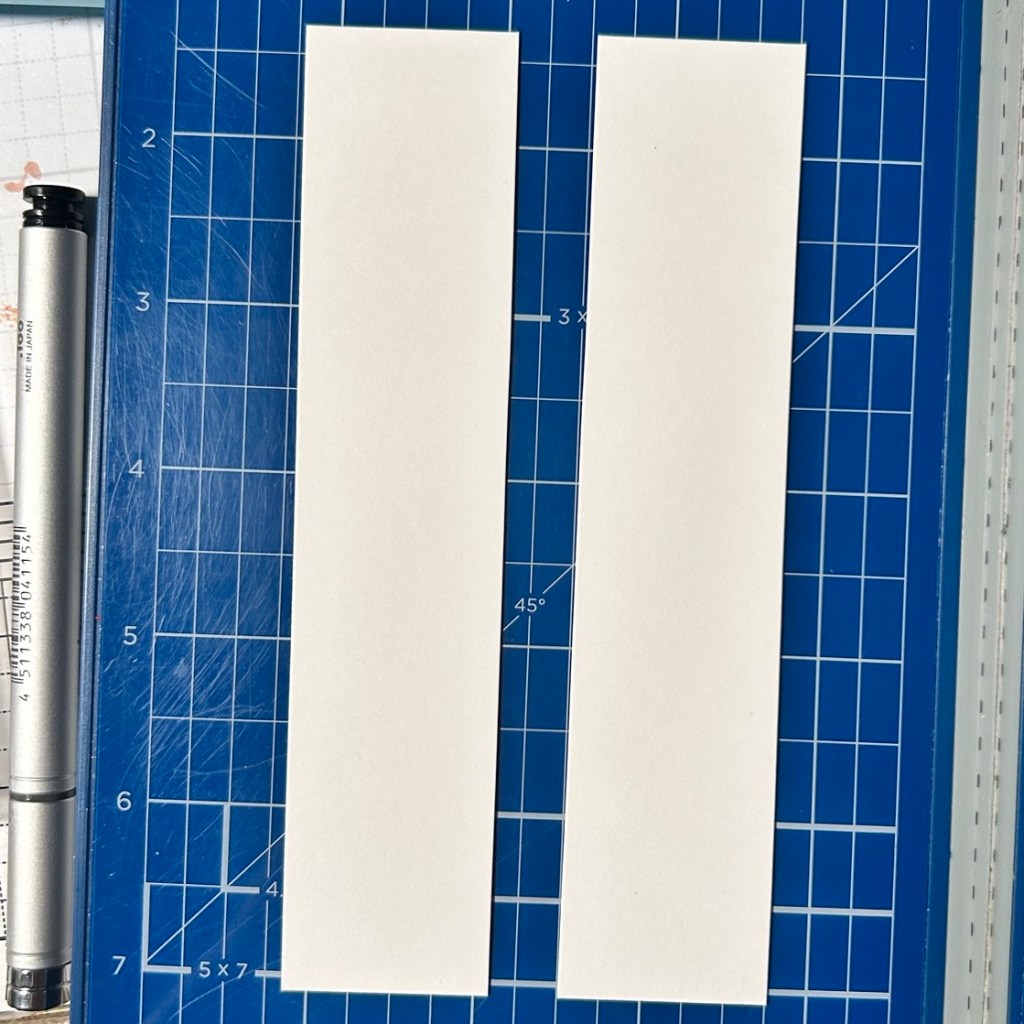
Scored down the side at 3/4 inchPanel Scored at 3/4 inch on both sidesCut 2 strips white cardstock at 1 1/4 inch x 5 3/4 inScore BOTH strips using scoring board or paper trimmer at 3/4 in, 2 in, 3 3/4 in, and then at 5 in.
Scored each at: 3/4 in, 2 in, 3 3/4 in and 5 in
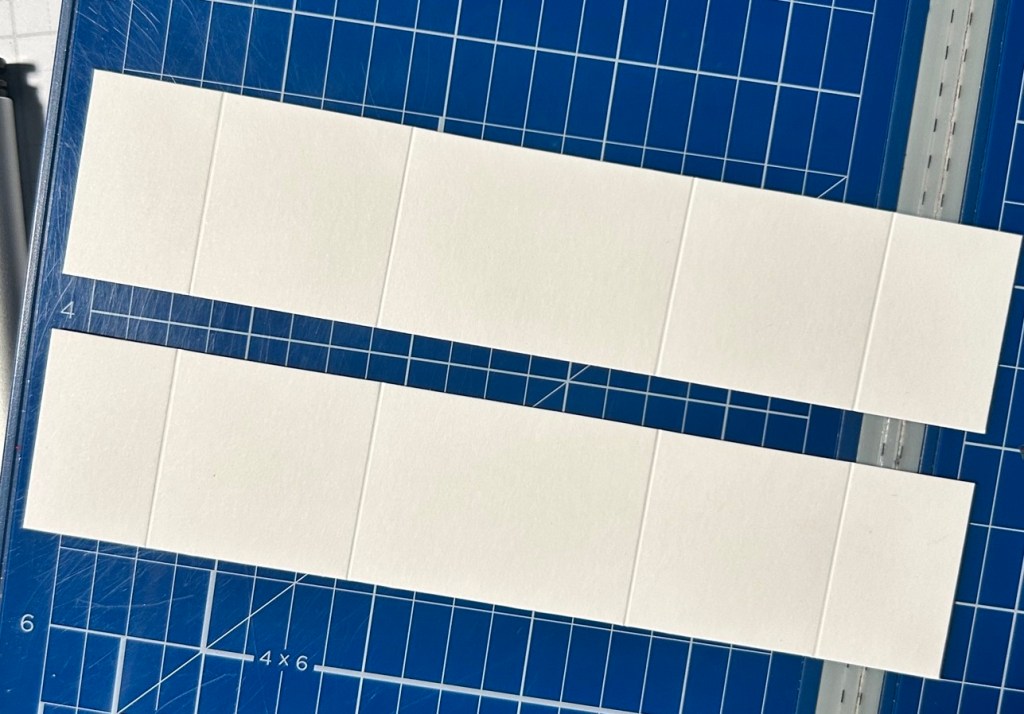
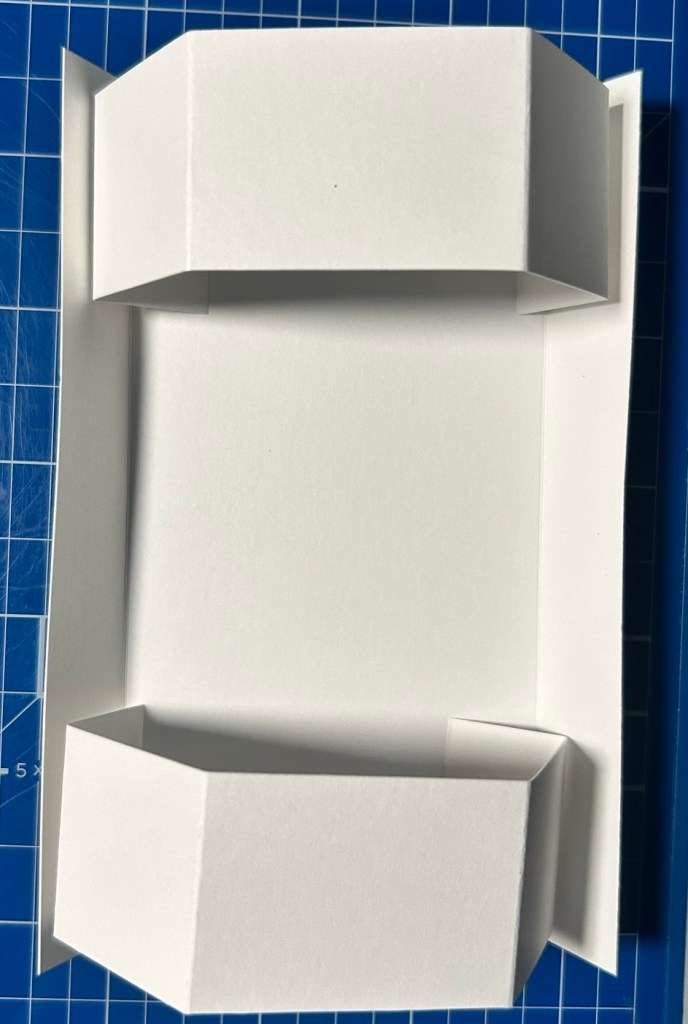
Then using your bone folder, mountain fold each
mountain fold each scored lineHere is what we have created as your base without embellishing or glue
As you craft, enjoy the process of layering papers and arranging your stamped images. Every cut and stamp will bring you one step closer to creating a unique piece that captures the essence of celebration.
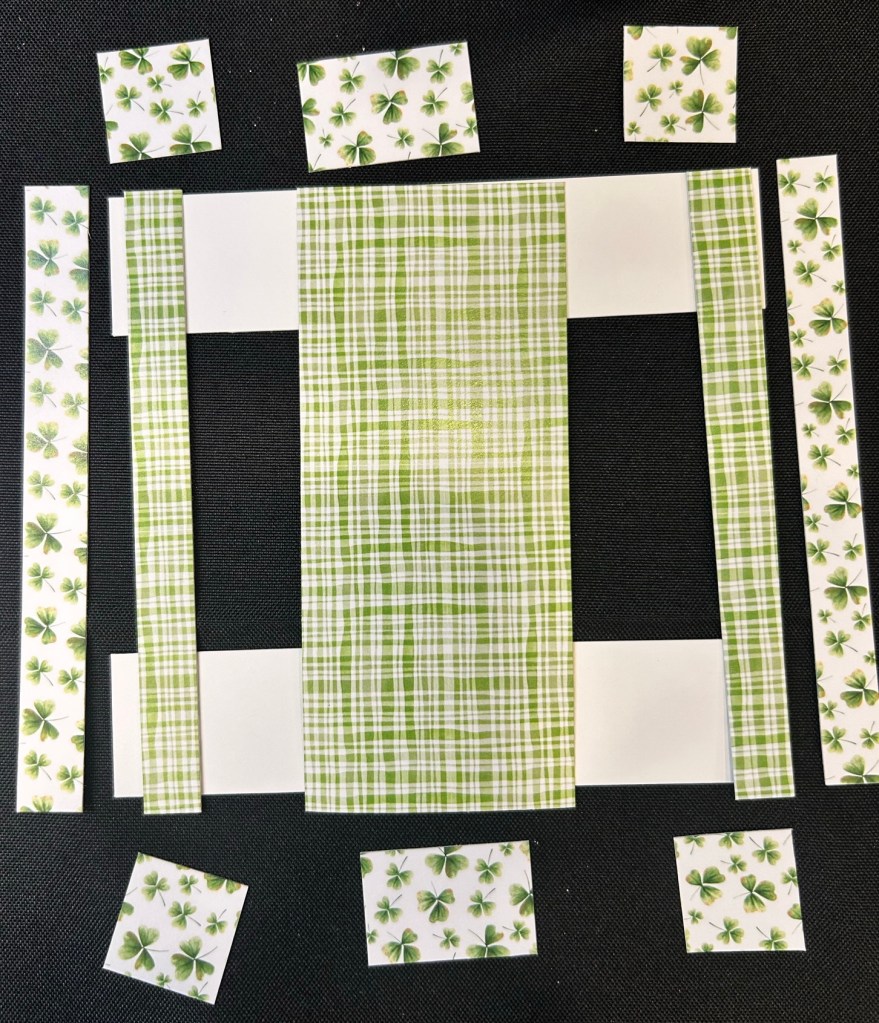
Now we need to cut patterned papers & embellish
Green Plaid Paper: 2 thin strips cut 3/4 in wide by 5 1/2 inch long, glued to the inside of the A2 panel in those 2 flaps you scored on each side. Cut another larger panel of green plaid 2 3/8 x 5 1/2 inch. See photo above for placement.
Clover Patterned Paper: Cut 1 strip at 1 inch x 4 inches and another, 1 inch x 3 inches. I cut the 4 inch x 1 inch into 4 separate 1 inch pieces, which are the 4 clover squares below. I cut tge 3 inch piece x 1 in half, leaving two separate 1 x 1.5 inch pieces, which are placed in the middle of the 2 squares. The picture below should give you a good idea of placement.
All the cut pieces cut and shown where to place when decorating your stadium card.The back of project. Cut 2 strips of patterned paper in clover 3/4 in wide by 5 1/2 inches. These will be glued last to cover the seams along the side edges after you glue the top stadium strip and bottom stadium strip.
Cut a piece of clear acetate 1 3/8 inch x 4 inches. This will be placed strategically tucked inside the center panel, once the card base is assembled and decorated. You’ll want to use glue dots or foam tape sparingly to embellish the acetate, being careful of not having foam tape or glue overlap causing some areas to stick together that we want to pop out freely.
Final Touch:
Stamp leprechaun image with Memento black ink and color with Copic Markers (or stamp and color with YOUR favorite medium)
Copic Color Combos:
E05, E11, E00, E000, R20
G24, G46, YG03
Y00, Y02
E07, E37, E35, E33
C7, C5,C3
Complete your card with the adorable Leprechaun and a spirited sentiment that embraces the fun of the season. I used Seafoam Stickles (glitter glue) to add extra shine and interest to my shamrock and coins. This isn’t just a regular greeting card; it’s a joyful art piece perfect for anyone who loves a little luck in their life!
So grab your supplies and dive into this crafty adventure as we celebrate Valentine’s Day while eagerly preparing for the vibrant energies of March Madness!
Front View – 6×6 in square card feat. Yeti Friends
This cheerful penguin is perfect for bringing a wintery vibe to any occasion! Below, you’ll find a card sketch to help inspire you to create something today! 🎨💖
Sketch No. 1 – 6×6 square card
Check out the side view of the card featuring the Yeti Friends stamp set from Pajama Crafters Stamps! ❄️ I added a snowflake die cut from PCS (older product) and created coordinating peppermint candies using a circle die from my stash to finish off my shaker card. Perfect for the winter season! 🎉”