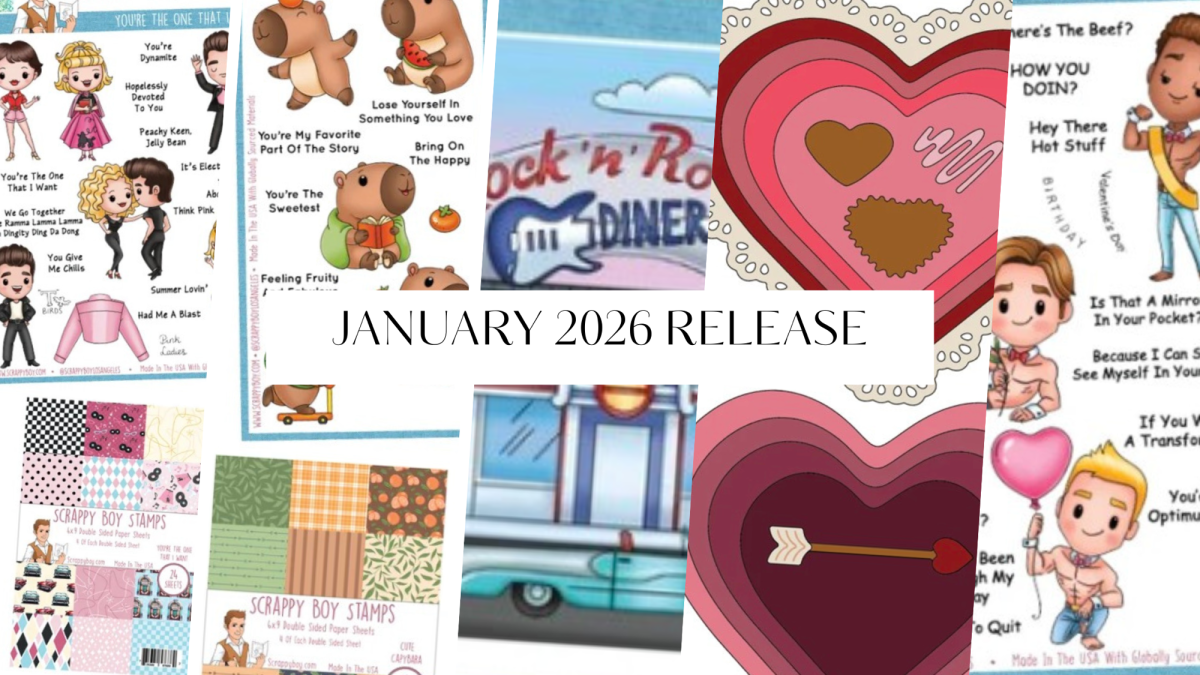
Hello crafty friends! As we wrap up January, I’m excited to share my latest projects featuring Scrappy Boys Stamps’ January 2026 release. I had so much fun creating these cards and projects, and I hope they inspire you!
Featured Projects:
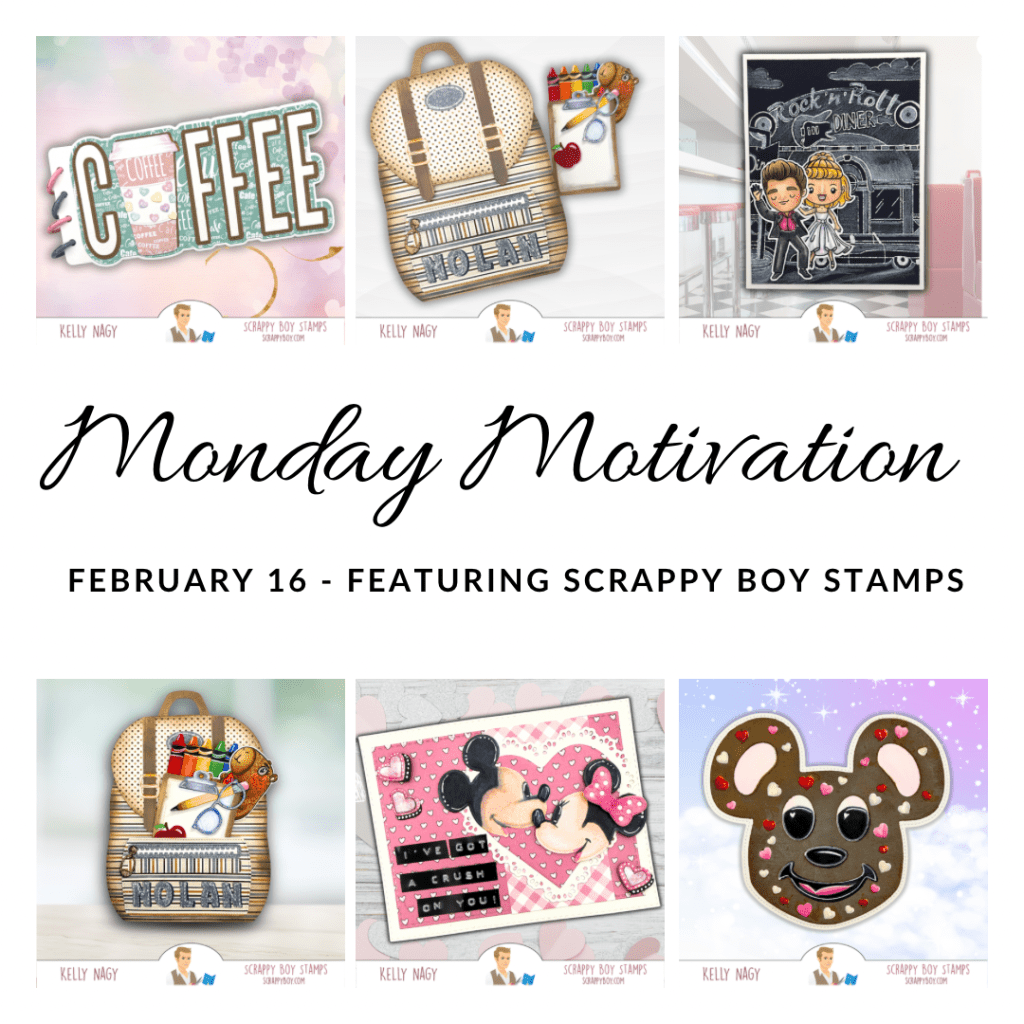
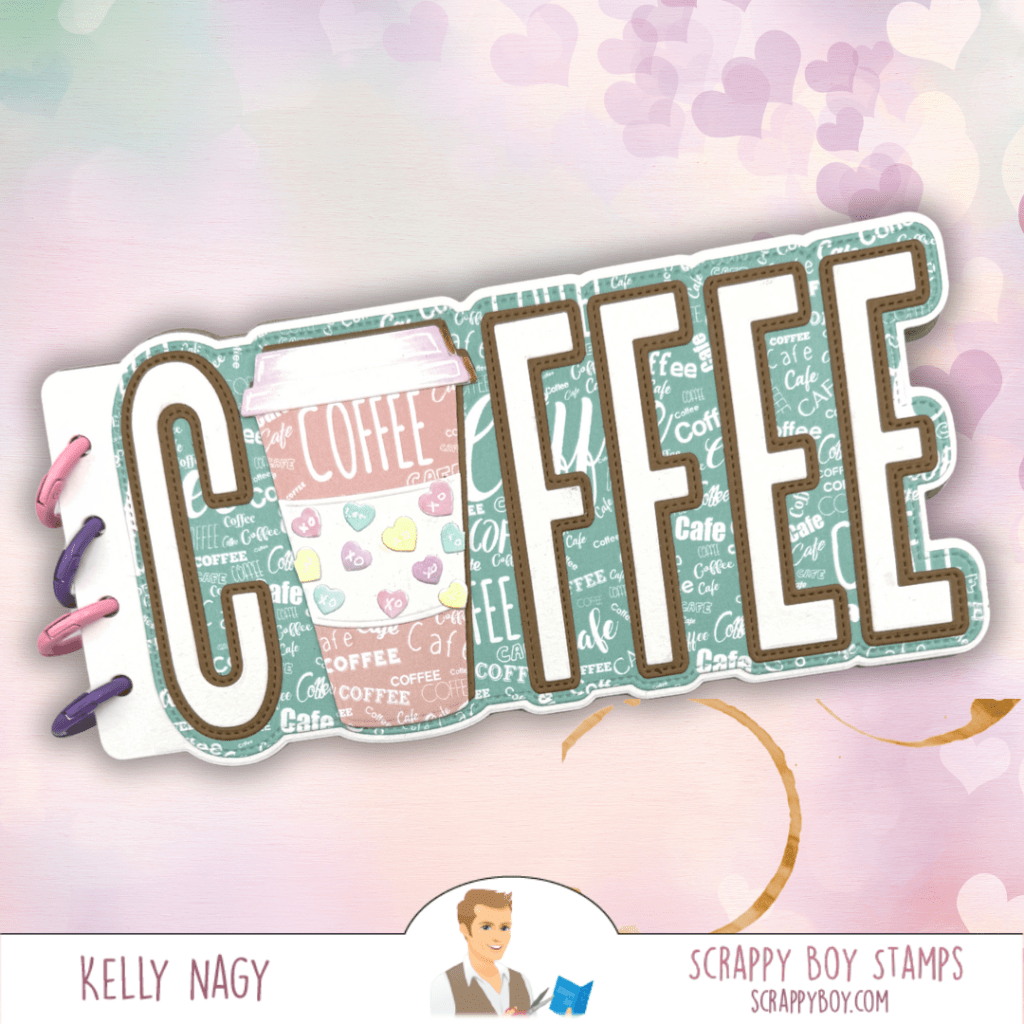
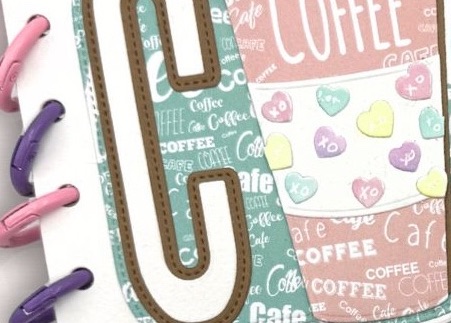
Coffee-Themed Mini Album
Items Used:
Coffee Mini Album Die
Dreaming of Coffee Paper Pack
Use hook rings to hold albums together or simply use ribbons or twine! Personalize your coffee cup
Backpack Shaped Card
Items Used:
Backpack Die
School Supplies Add-On Set
Cute Capybara Stamps & Dies
Scrappy Boy Alphabet Dies
Charmed and Chiseled Paper Pack
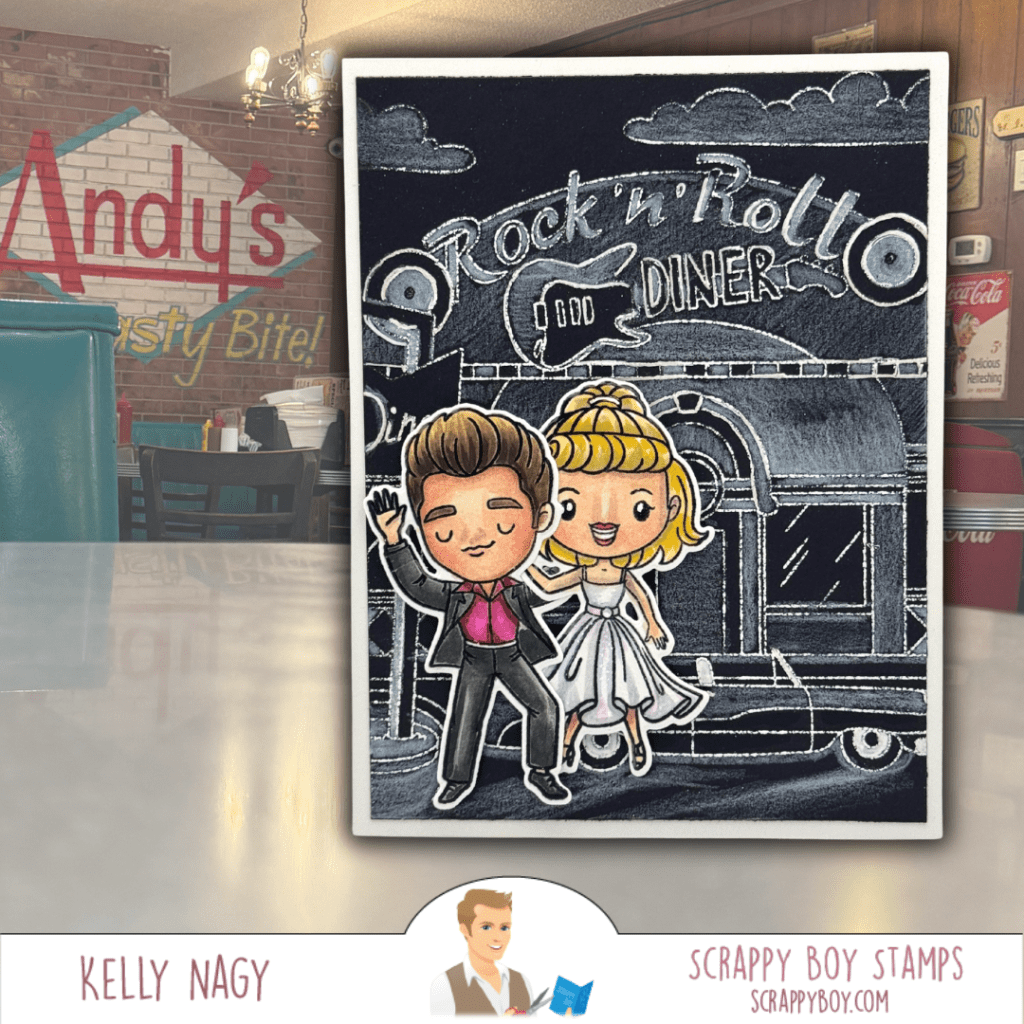
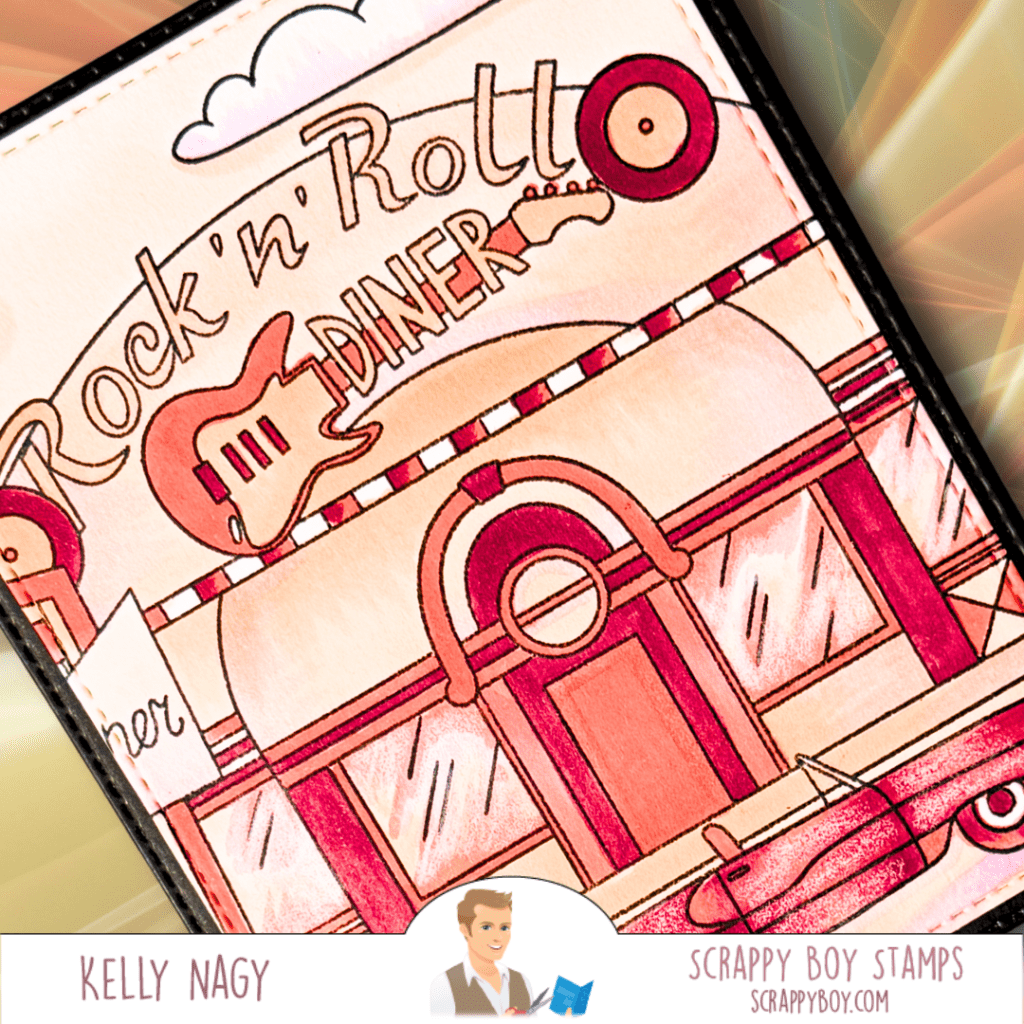
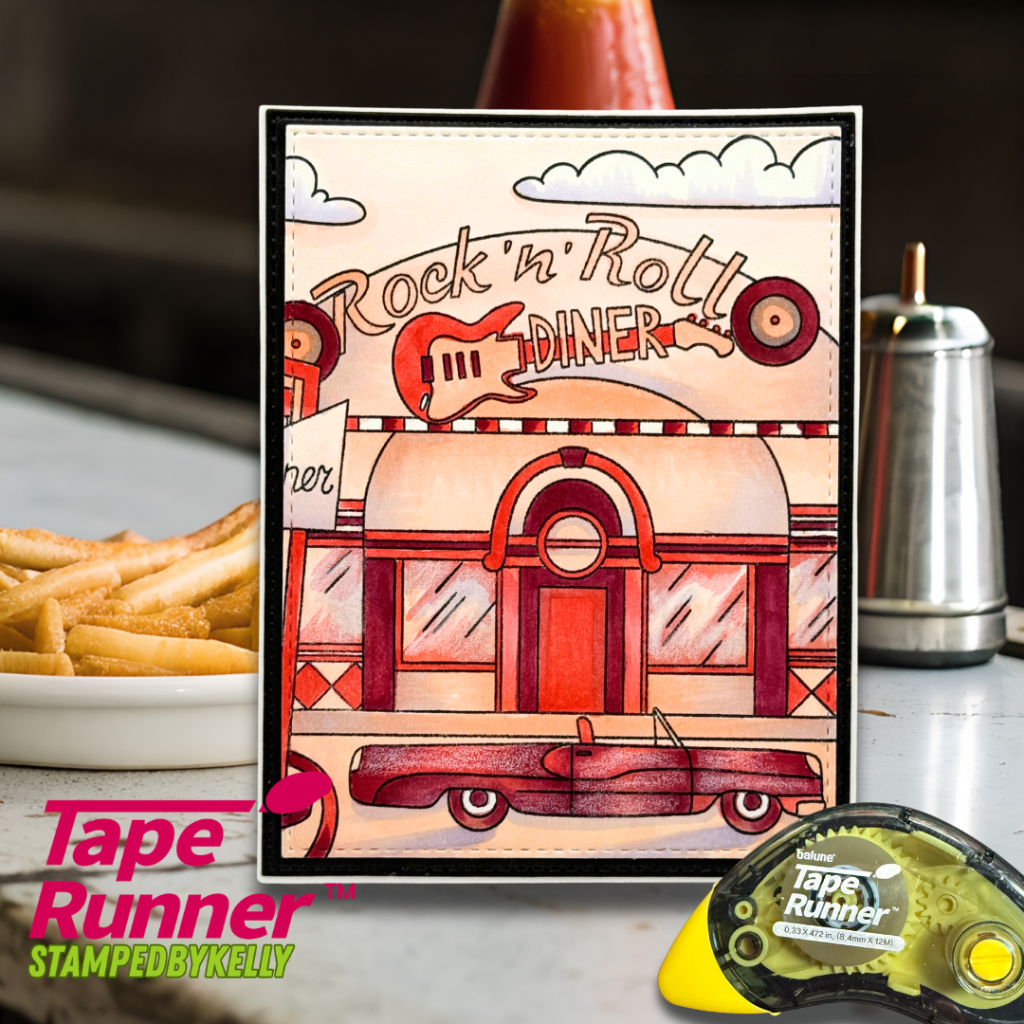
Diner Scene Card
Items Used:
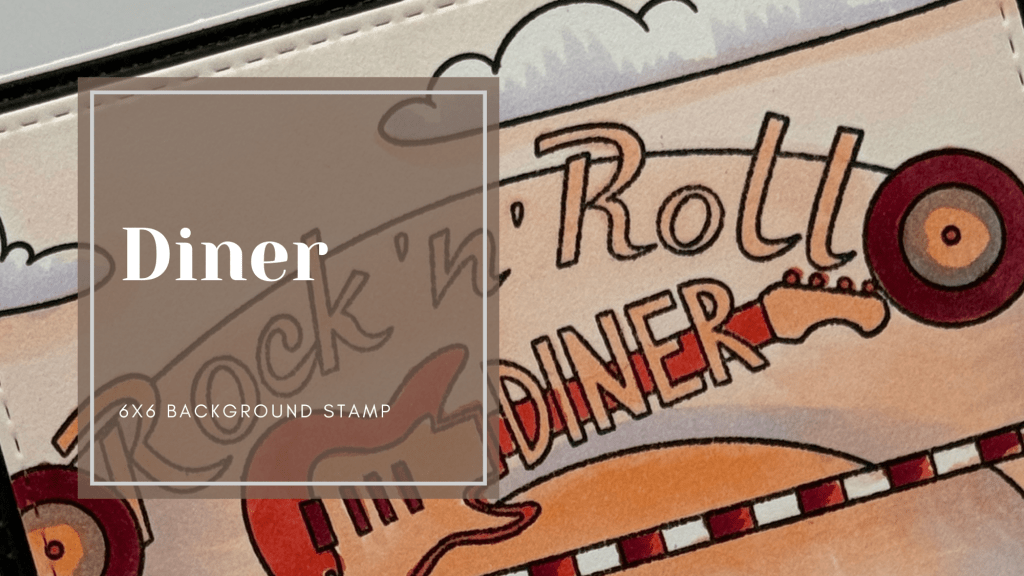
Diner Background Stamp
You’re The One That I Want Stamps & Dies
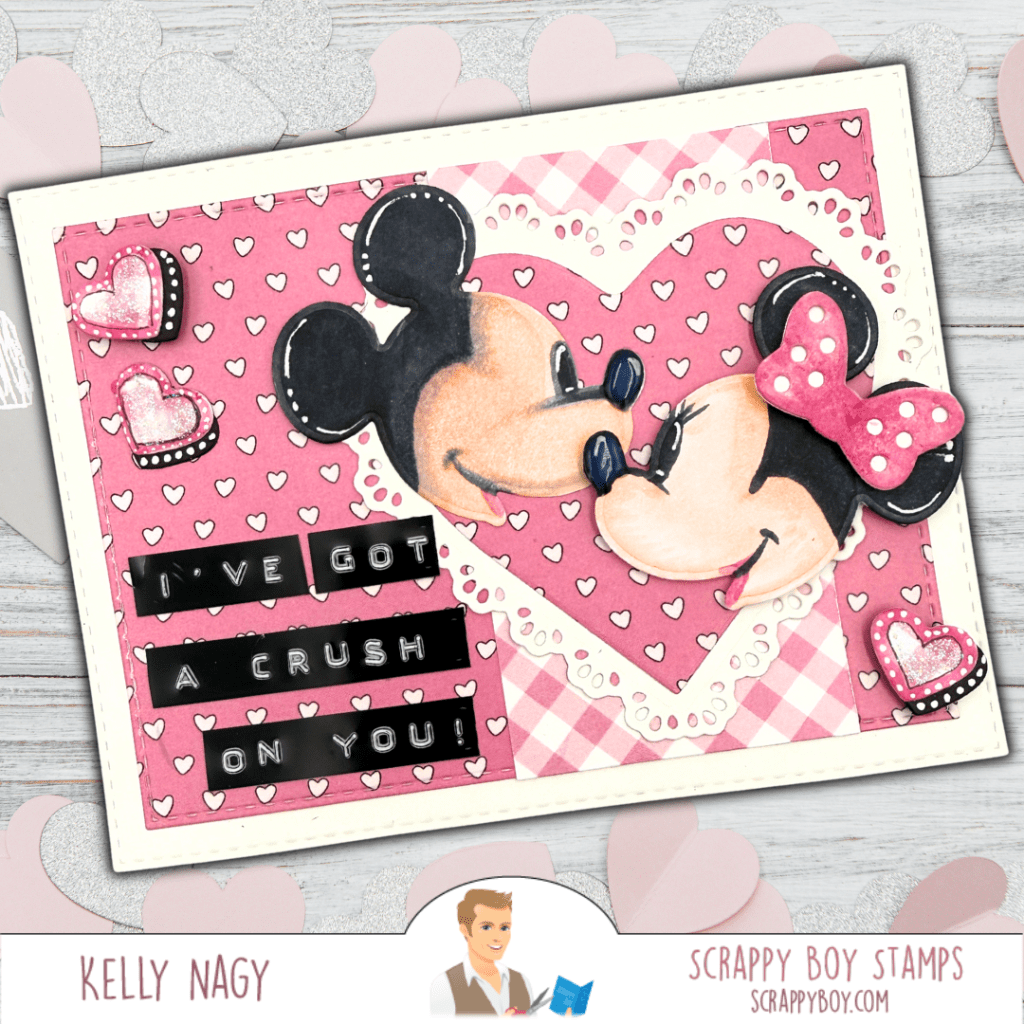
I’ve Got A Crush On You Card
Items Used:
Valentine Hearts and Chocolates Nested Dies
Mouse Shaker Die
Birthday Pinup Girls Paper Pack
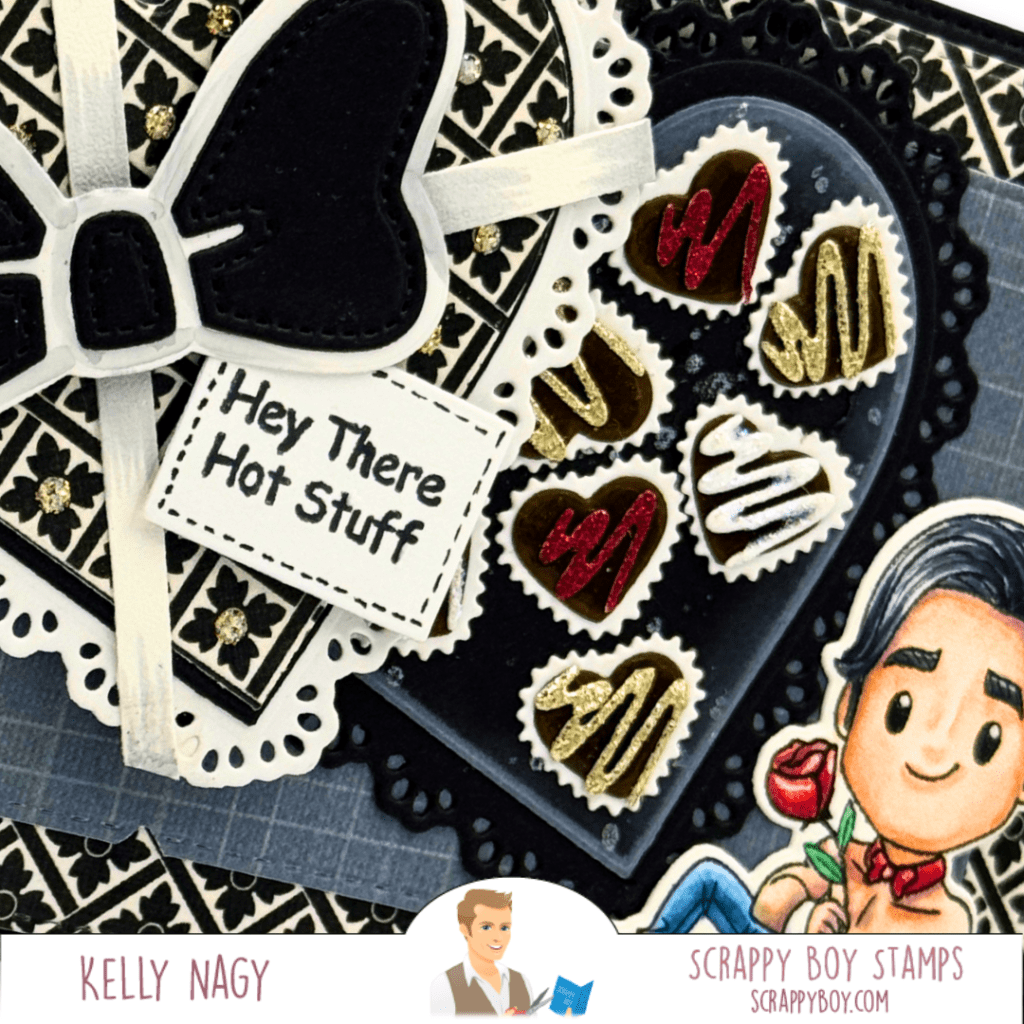
Here are more options using the Hearts & Chocolates nesting dies.
Mouse Pretzel / Dessert with Heart Sprinkles Card
Items Used:
Mouse Pretzel Die
Mouse Head and Heart A2 Card Panel Die (for the heart negative pieces. You can also use the shaker panel dies with hearts to cut out in white and color up to match whatever pallet you chose!
Here are some other options for this fun and versatile die!
💖 Don’t forget to shop January’s release and previous collections at http://www.scrappyboy.com (http://www.scrappyboy.com)! Plus, subscribe to their newsletter to stay updated—you won’t want to miss next month’s release! Sneak Peeks coming at the end of this week, with NEW RELEASE on February 20th!
For more inspiration, please consider follow me on social media @StampedbyKelly and @CraftingChaosCreativity. Your support means the world to me!
I’m thrilled to share some wonderful inspiration featuring the latest releases from Scrappy Boy Stamps last month. Our February Release is coming on the 20th!!!
Get ready to unleash your creativity with three stunning cards that showcase the beautiful new collections!
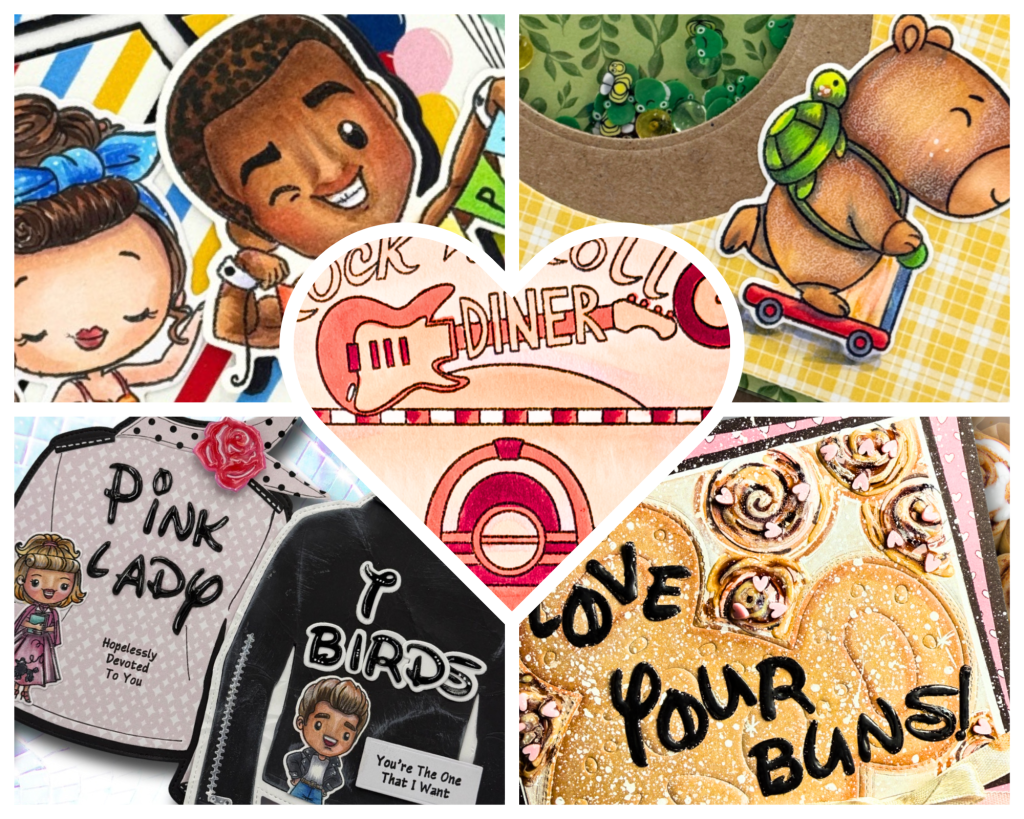
Diner Background Stamp 🍔 First up, we have the Diner Background Stamp. This fun and nostalgic stamp adds a playful touch to any project.
For my first card, I took on the February Color Challenge, utilizing a monochromatic color palette to create a striking design. Using varying shades of red, I crafted a vibrant backdrop that perfectly embodies the diner theme. Pairing this backdrop with complementary colors makes the card truly pop and highlights the versatility of the Diner stamp!
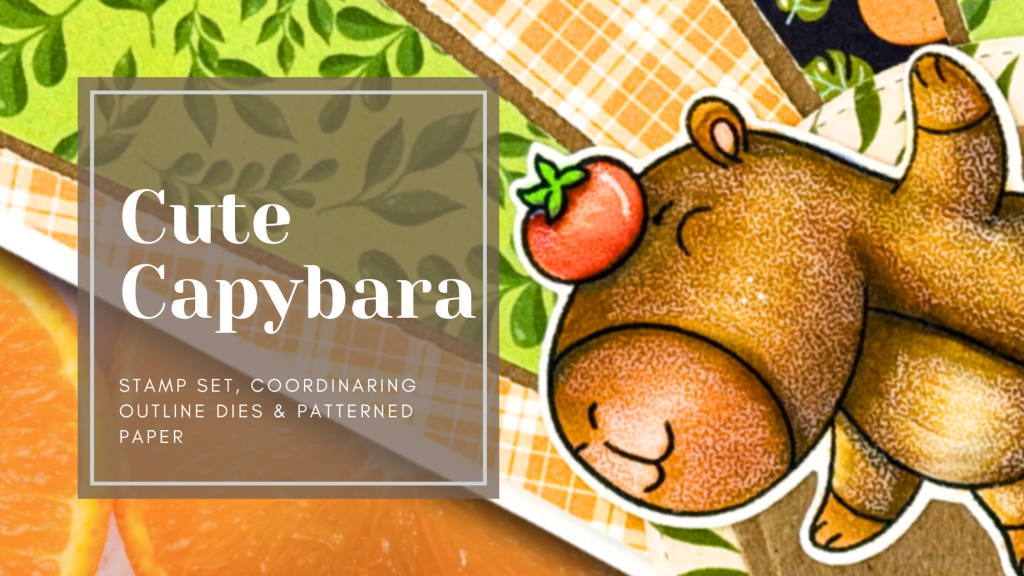
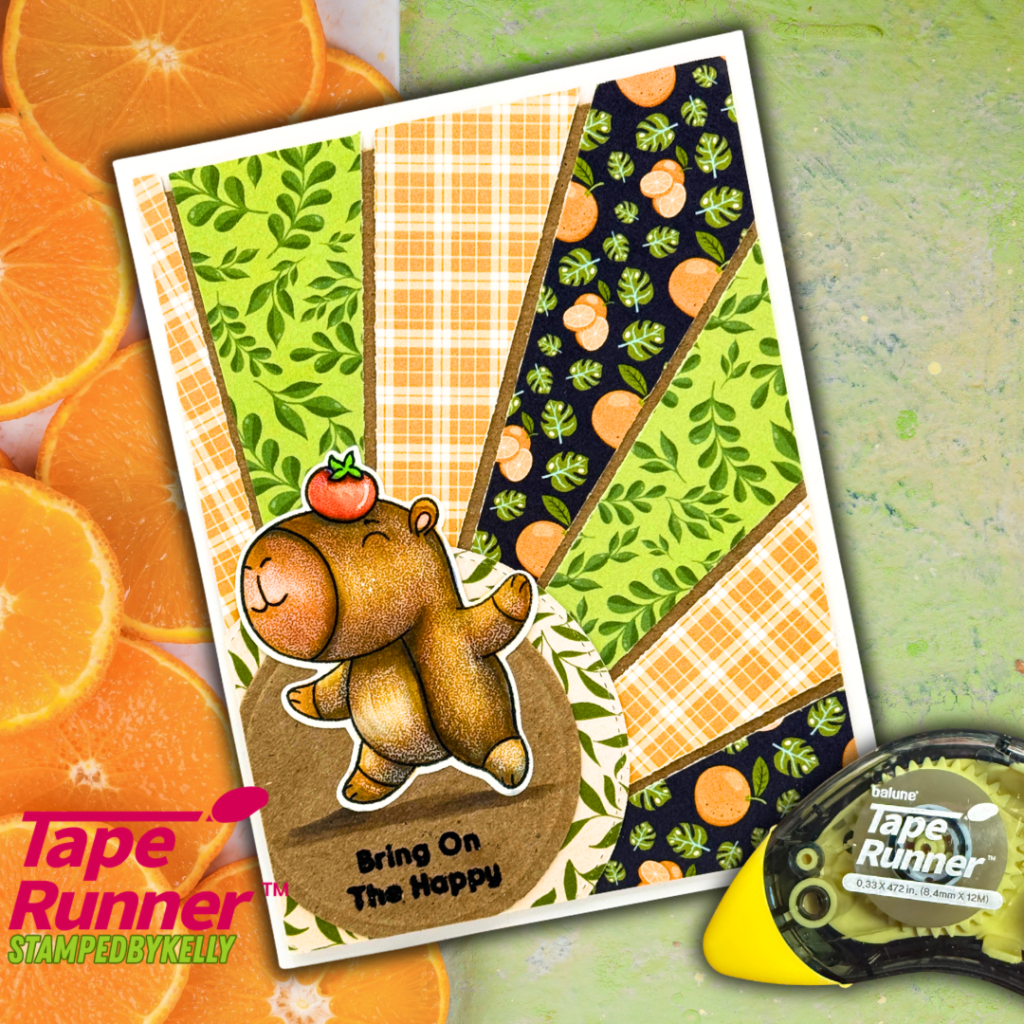
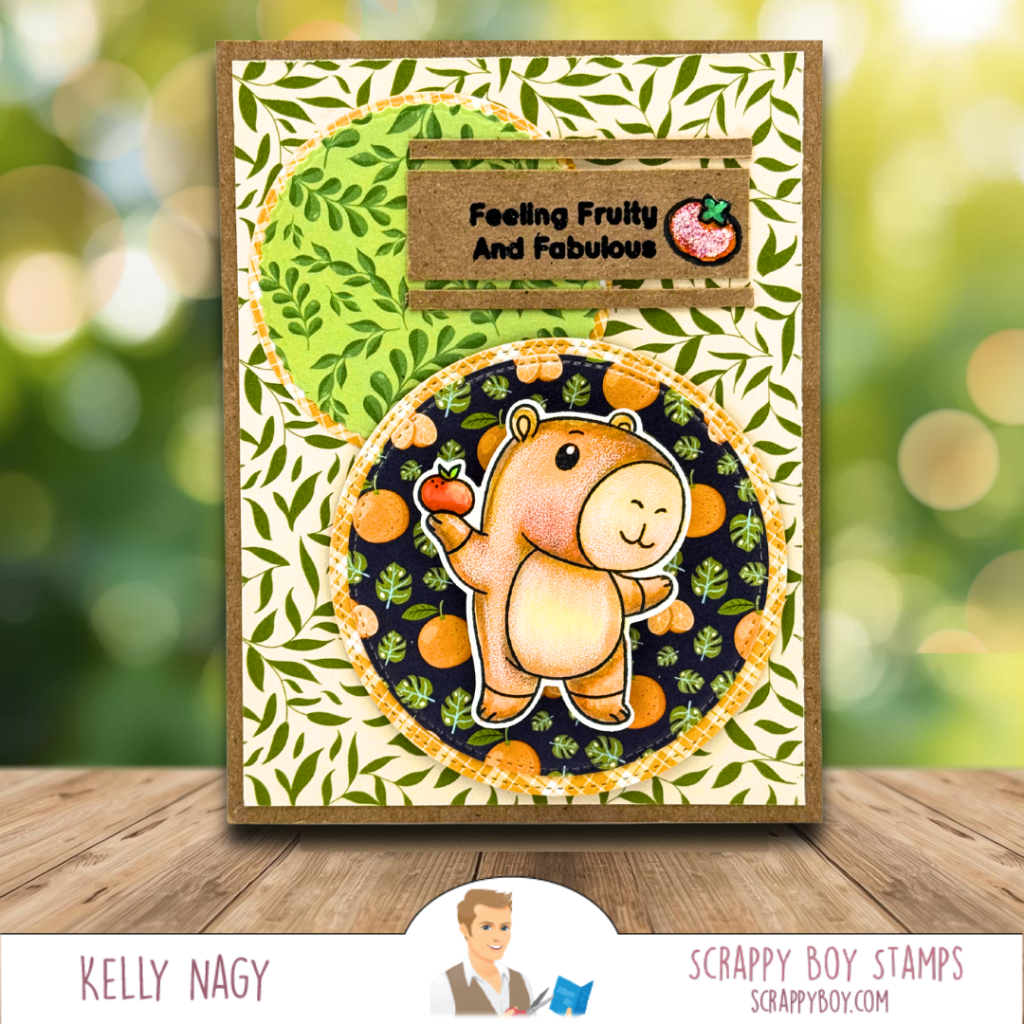
Cute Capybara Collection 🦙 Next, let’s talk about the Cute Capybara Collection, which includes adorable stamps,outline dies, and coordinated patterned paper.
I crafted a cheerful card featuring these lovely capybaras enjoying a sunny day. With whimsical patterns and soft color schemes, this collection truly brings joy to your crafting!
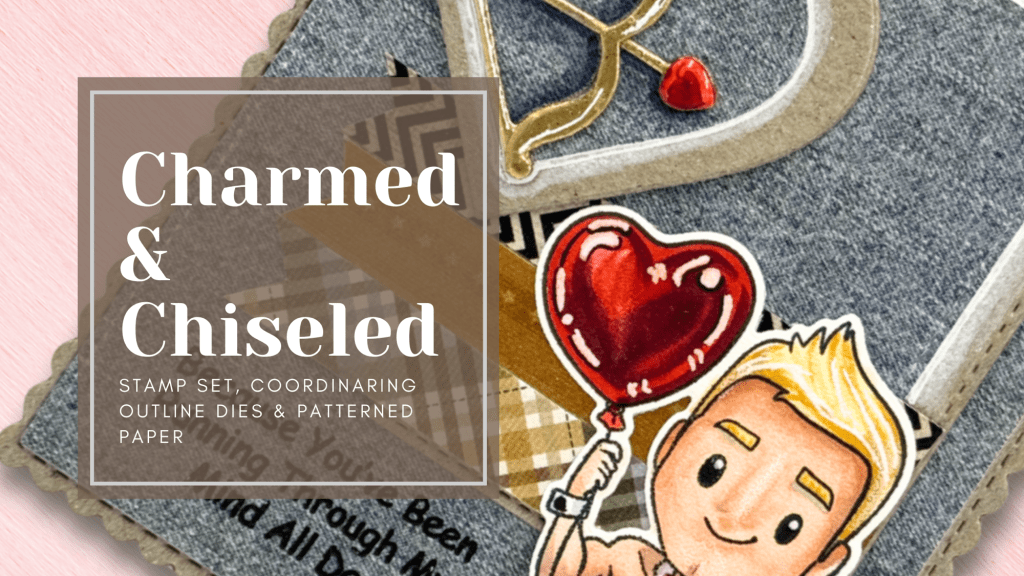
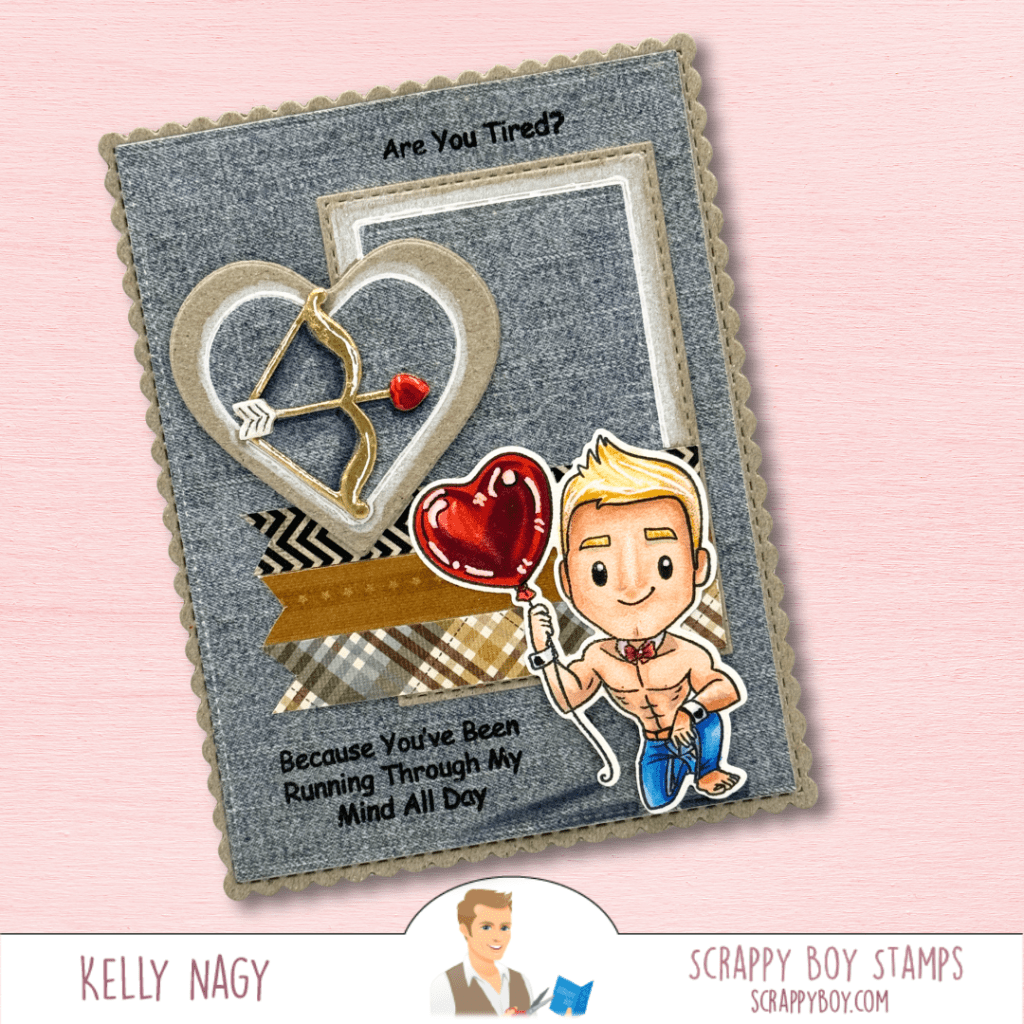
Charmed & Chiseled Collection 💖 Lastly, I couldn’t resist using the Charmed & Chiseled Collection. With its stunning stamps and outline dies, this collection is a must-have!
I accented my card with the Valentine Hearts & Chocolates Nesting Dies for that perfect romantic touch. It’s great for crafting heartfelt cards this Valentine’s season!
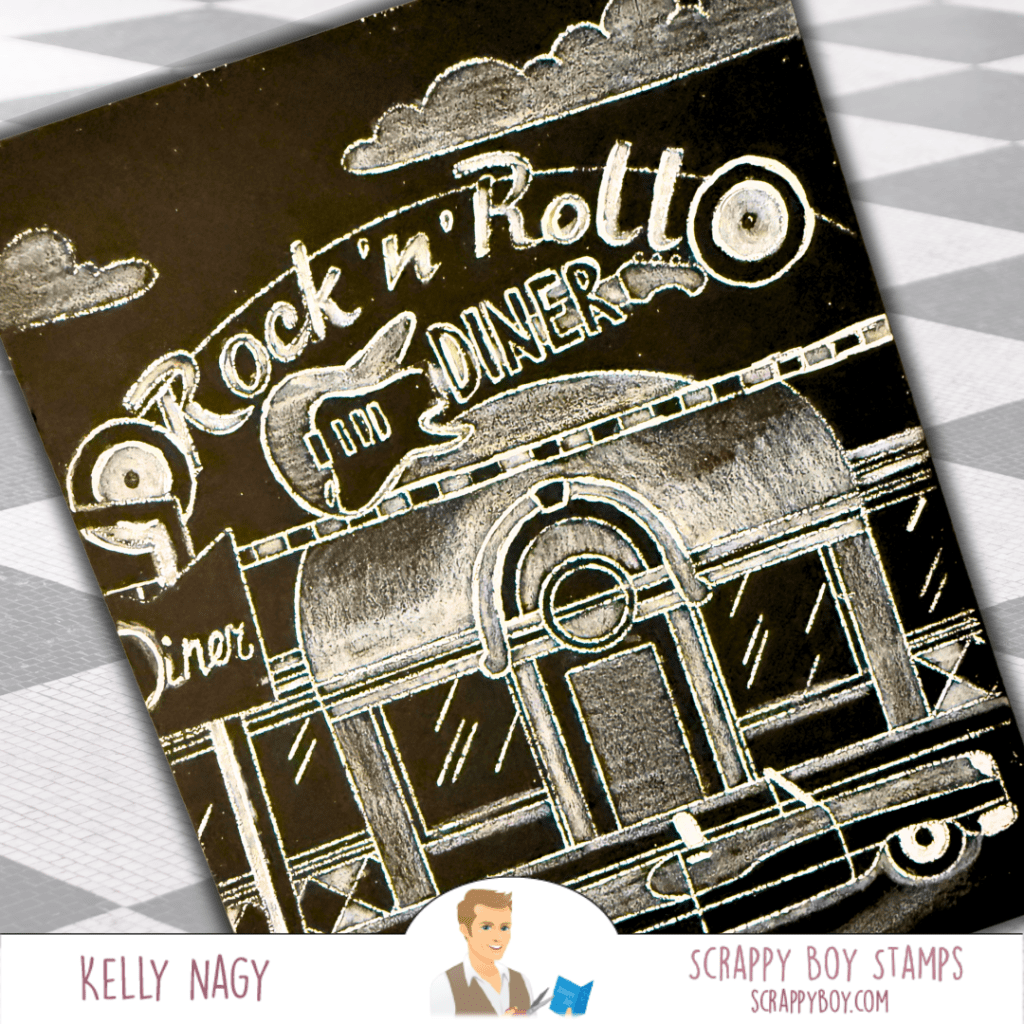
Sneak Peek for Next Month! 🌟 I’m excited to invite you back next month, where I’ll be taking the Diner Background Stamp and incorporating it into a layout that is also monochromatic. It will be stamped with white ink, embossed on black paper, and then colored with a variety of white pencils to create a beautiful chalkboard effect. You won’t want to miss it!
Here is a throwback from last week with inspiration using same products, only in a totally different way!!! Happy Crafting!!
I hope these ideas inspire you to get creative with the Scrappy Boy Stamps January release! Explore these products to make your own unique creations. Happy stamping! 🌟
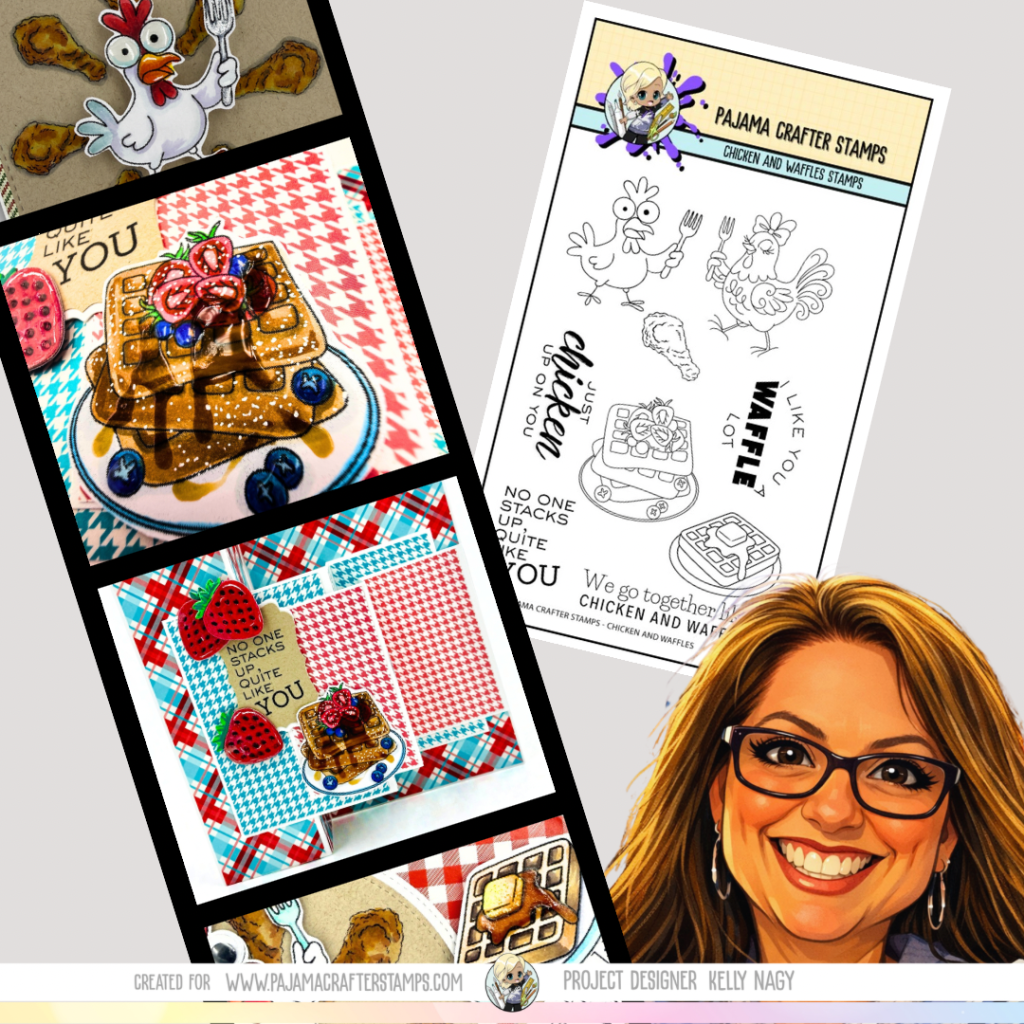
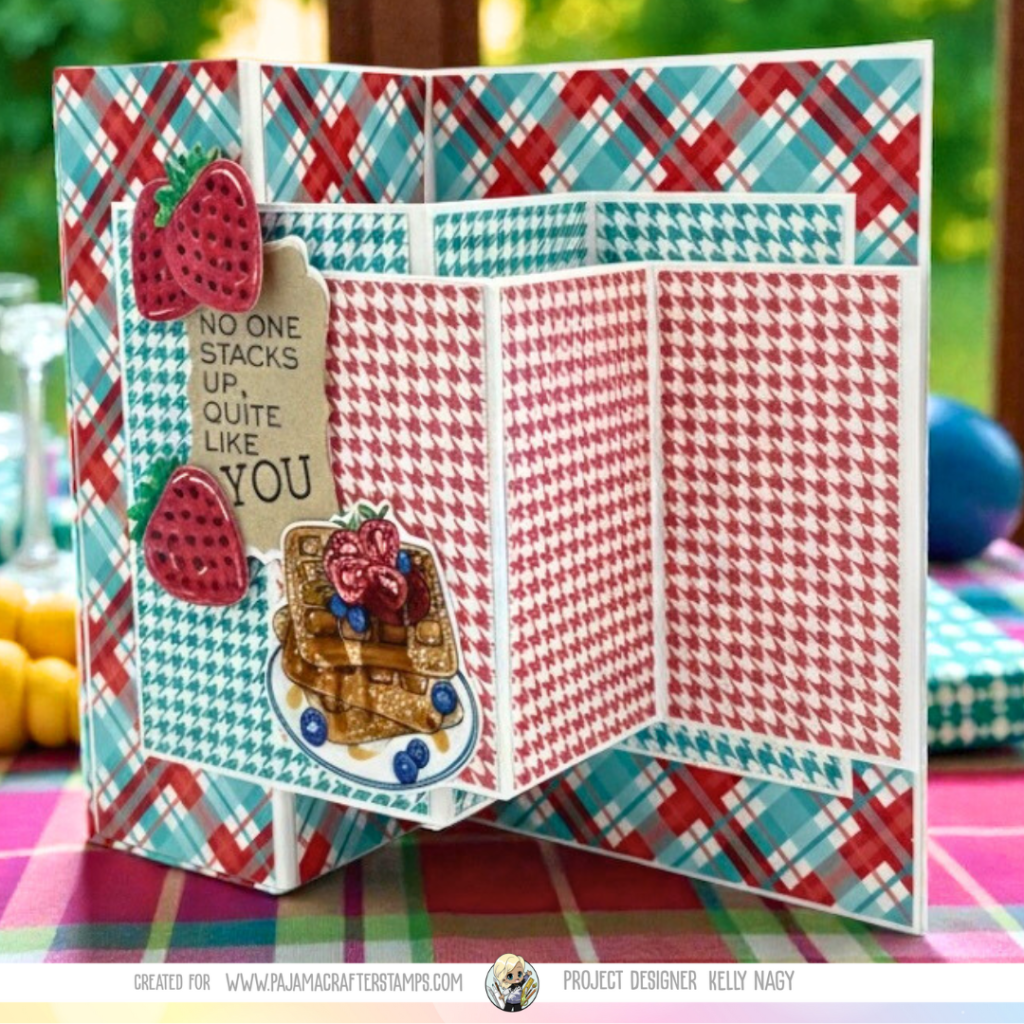
Hey friends! Today, I’m excited to share not just one, but TWO fun projects that celebrate creativity and gastronomy! 🎨💕
First up is my card project featuring the adorable Chicken and Waffles Stamps Set that I designed for Pajama Crafters Stamps. This set is perfect for sending love this Valentine’s Day or acknowledging those special friendships that mean the world to you.
Card Project Highlights:
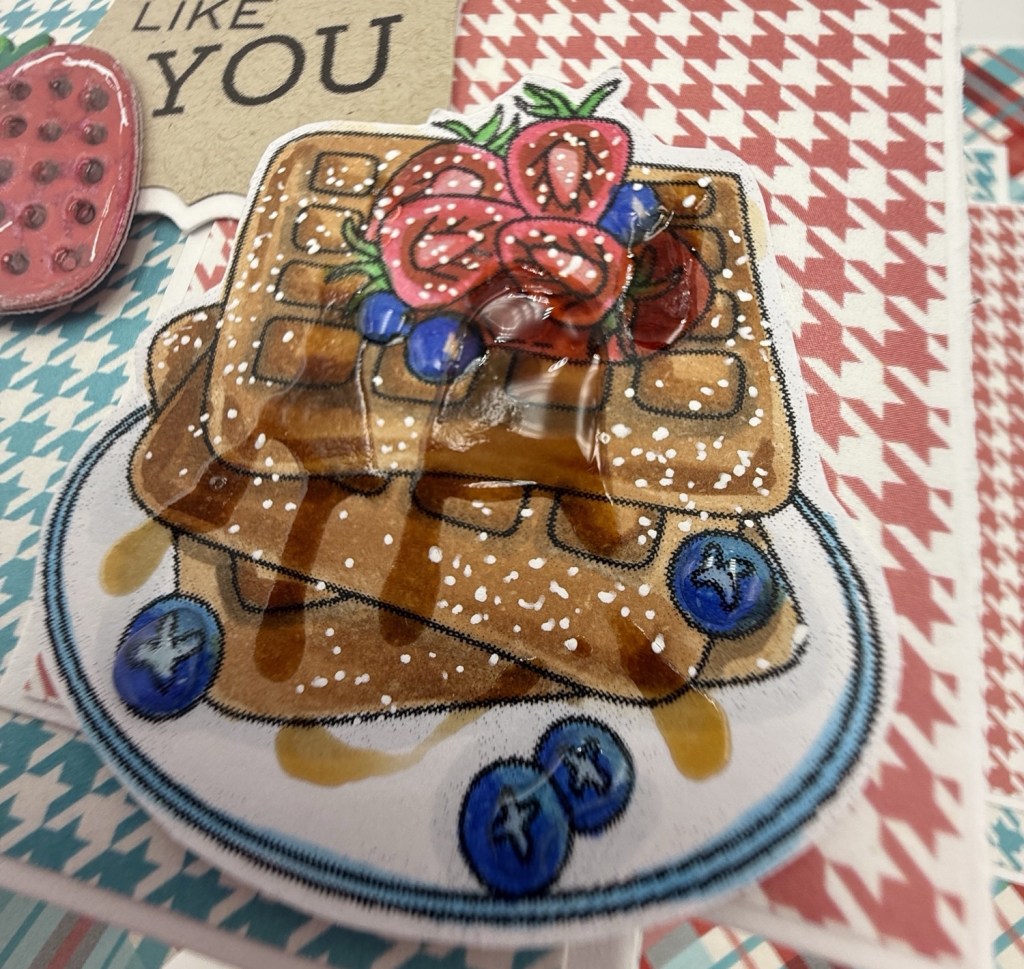
Stack of Waffles: Made with layers of color and topped with juicy fruit! I added a dreamy powdered sugar effect with my white gel pen.
Maple Syrup Glaze: To mimic that sweet syrupy drizzle, I used colored crystal glaze. The details truly elevate the card!
Featuring PCS Chicken & Waffles Set
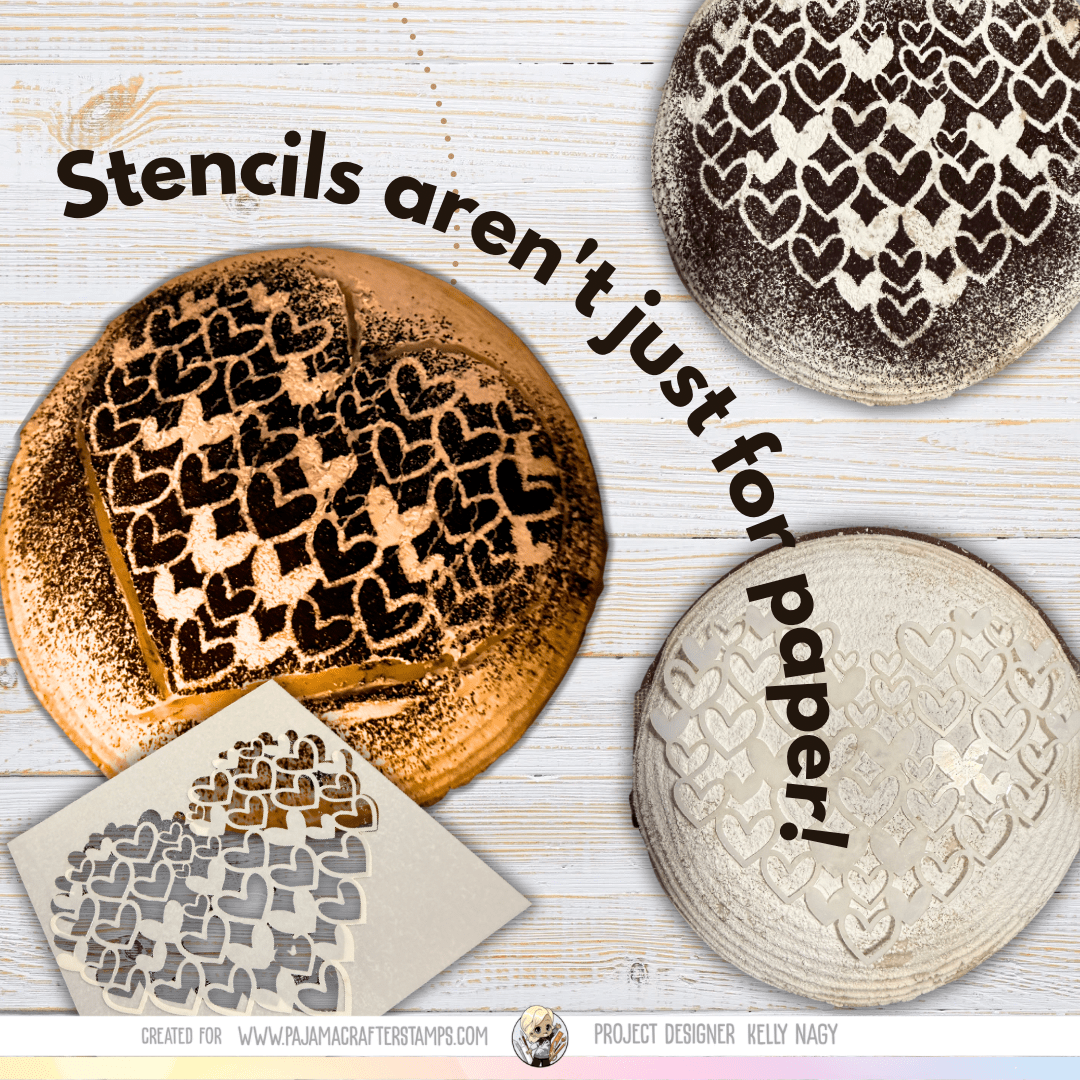
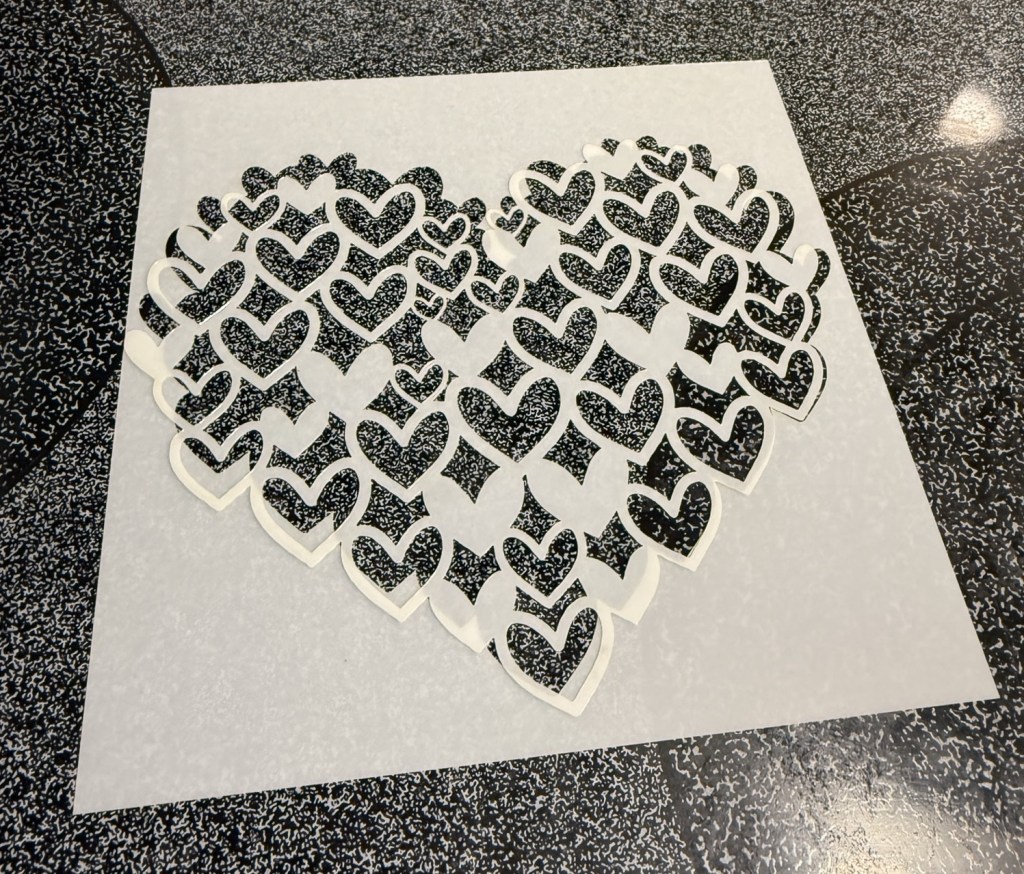
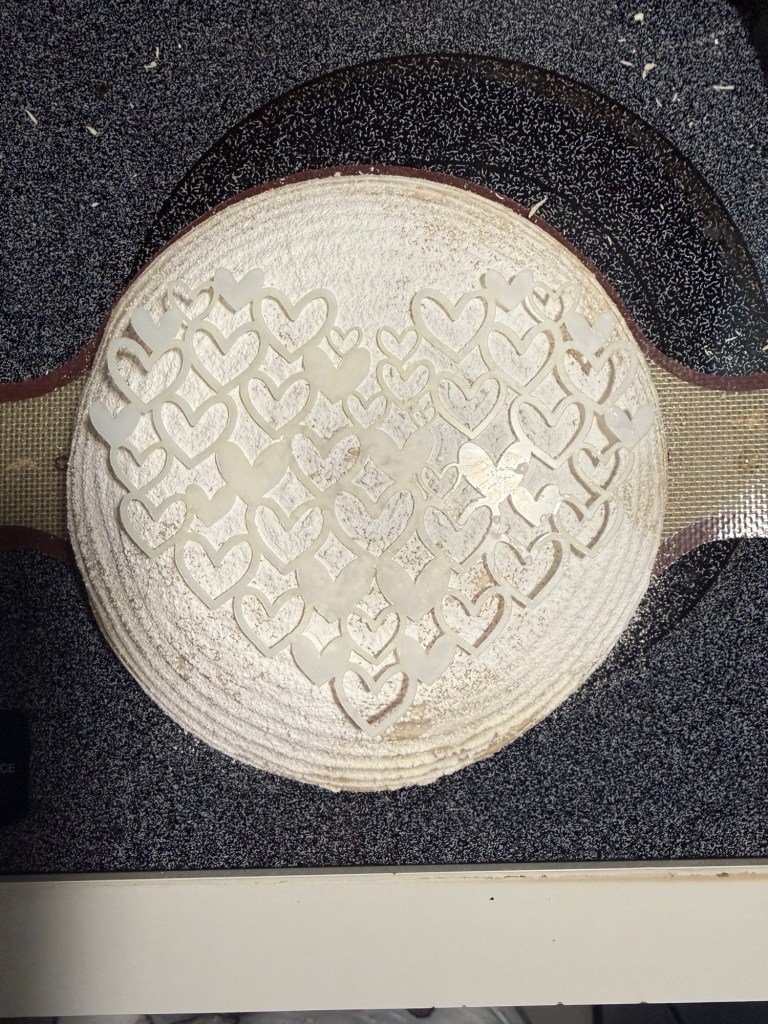
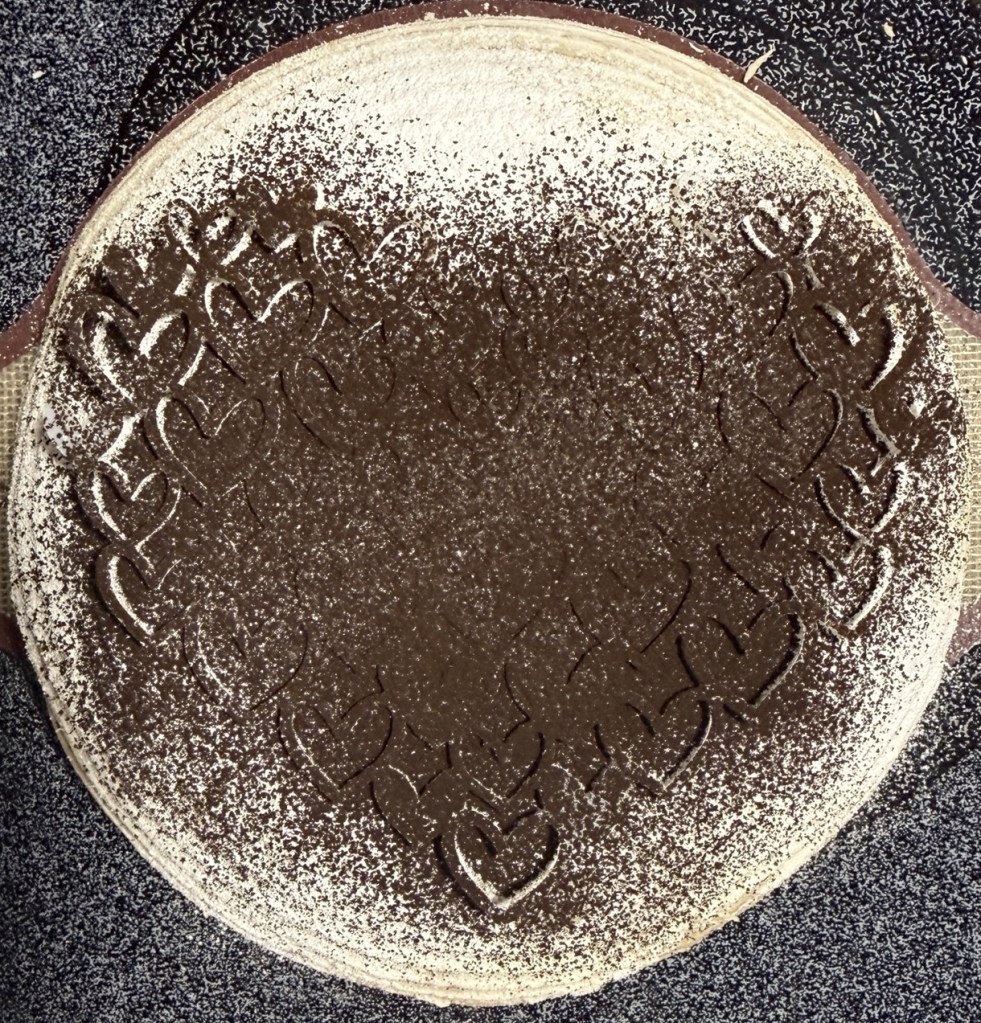
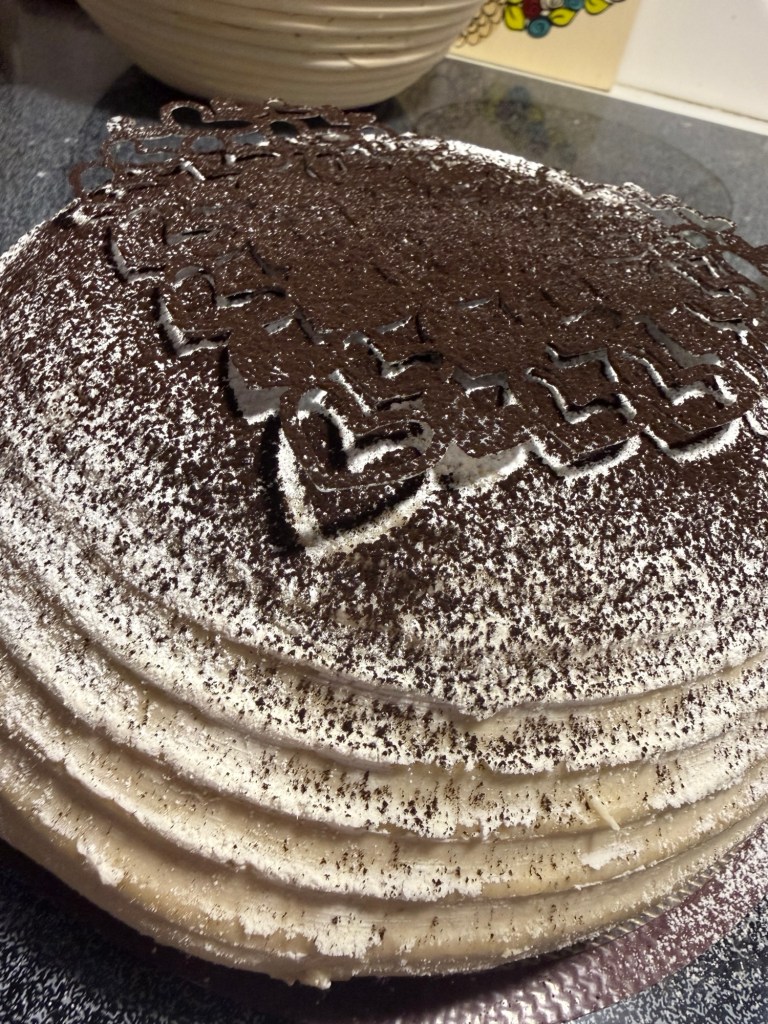
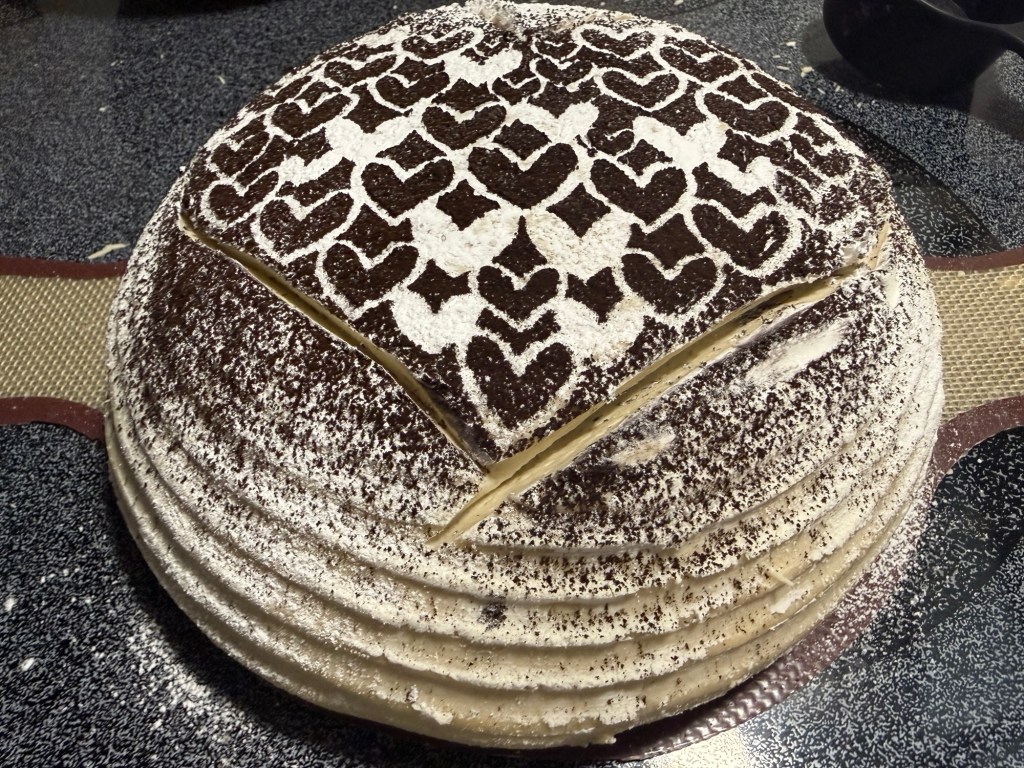
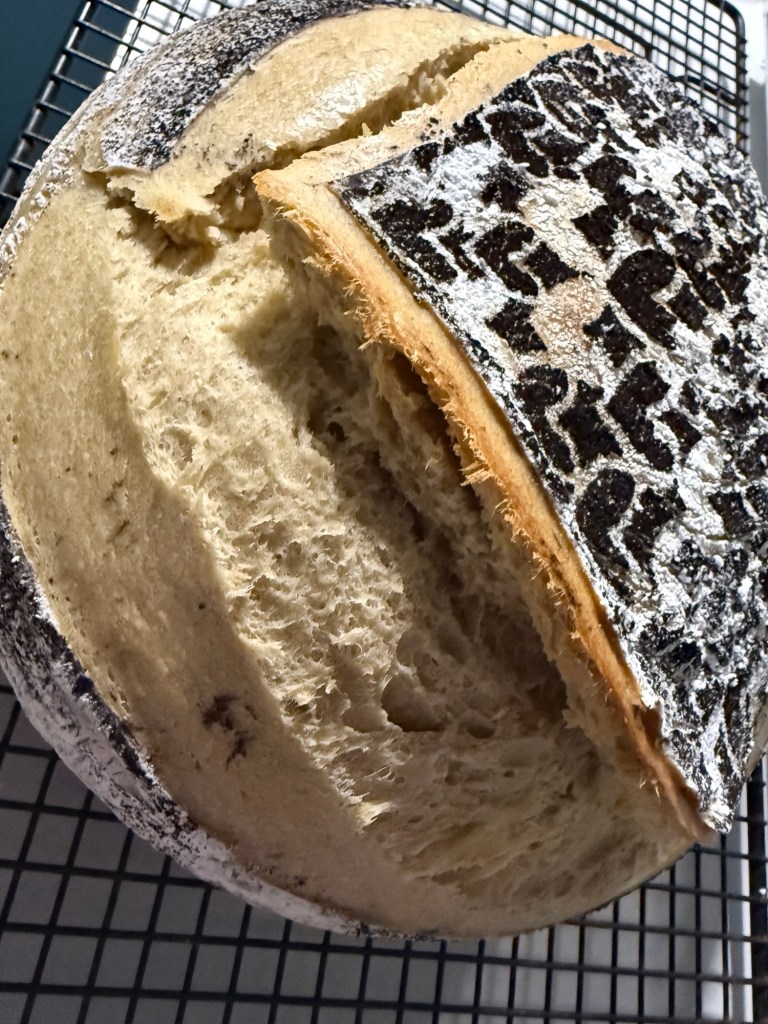
But that’s not all! I’ve also got a delicious baking project to share, featuring the In My Heart of Heart Stencil! This stencil proves that crafting supplies can be multifunctional! Here’s a fun twist: add heart shapes to your sourdough bread!
Here’s How:
Start with your favorite sourdough recipe.
Once your dough is mixed, slightly dampen it so the stencil can stick without causing a mess.
Position the stencil, and sprinkle black cocoa and white rice flour over it for a beautiful heart pattern.
Carefully lift off the stencil to reveal your heart designs!
Bake as usual and enjoy the compliments from family and friends!
I’m thrilled to see more creative uses of stencils in the kitchen! What are your favorite baking tips? Share your creations with me in the comments below!
Use sharp blade to make venting cutsLook at those soft pockets of pillowy bread😍😍😍
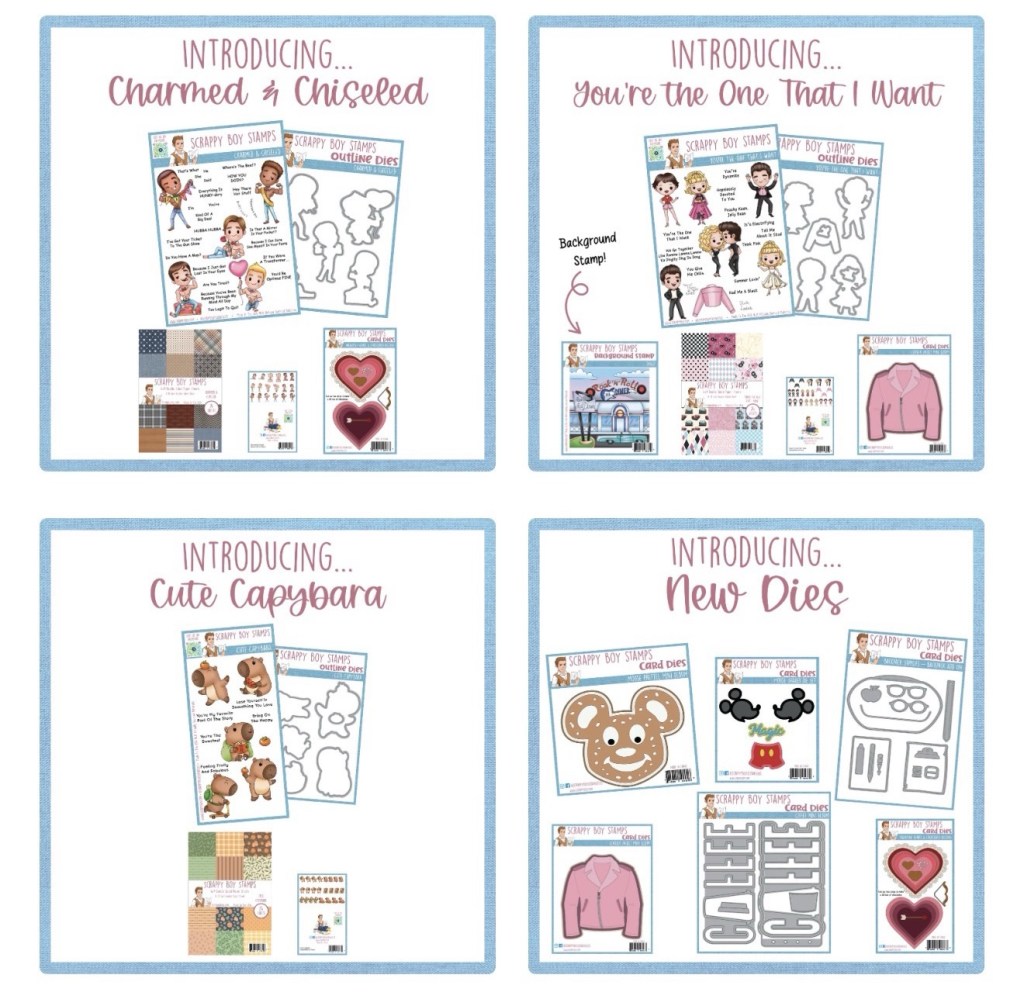
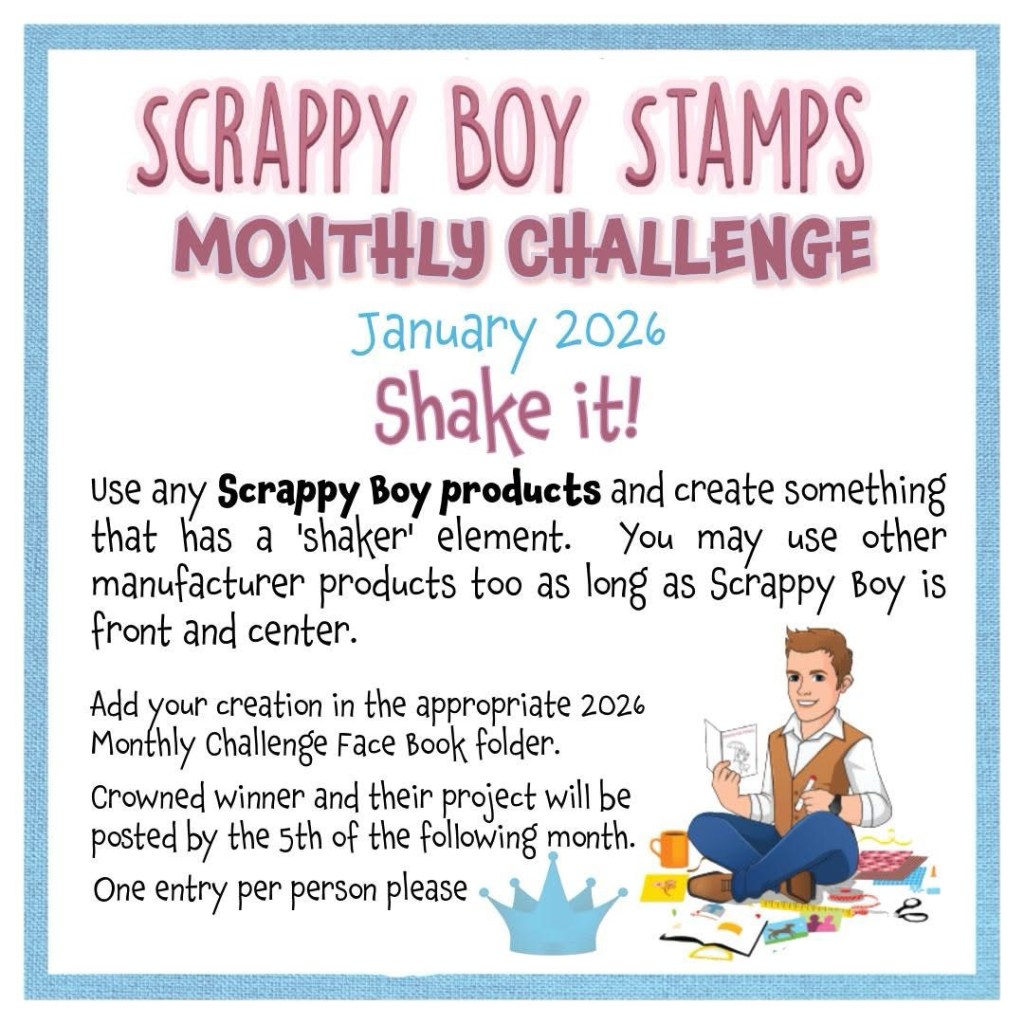
Featuring projects from SCRAPPY BOY STAMPS January 2026 Release.
I’m thrilled to share some fabulous projects I created using Scrappy Boy Stamps’ January 2026 release! Here’s a quick look at the amazing products I used:
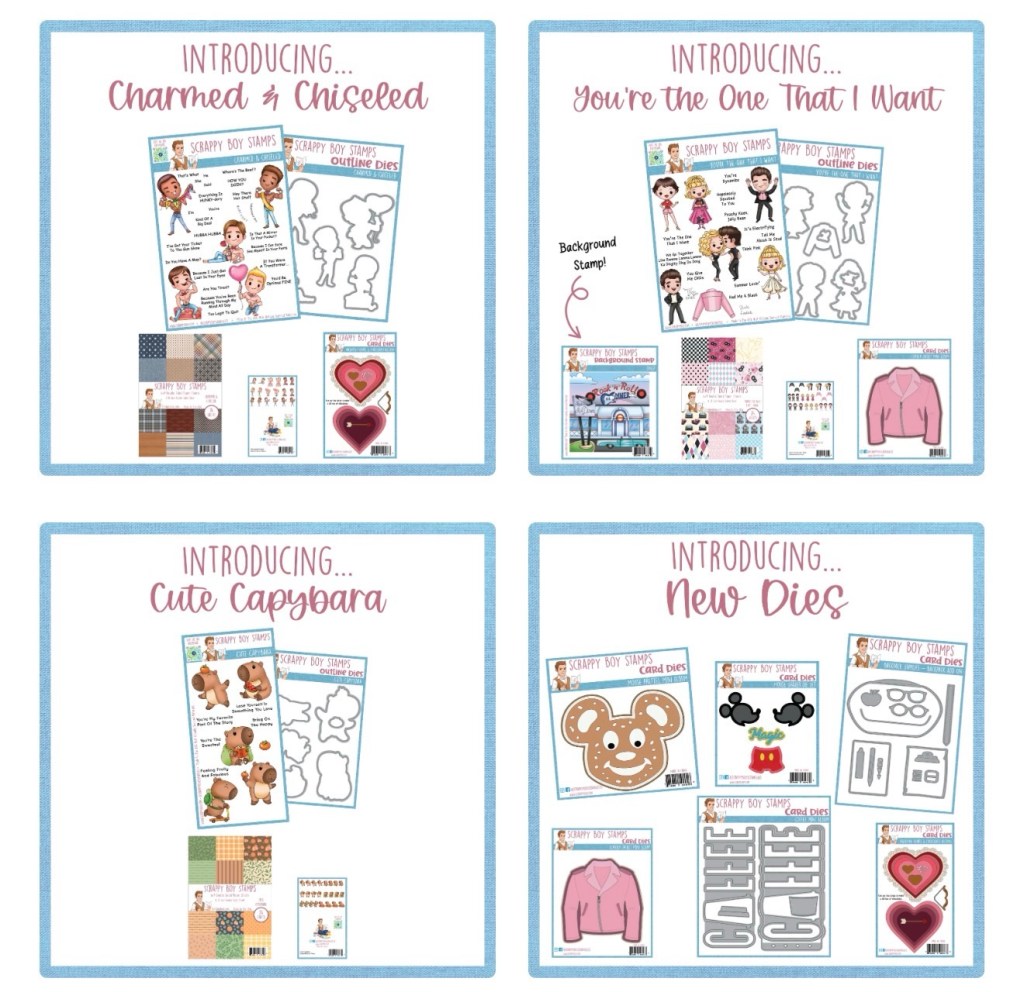
🌹 Charmed & Chiseled Stamps & Outline Dies as well as the new Valentine Heart and Nested Chocolate Heart Dies!! Perfect for adding dimension to your cards!
🌹 Valentine Heart & Nested Chocolate Heart These are wonderful for all your love-themed projects!
🌹 4 x 9 Coordinating Paper Pack Great patterns that complement your designs beautifully!
🍊 Cute Capybara Stamp + Dies Adorable capybaras that are sure to charm everyone!
🍊 Cute Capybara Paper Pack Fun and whimsical designs for your creations!
🍊 A2 Stitched Rectangle Nesting Dies Ideal for layering and finishing touches!
🍊 Magnifying Glass Die (Circle) Adds a playful element to your projects!
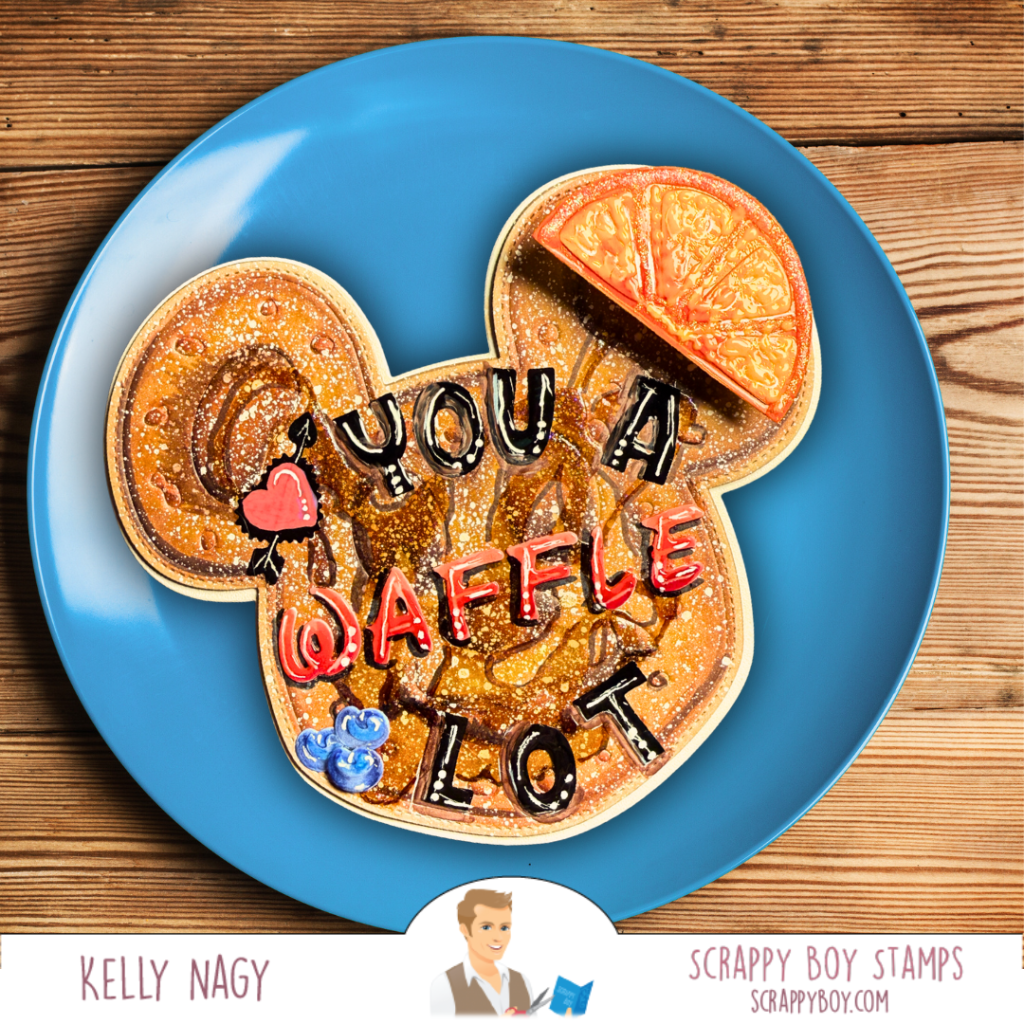
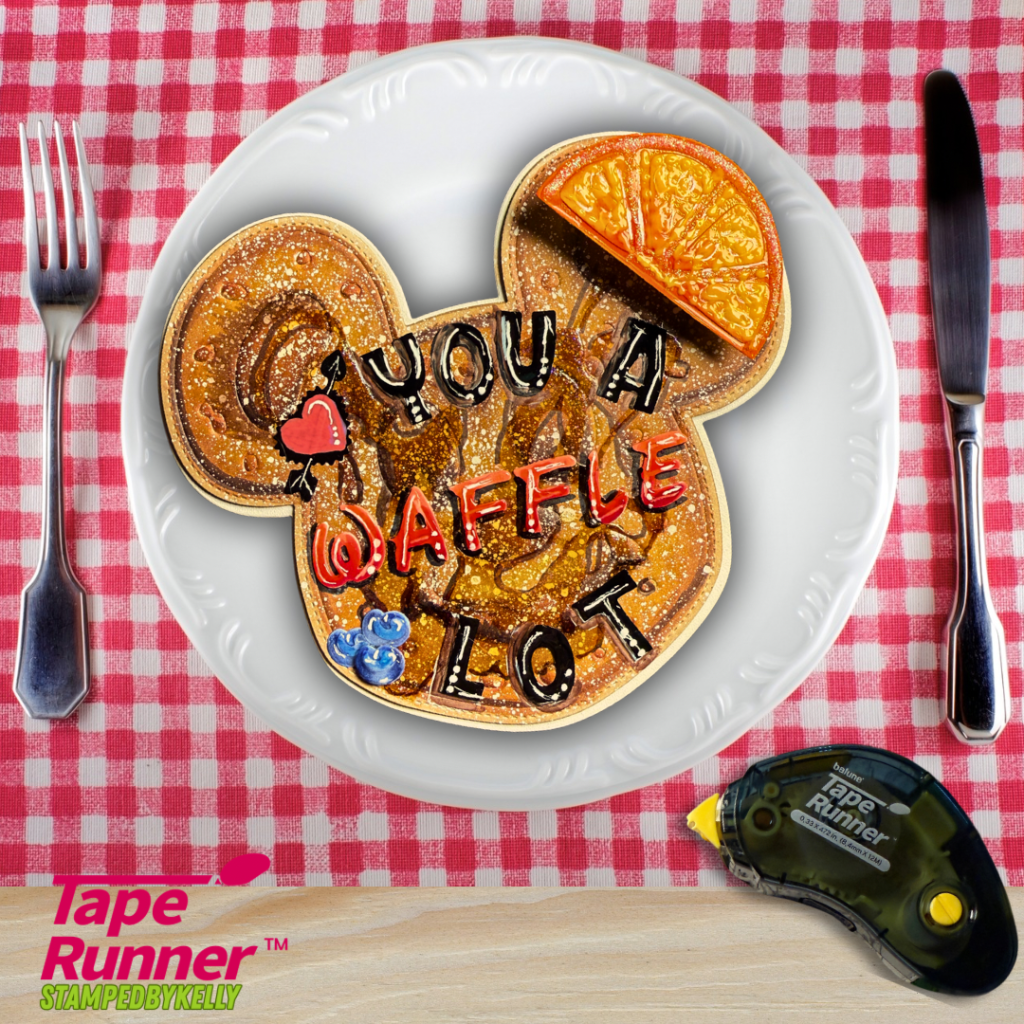
🥨 Mouse Pretzel Mini Album Die Create fun mini albums in the shape of pretzels! But don’t limit your imagination to just pretzels! I made a waffle!!!!!
🥨 Scrappy Boy Alphabet Die Set Personalize your cards and projects with style!
🥨 Believe in Magic Alphabet Die Set Perfect for magical-themed creations!
🐭 Mouse Shaker Die Set Add some fun with these shaker elements!
🐭 Valentine Heart & Nesting Chocolate Heart Dies Great for enhancing your Valentine’s projects!
🌟 Follow me on Social Media @stampedbykelly and follow my crafting Facebook Page, Crafting Chaos & Creativity!
I’d love to hear your thoughts! What’s your preferred video length for card-making tutorials—long or short? Let me know in the comments!
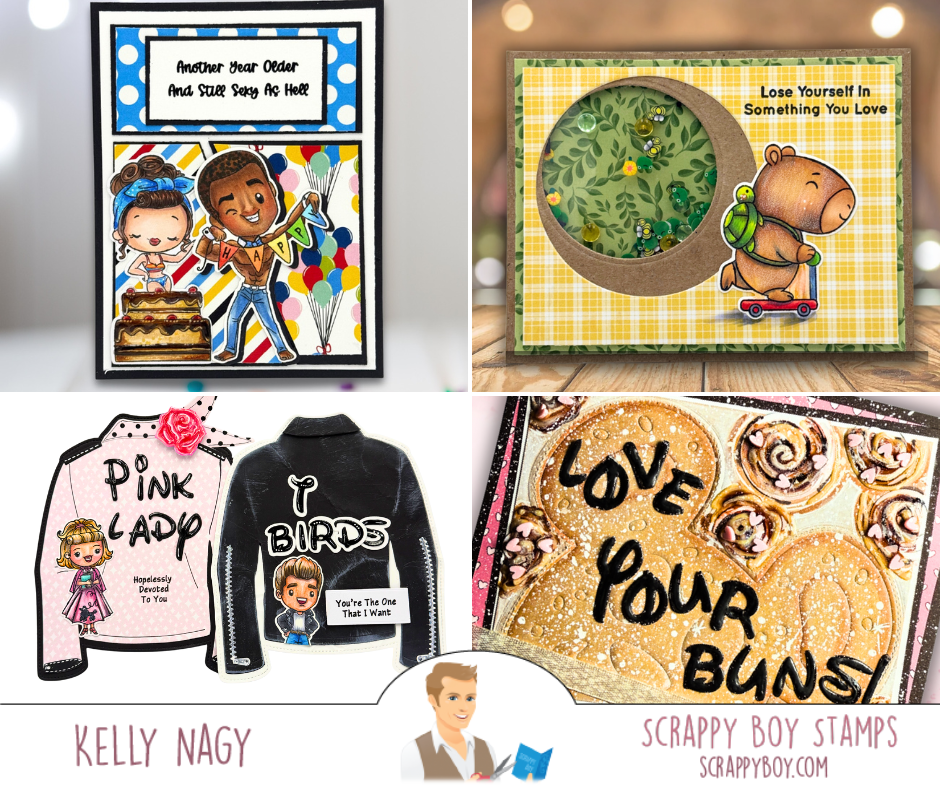
Card projects featuring January 2026 Release for Scrappy Boy Stamps – Week 1
Hey crafty friends! 🎨✨ I’m excited to share four new card projects I created using the unique and whimsical products from the January 2026 release over at Scrappy Boy Stamps!
Check out these fun and interactive cards that showcase creativity and charm. Don’t forget, there are opportunities and challenges every month, including a shaker card challenge for January in the Scrappy Boy Inspiration Facebook group!
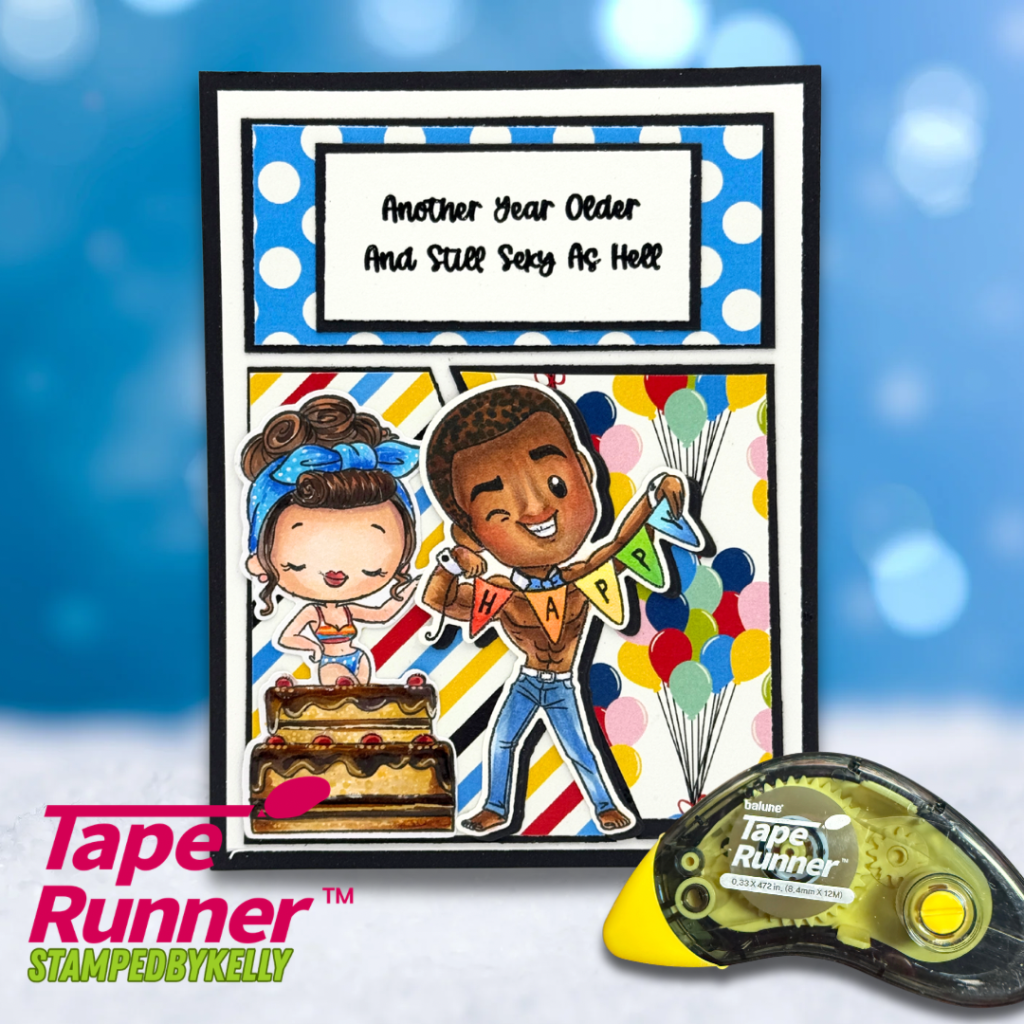
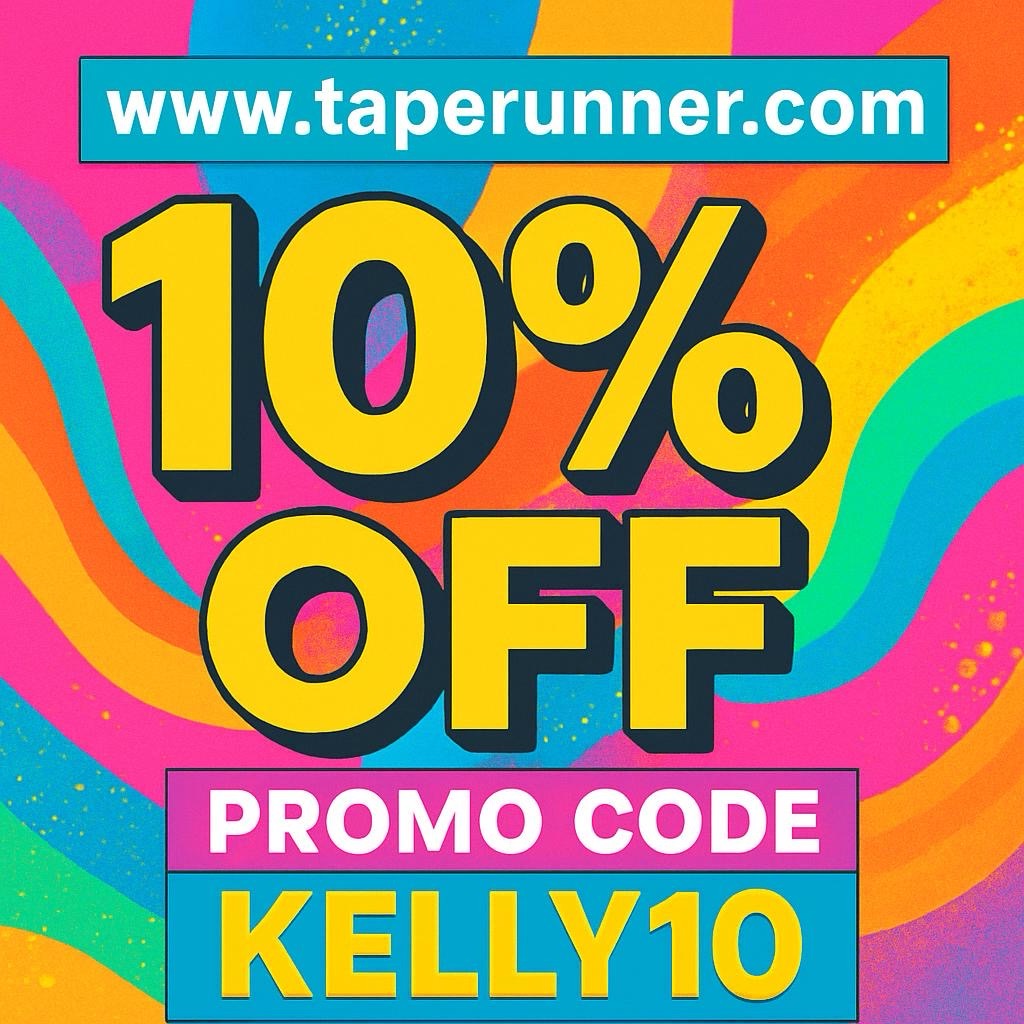
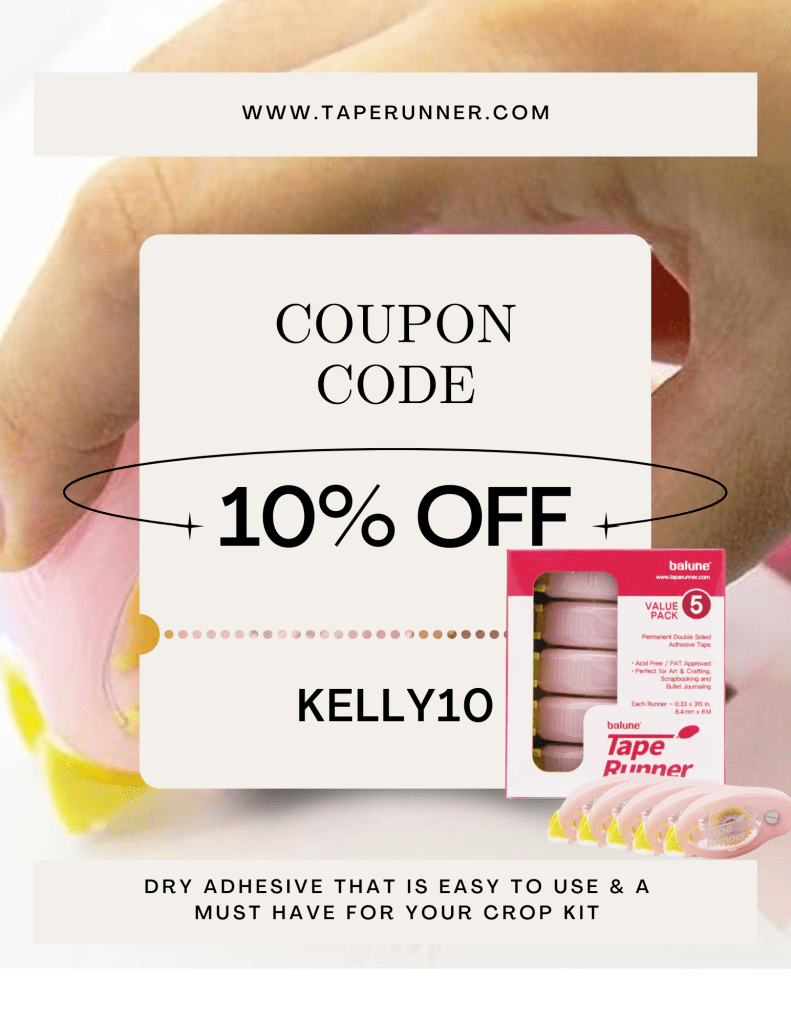
Before diving into the individual projects, I wanted to share my go-to for assembling cards: the dry adhesive from Tape Runner! 🙌 This adhesive makes it super easy and mess-free to put my cards together. If you’re interested, you can visit tape runner.com and use my code KELLY10 to get 10% off your cart! 🎉 For your convenience, you can also find their products on Amazon, but please note that the promo code isn’t applicable over there. Happy crafting! ✂️💖
🎂Project 1: Chiseled Charm for Pin-Up Party
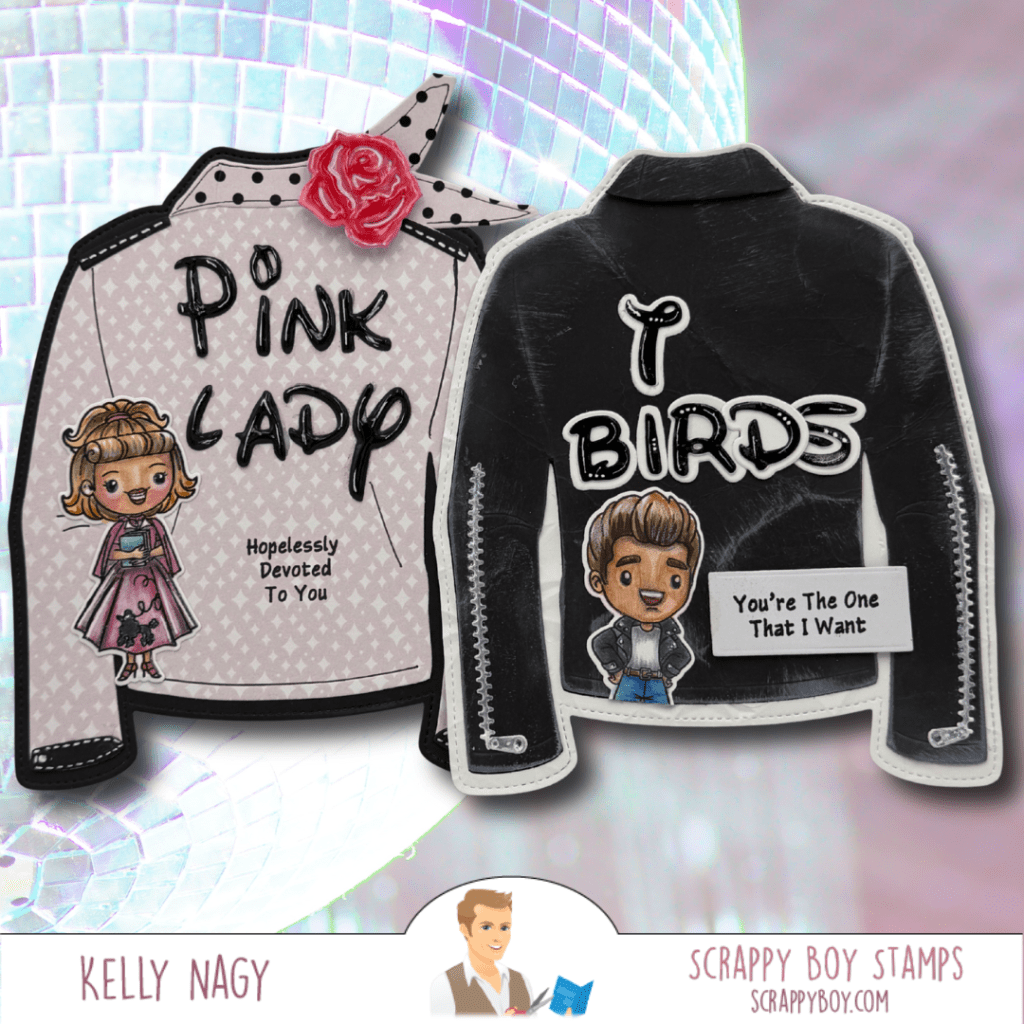
🎂 Project 2: Leather Love Notes from Rydell!
For these 2 shaped cards, project, I’m thrilled to showcase the fun and edgy Leather Jacket Mini Album Die Set paired with the You’re The One That I Want Stamp Set! This combination brings a playful twist to any occasion. I started by using the Leather Jacket die to create a stylish focal point and shaped card base. What a perfect backdrop for any cool character or theme. For the PINK LADY & T-BIRD custom words, I used the Believe in Magic Alphabet Die Set, allowing me to personalize my project in a whimsical way. The overall designs are fun, vibrant, and perfect for celebrating any special moment with a touch of movie FANDOM attitude! Whether you’re making it for a friend or for yourself, this card is sure to impress. Consider using as a fun element on your scrapbook pages!
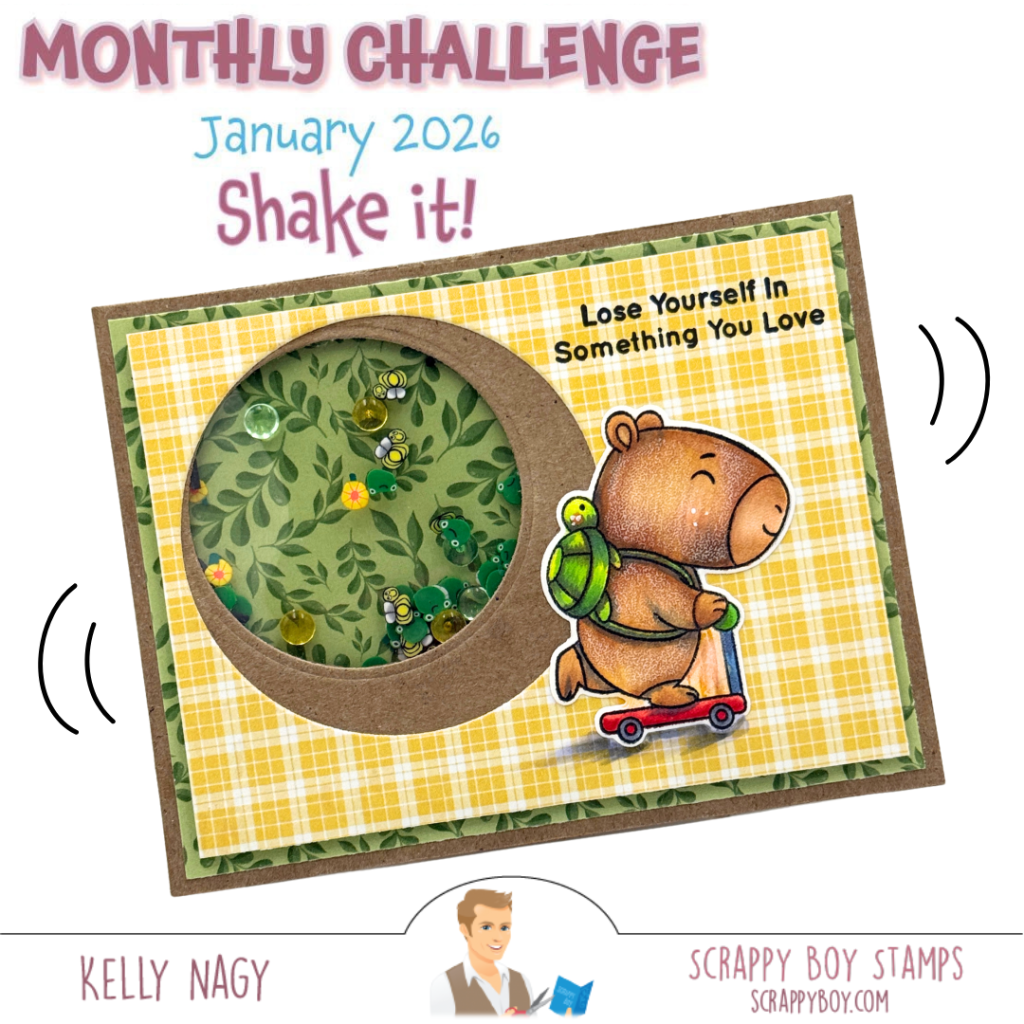
🌈 Project 3: Cute Capybara Bliss Shaker
I couldn’t resist using the adorable Cute Capybara Stamp + Dies along with the coordinating Cute Capybara Paper Pack. This A2 card will capture hearts with its cuteness and charm! Plus, it meets all the elements for the JANUARY 2026 Card Challenge over at Scrappy Boy Inspiration Facebook Group.
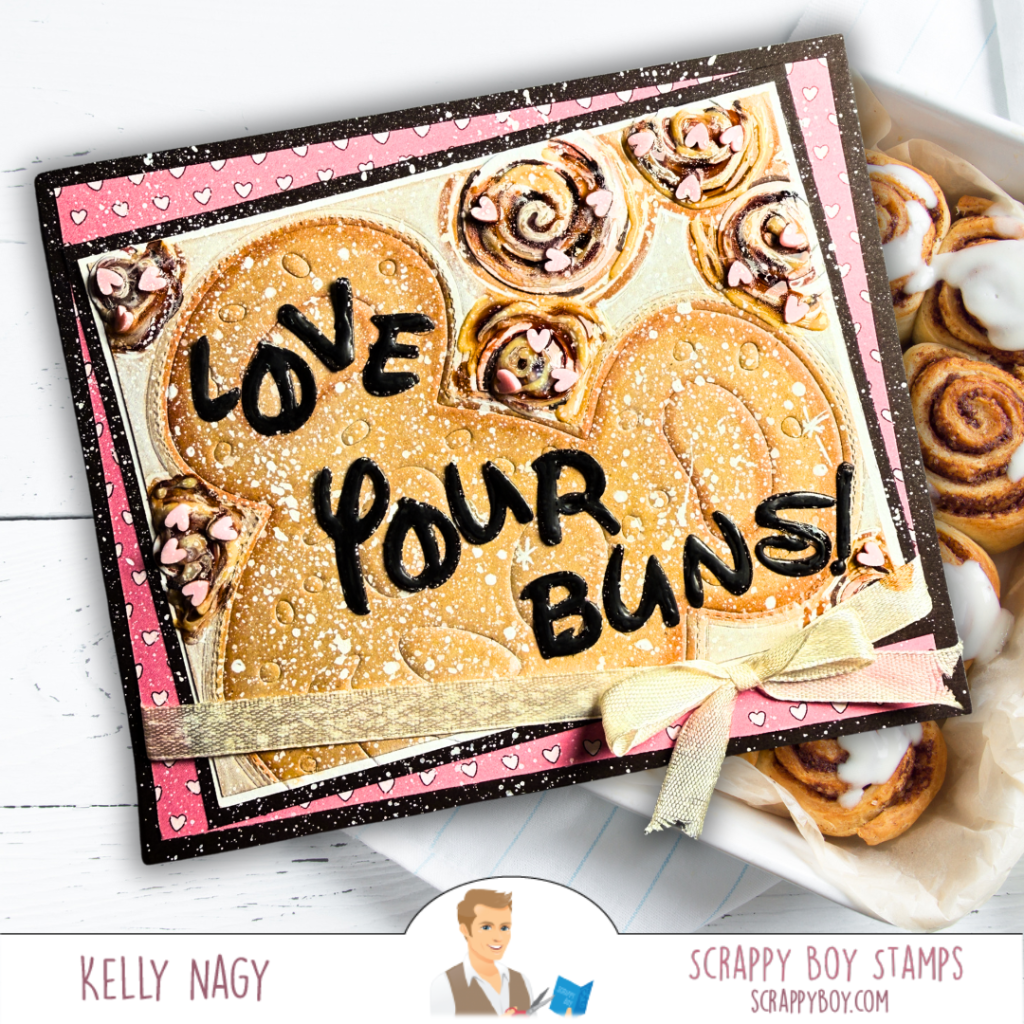
🎉 Project 4: Love Your Buns! SWEET Valentine
Last but certainly not least, I created a delightful SWEET VALENTINE using the Mouse Pretzel Mini Album Die paired with the Mouse Lollipop Accessories Add-On Die Set. Instead of cutting out the Pretzel Die, I used the rubber pad with my die cut “sandwich” to only emboss, NOT CUT, the die into my Kraft cardstock. It looks like a graham cracker cookie, waffle, pancake, baked good….use your imagination and stretch your stash.. This card is perfect for sending sweet messages to your loved one or make fun elements to add to scrapbooking pages.
Photo Credit: Meagan Nagy Archard
Head over to scrappyboy.com to grab these wonderful products and unleash your creativity! 🛍️
🎂Charmed & Chiseled Stamps & Outline Dies 🎂Pin Up Girls Birthday Stamps & Outline Dies 🎂Magical Memories 6 x 9 Paper Pack
🏍️You’re The One That I Want stamp + dies 🏍️Leather Jacket Mini Album Die Set 🏍️You’re The One That I Want Paper Pack 🏍️Believe in Magic Alphabet Die Set 🏍️A2 Dome Shaker Die Set (rose)
🍊Cute Capybara stamp + dies 🍊Cute Capybara Paper Pack 🍊A2 Stitched Rectangle Nesting Dies 🍊Magnifying Glass Die (circle)
🥨Mouse Pretzel Mini Album die 🥨Mouse Lollipop Accessories Add On Die Set 🥨Believe in Magic Alphabet Die Set 🥨Birthday Pin Up Girls Paper Pack
✨ And remember, join the fun over at the Scrappy Boy Inspiration Facebook group and don’t forget to participate in monthly challenges and share your creations using #scrappyboy!
For FREE CONCIERGE travel planning, hit up my bonus daughter, MagicallyMeags, whose insider knowledge and superior energy and creativity can instantly turn your dream vacation into a reality! Tell her Kelly sent you!💋
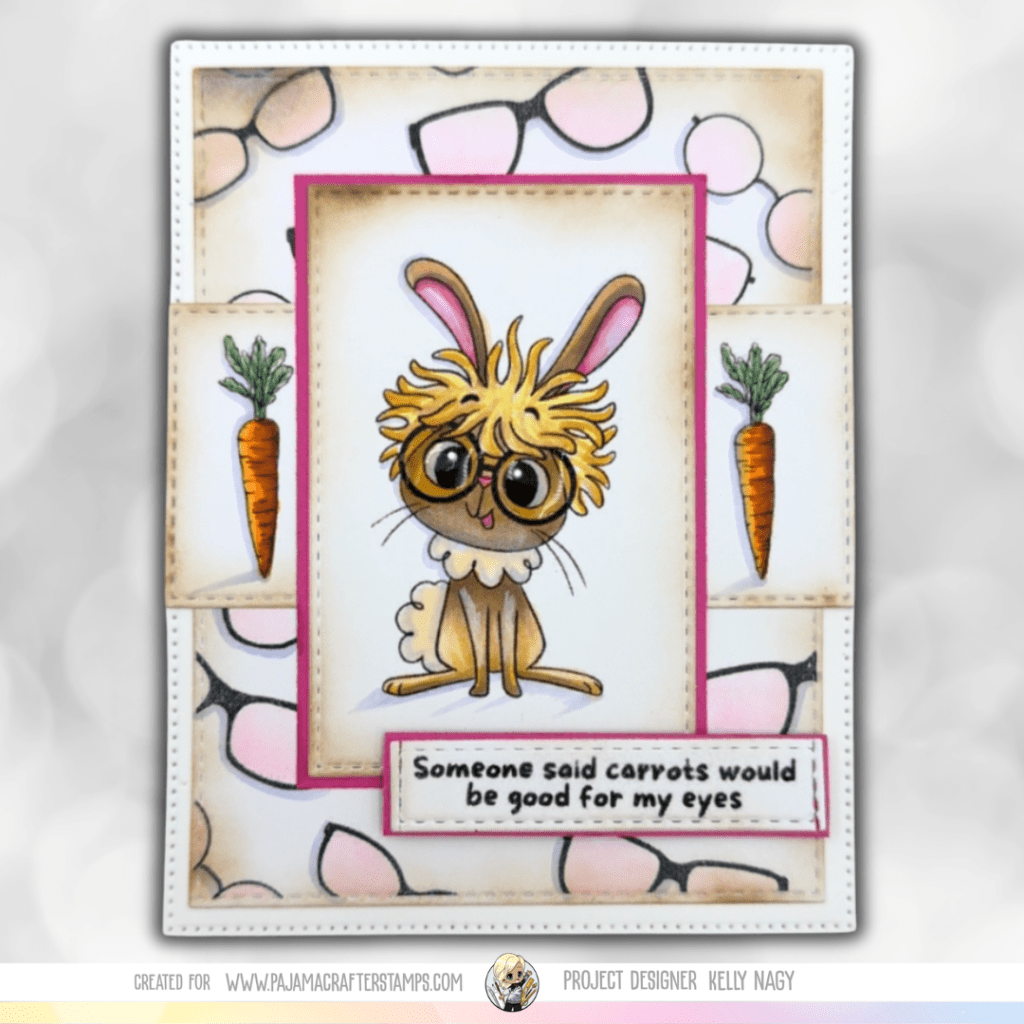
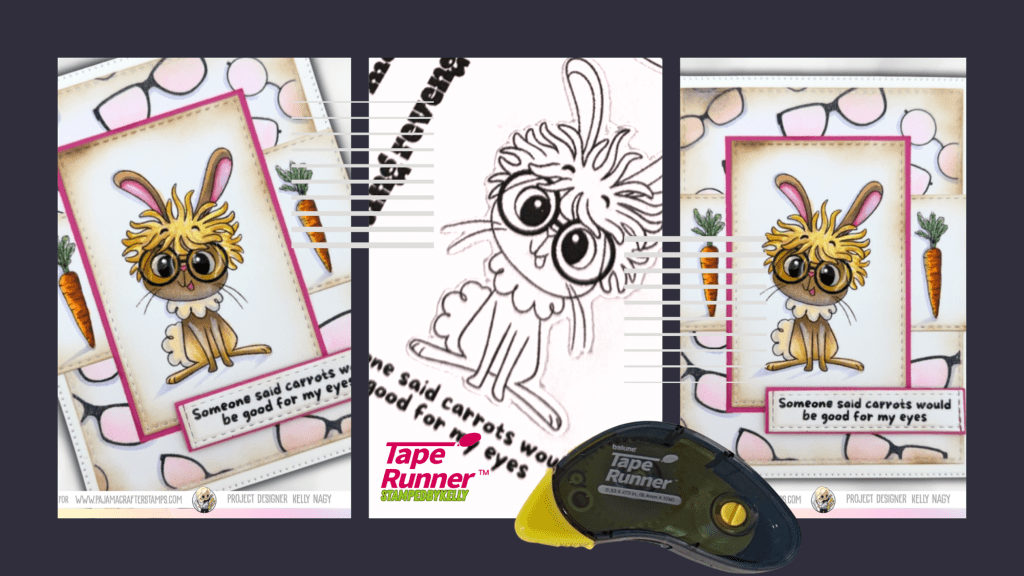
Jan 2026 New Release from PAJAMA CRAFTER STAMPS featuring card using FUNNY BUNNIES
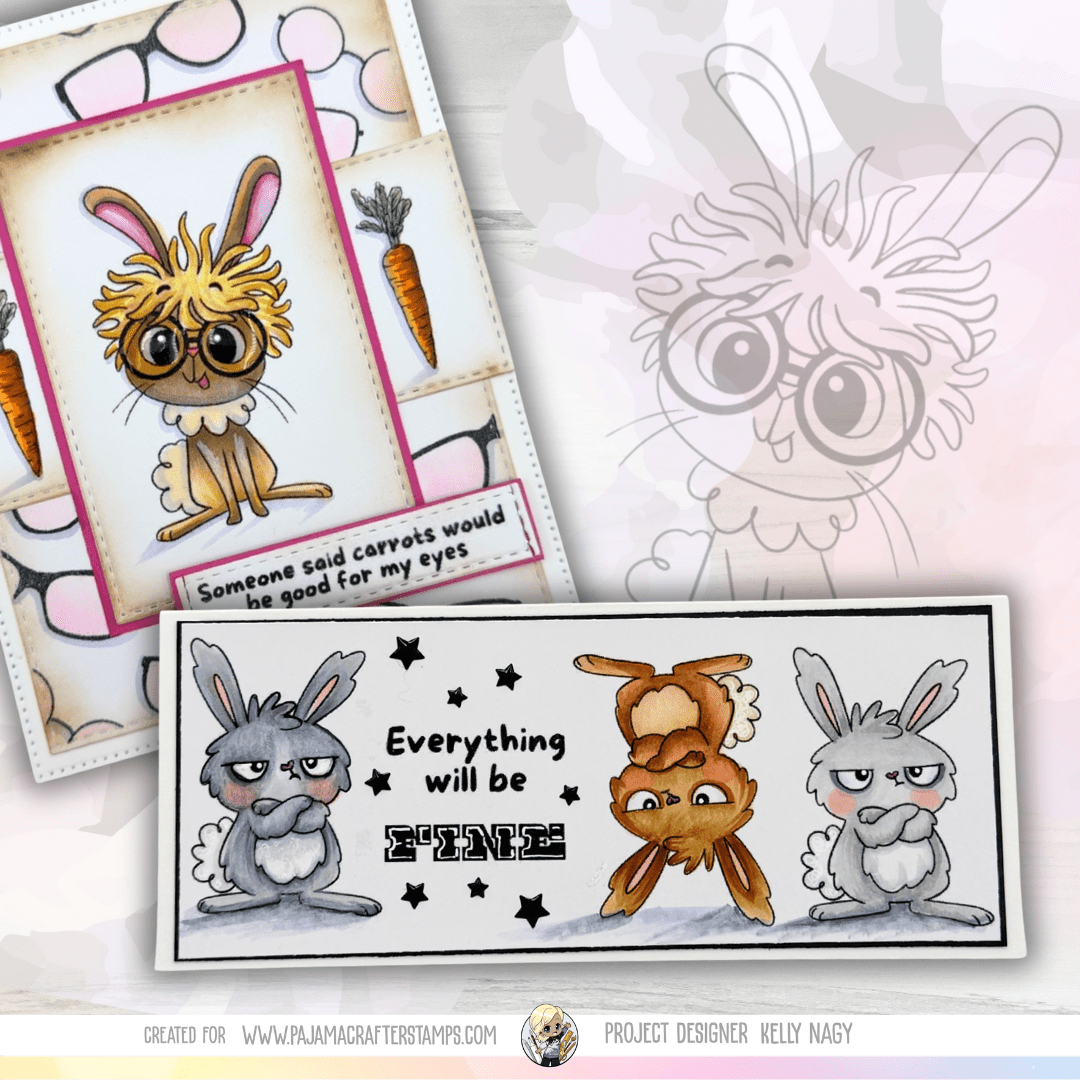
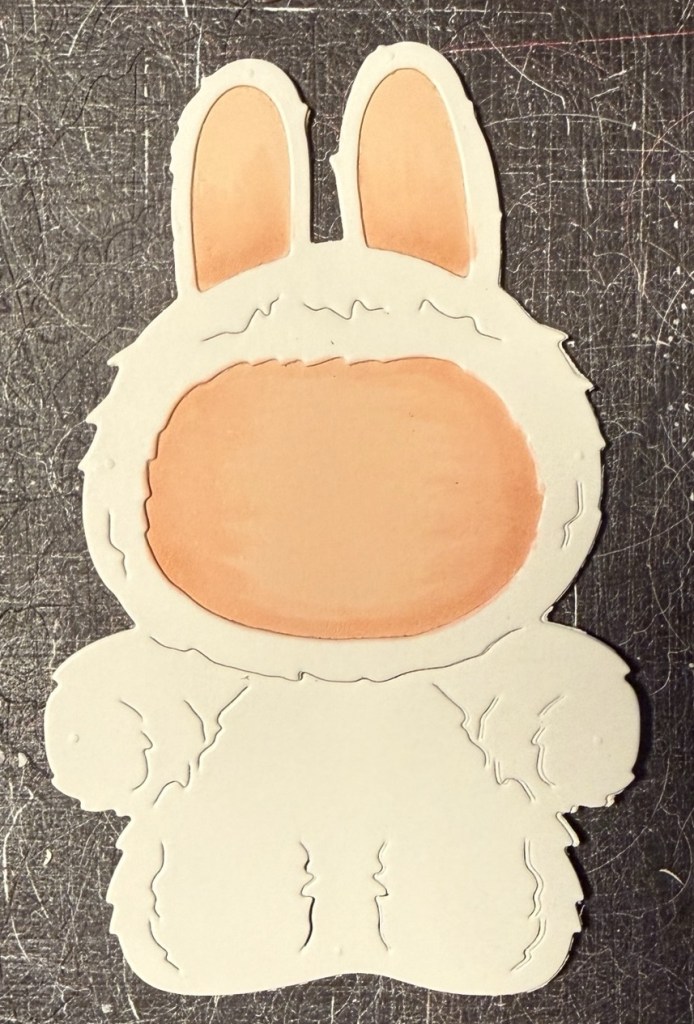
Hey there, crafty friends! I’m thrilled to share my latest creation featuring the delightful Funny Bunnies stamp set, just released by Pajama Crafters this January. This 6 x 6 stamp set is not just adorable; it’s bursting with personality and charm that’ll undoubtedly make your crafting experience exceptional! I have edited the photo to prevent theft of the images, but you can see the official photo on the Pajama Crafter Stamps’ website through my personal link here: https://pajamacrafterstamps.com/STAMPEDBYKELLYBLOG
Copy Protected Sneak Peek
Each bunny in this set is the perfect size to truly stand out on an A2 card. Just picture it: a single bunny, commanding the stage and bringing smiles to anyone who sees it! Among them, there’s a bunny with an angry face that brings a giggle, a sweet one blowing bubble gum, and—my personal favorite—the chic bunny with quirky glasses and an amazing hairdo, which I think is as cute as a button!
Featuring Funny Bunnies Stamp Set – Jan 2026
I incorporated some patterned paper from my stash to create a stunning backdrop, but don’t shy away from using your favorite background techniques! The best part about the bunnies is that they can shine against any creative landscape you conjure. Imagine the fun possibilities!
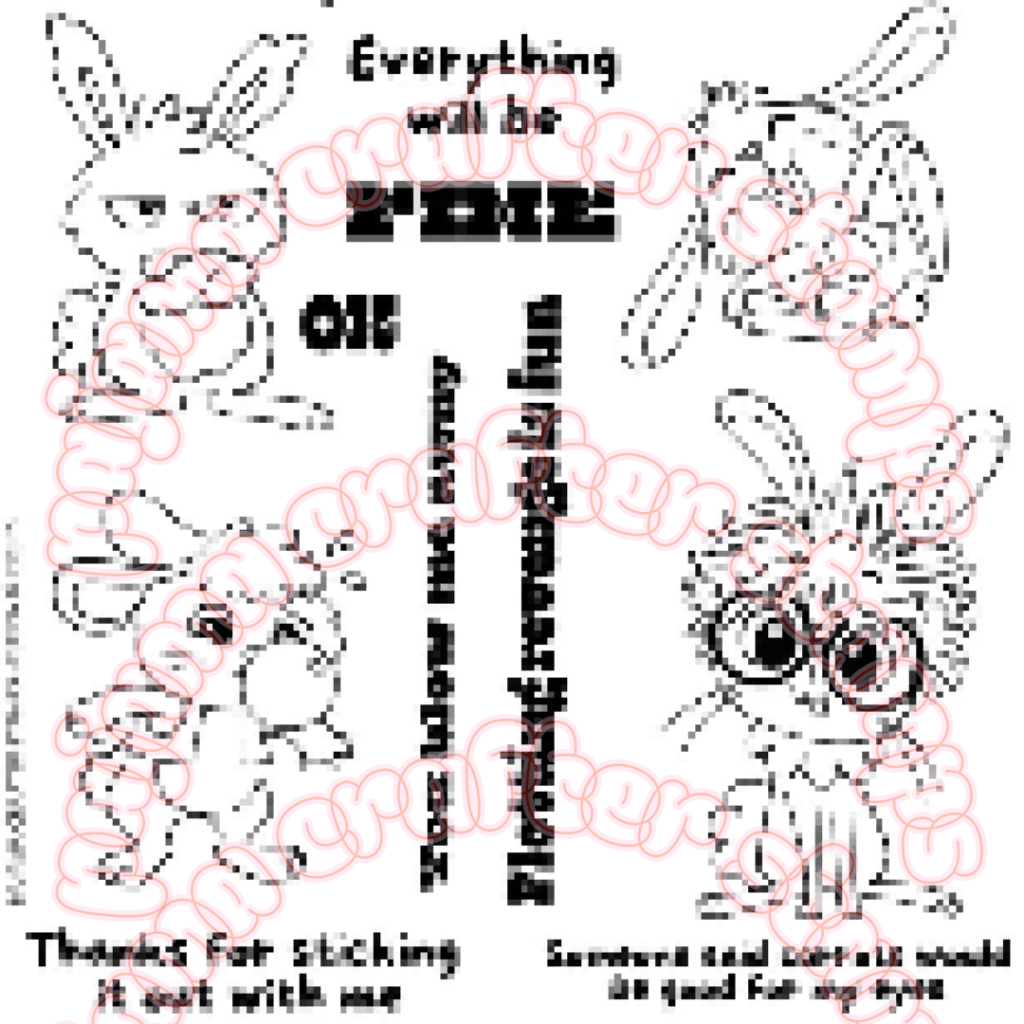
📸 See Here for a Peek at the full stamp set! Funny Bunnies Stamp Set Pajama Crafter Stamps
Don’t underestimate the power of words—this set comes with a variety of sentiments, from phrases like “Everything will be FINE” to heartfelt messages celebrating friendship. Bunnies are no longer just for Easter; they’re here to spread joy year-round!
For this card, I carefully stamped that fabulous “nerdy” fashionista bunny onto marshmallow alcohol blending cardstock. Coloring her in with my trusty Copics brought her to life, and I added some dainty details with a white colored pencil and gel pen to make her pop even more. To give the design solid grounding, I layered some gorgeous stitched dies from my stash, which I ink blended with Distress Inks for added depth. I used my trusty TAPE RUNNER dry adhesive and love how quick it came together with NO DRYING time!!! Visit http://www.taperunner.com and use PROMO CODE: KELLY10 for 10% off your entire cart!
10% OFF PROMO CODE: KELLY10 at TapeRunner.com
And let’s not forget the sentiment! I opted for a playful touch: “Someone said carrots would be good for my eyes!” It’s the perfect mix of humor and warmth that captures the essence of these funny little creatures.
I hope this card inspires you in your crafting journey! If you feel encouraged by what I’ve shared and want to explore this adorable stamp set yourself, please consider clicking my affiliate link. Every click brings a smile to both me and Pajama Crafters, showing that you appreciate what I share.
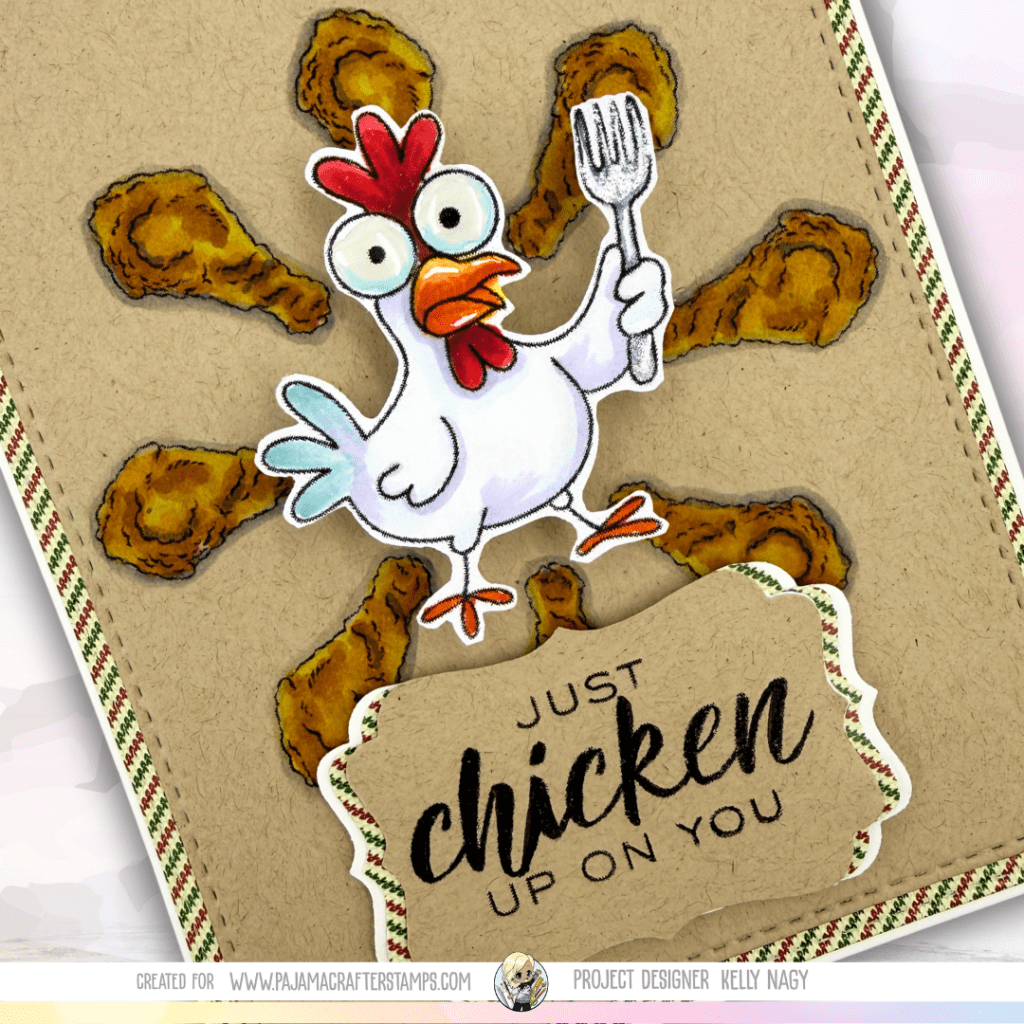
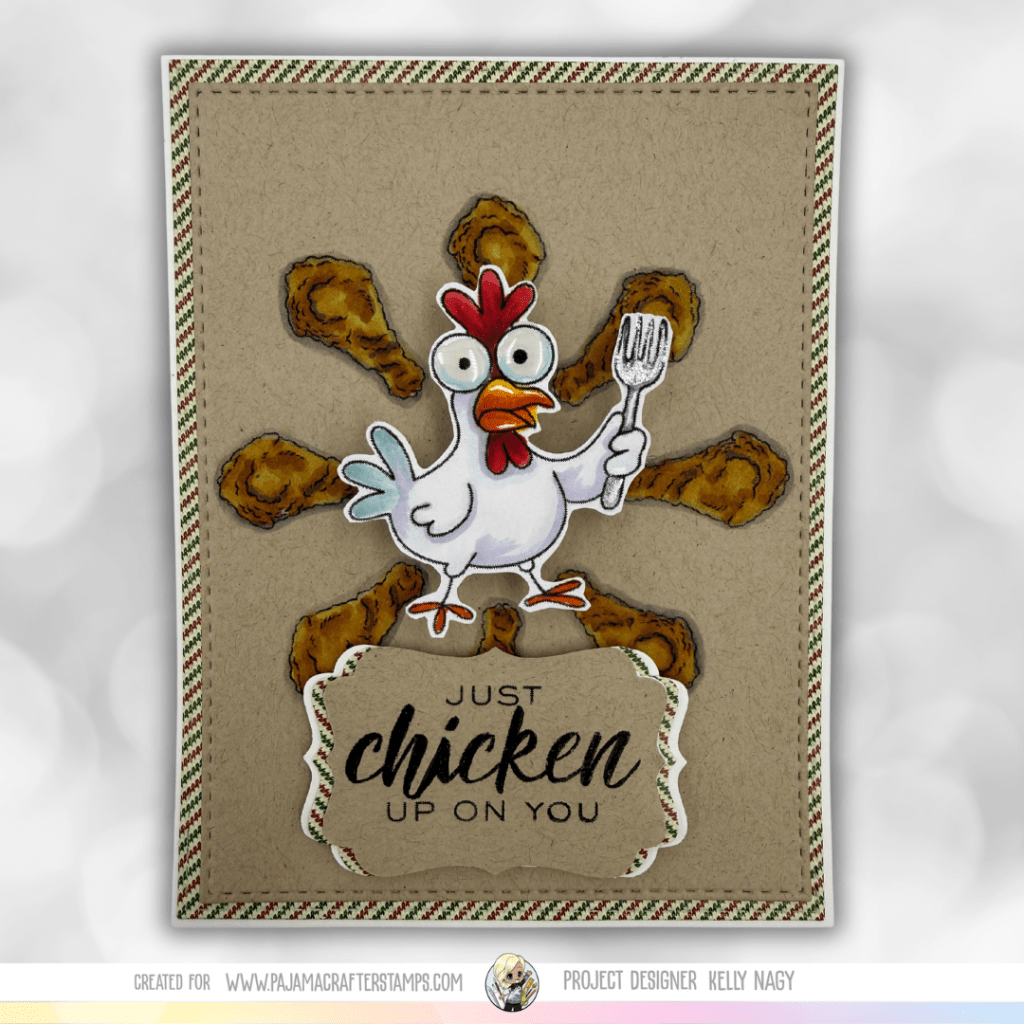
I’m excited to share a card I created to celebrate the first new release of 2026 from Pajama Crafter Stamps! This particular set in the JANUARY 2026 release holds a special place in my heart, because I had the honor of designing this fun and versatile CHICKEN & WAFFLES stamp set. 🐔🍽️
It has been truly inspiring to see all the fun projects created by our incredible design team! Their creativity and passion shine through in every piece, and I feel proud to be part of such a talented group. 🎨✨
For my card, I paired the CHICKEN & WAFFLES stamp set with an action wobbler to give it a playful touch. I used my favorite Pebbled Beach Kraft cardstock, which complements the stamp perfectly and adds depth to the design.
To create an eye-catching background, I utilized my trusty stamp positioner to make a wreath-like structure using the drumstick stamp from the set, which frames the sassy chicken beautifully! The added movement from the action wobbler makes this card even more fun and unique, perfect for anyone receiving it 🎉!
I invite you to hop on over to my Instagram page @StampedbyKelly to view more creations from the Birthday Hop! Not only will you find my project, but the entire design team is showcasing a variety of inspiring designs. There’s definitely something for everyone to enjoy!
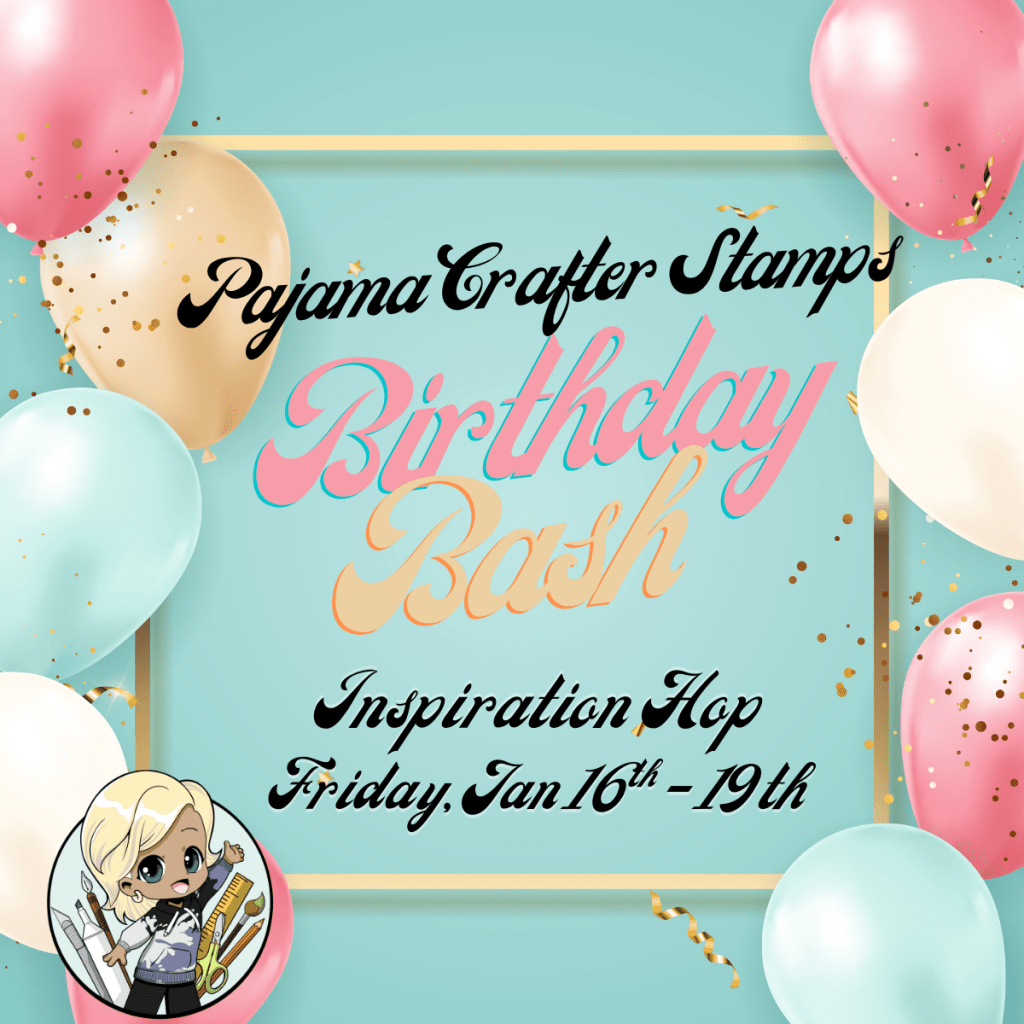
As we embark on this chilly season, we’re keeping the creative sparks warm with HOT OFF THE PRESS inspiration! Don’t forget that there’s a chance to win a $25 Pajama Crafter Stamps Store Voucher during the hop, so be sure to participate!
Take a journey with me on how you can use simple shapes and fun patterned paper to create textures and interest.
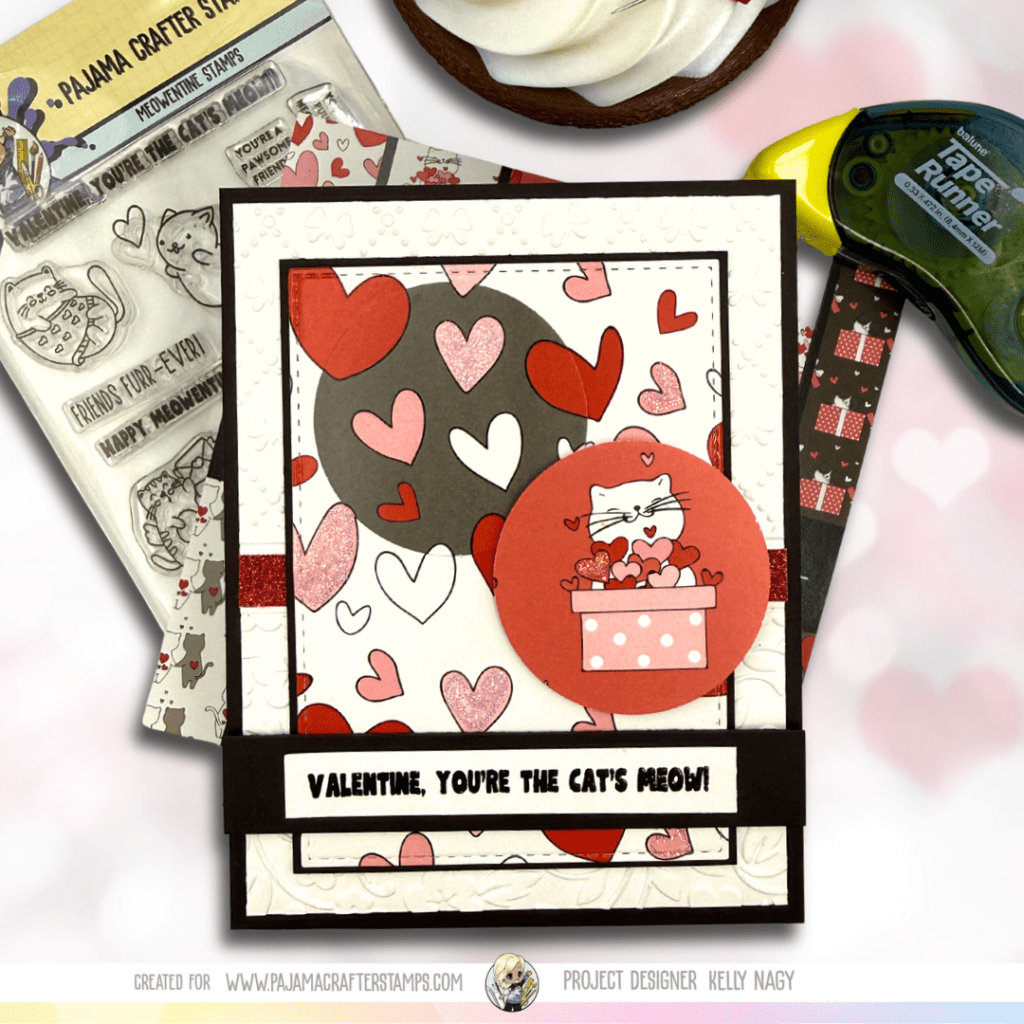
Hey there, crafty friends! 🌟 I’m excited to share a special card-making journey I recently embarked on, showcasing the products from Pajama Crafter Stamps. I created a heartwarming Valentine using the delightful Meowentine Stamps and some festive feline and heart filled patterned paper that truly brought my vision to life.
Crafting Details
I had a blast layering cardstock and matting it with Coal cardstock to give my card some extra flair. To add that special sparkle, I incorporated Stickles and used an embossing folder for texture. The assembly was easy with my favorite liquid glue and the fantastic Tape Runner from http://www.taperunner.com (https://www.taperunner.com). If you decide to grab one, don’t forget to use promo code KELLY10 for 10% off your entire cart!
A Cute Touch of Inspiration
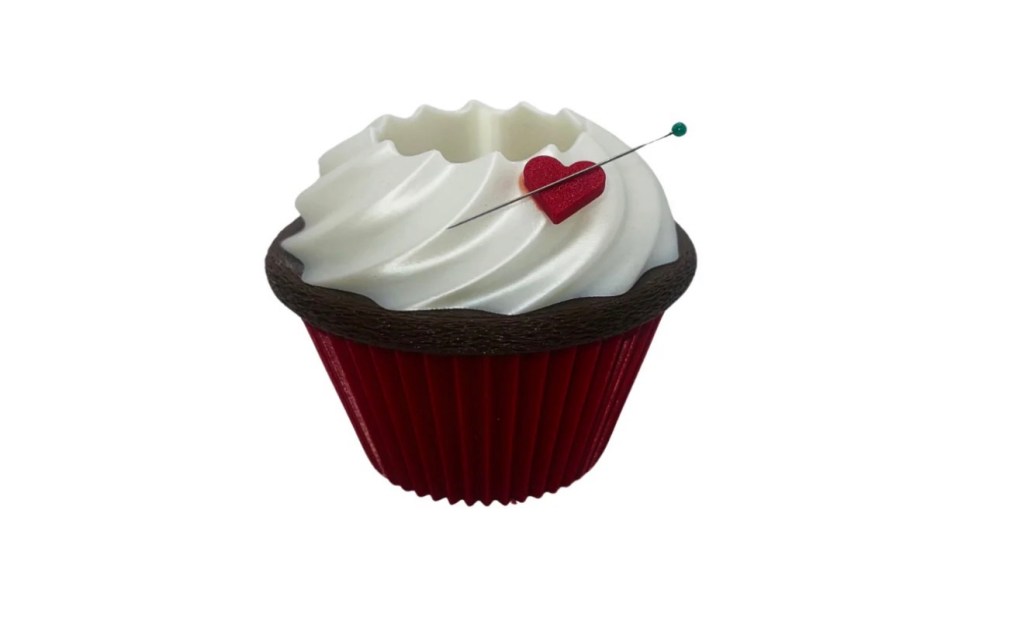
To make my crafting space even more enjoyable, I added an adorable cupcake glue holder. It’s both functional and fun, making it a perfect gift for any crafter in your life! Plus, it offers all the sweetness without the calories! 🧁💖
For everything you need, including the Meowentine Stamps, patterned papers, and cute desktop accessories, be sure to check out my affiliate link: Pajama Crafter Stamps (https://pajamacrafterstamps.com/STAMPEDBYKELLYBLOG).
Join the Crafting Journey
I genuinely believe in the joy of crafting and how it connects us all. I’d love to see your interpretations of this project, so please share your creations! Together, we can inspire each other and foster a wonderful crafting community.
Happy crafting, friends! Your support means the world to me! 💌
I’ve been busy working on some fun card projects using the December 2025 release from Scrappy Boy Stamps, and trust me, there’s something for everyone in this collection! 🎉💖 From “Noble Traditions” to “Little Orphans” and “Shabubu,” you’re going to adore this release! My tape runner dry adhesive made putting together these cards simple and clean. No sticky fingers!
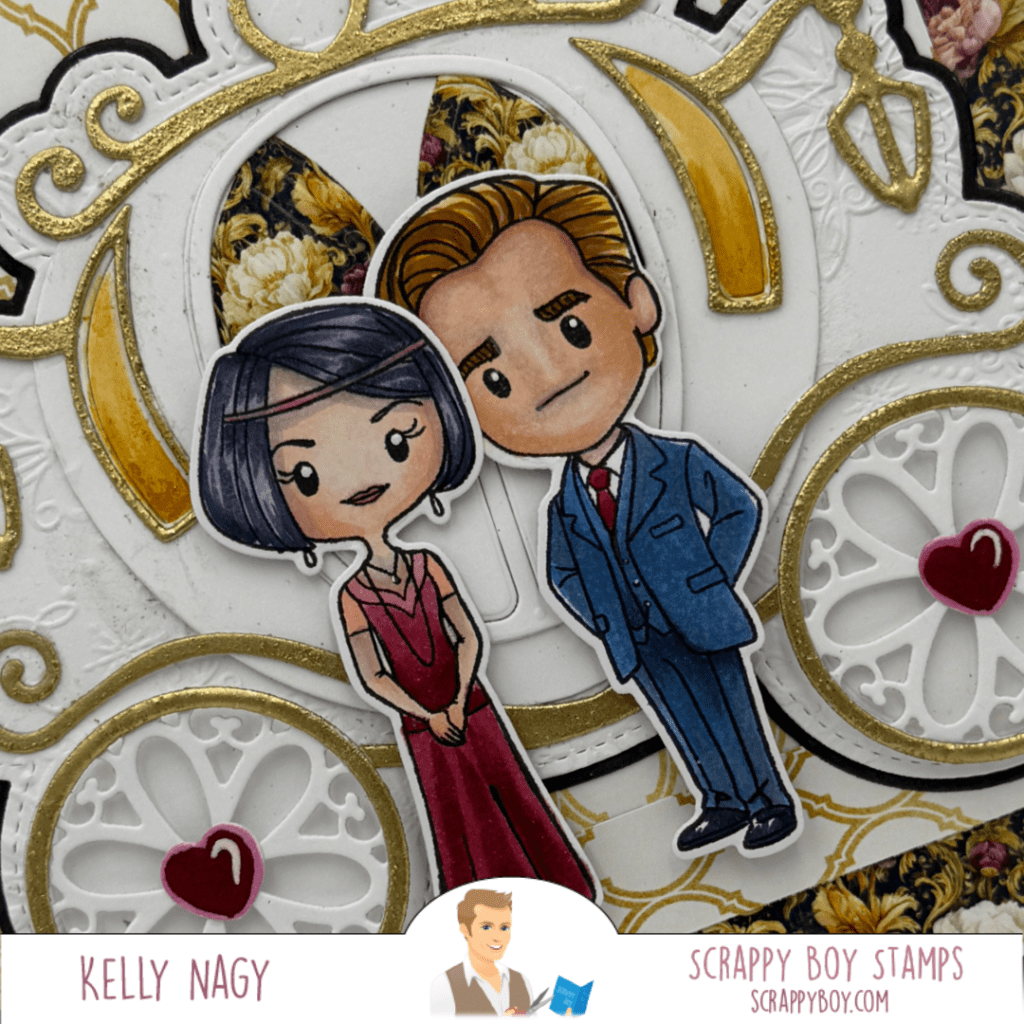
1️⃣ Noble Traditions Card
In my first project, I created an elegant square design featuring images from the Noble Traditions release, paired with the stunning Fairytale Carriage Mini Album Die Set. To elevate the look, I used the coordinating paper pack and sprinkled some gold embossing powder for that extra touch of glitz! 👑✨
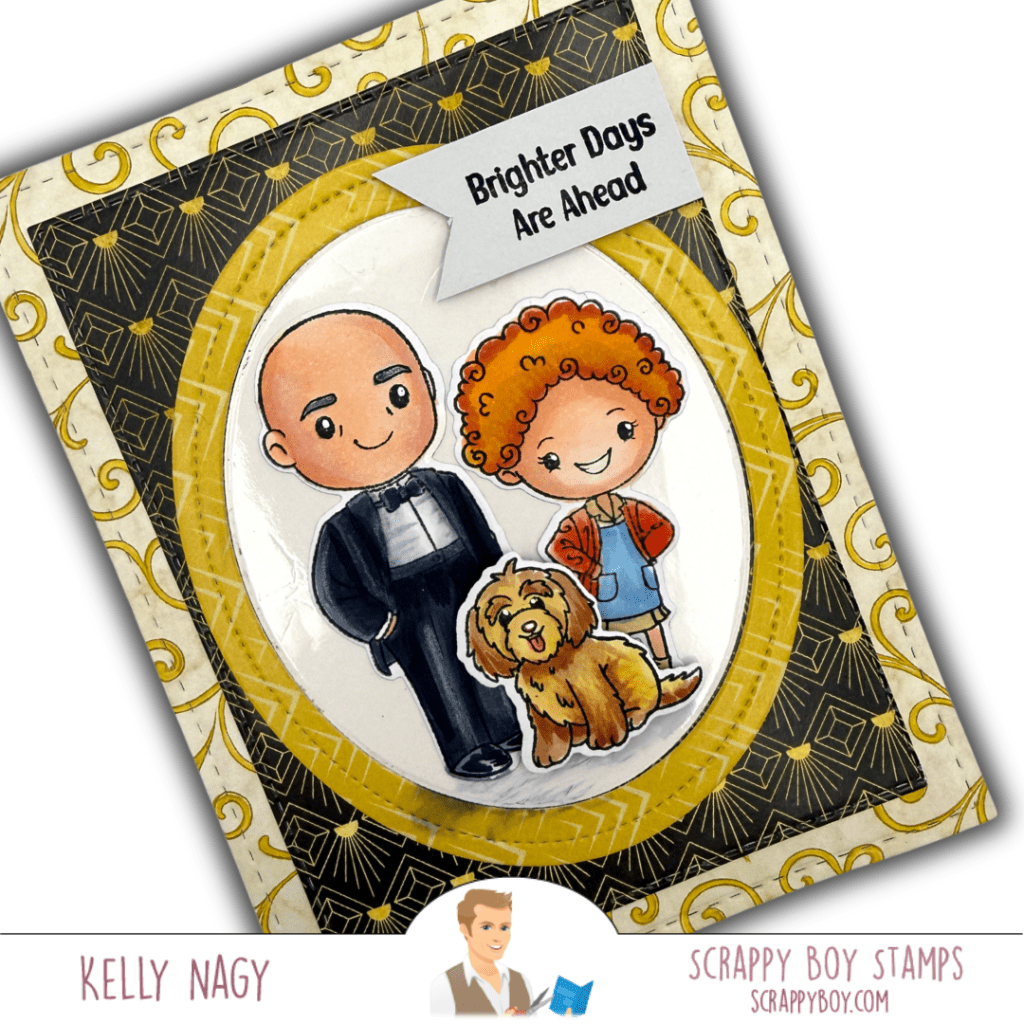
2️⃣ Little Orphan Card
For my second project, I made an A2 size card using the adorable Little Orphan set. I paired it with the coordinating paper pack, using both my Stitched Rectangles and Stitched Ovals. After stamping the images, I brought them to life with my trusty Copics! 🖌️💖
3️⃣ Shabubu Shaped Card
Finally, I crafted a super fun Shabubu shaped card using fur-patterned paper that resembles real plush! I cut it with a die and paired it with a cute teddy bear from a previous release called the Craft Wagon Add On Die Set. This is the base of my Shabubu! Now the fun begins!!
It’s all about personalizing and adding elements to create those cozy vibes! 🐻💕 I used my Tape Runner to put the pieces together. You can get 10% off your cart using promo code: KELLY10
📝 Don’t forget to follow me on social media @stampedbykelly, or check out my crafting Facebook page, Crafty Chaos and Creativity!
Let’s spread some crafting joy! Did you know that Scrappy Boy sponsors monthly challenges. Here is your opportunity to play along!🌈💌
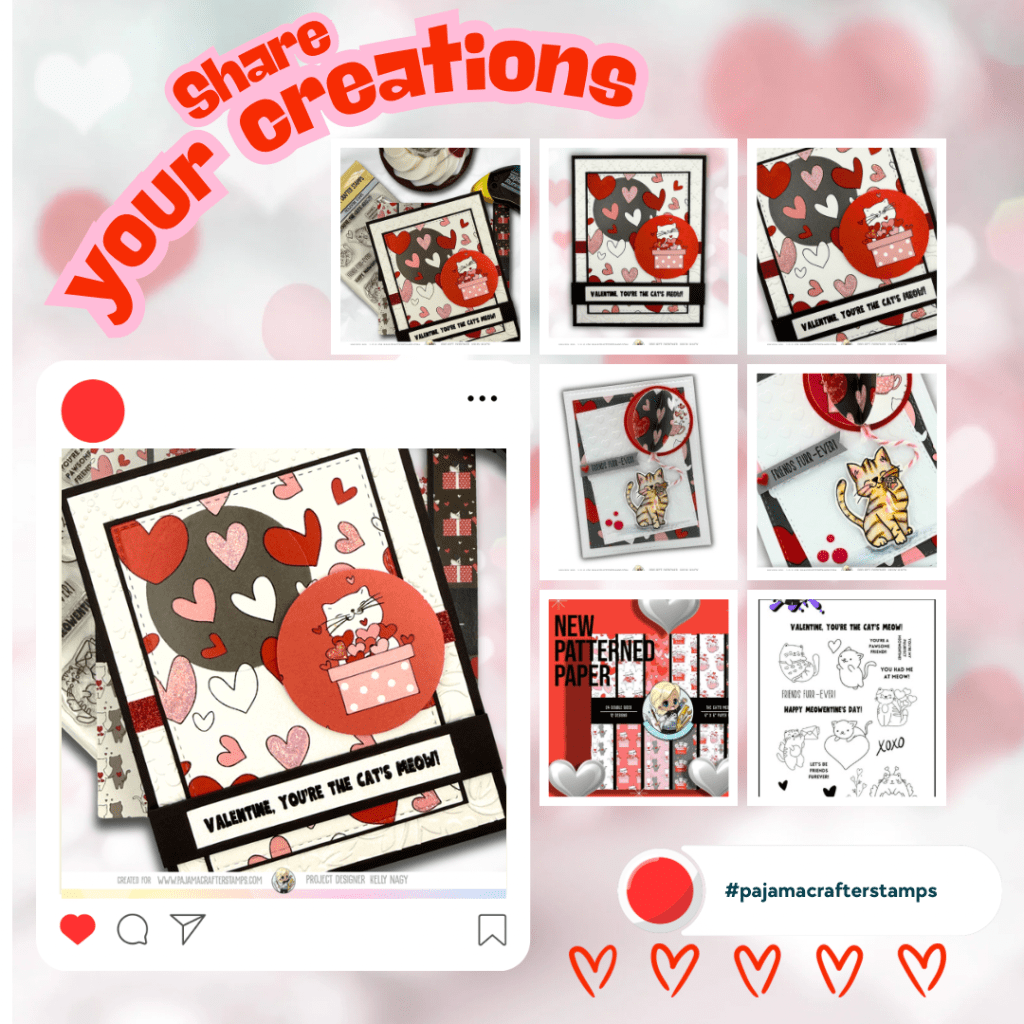
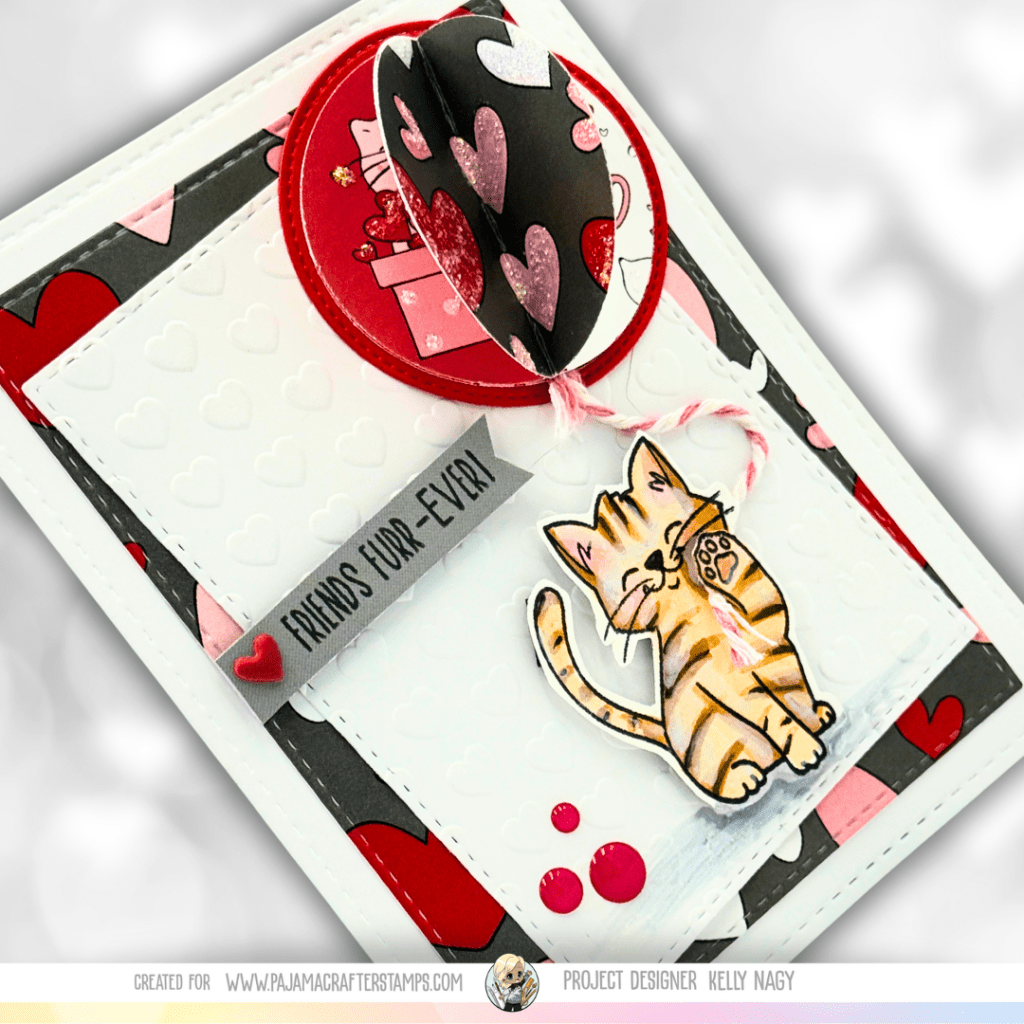
As we embrace the fresh possibilities of a new year, I find myself eager to dive into Valentine’s Day crafting! This month, I had an absolute blast creating a charming card that features the High Five Stamp Set paired with the Cat’s Meow 6×6 Paper Pack.
The adorable images in the High Five Stamp Set sparked my imagination, leading me to craft a sweet card that truly celebrates our love for our feline companions. To give it a fun twist, I used a circle punch to make a delightful 3D balloon from the coordinating patterned paper.
If you’re looking to unleash your creativity this Valentine’s Day, I encourage you to check out Pajama Crafter Stamps! Supporting small businesses is so important to keep our crafting community thriving, and you’ll find some truly unique and high-quality products there.
So why not hop over and explore all the crafty treasures waiting for you? 💖
Let’s make this Valentine’s Day unforgettable with heartfelt creations. Happy crafting, everyone! 💌✨
Not a fan of Valentine’s cards, check out this non-Valentine’s day card using the same HIGH FIVE stamp set below. Thanks for following me on social media @stampedbykelly