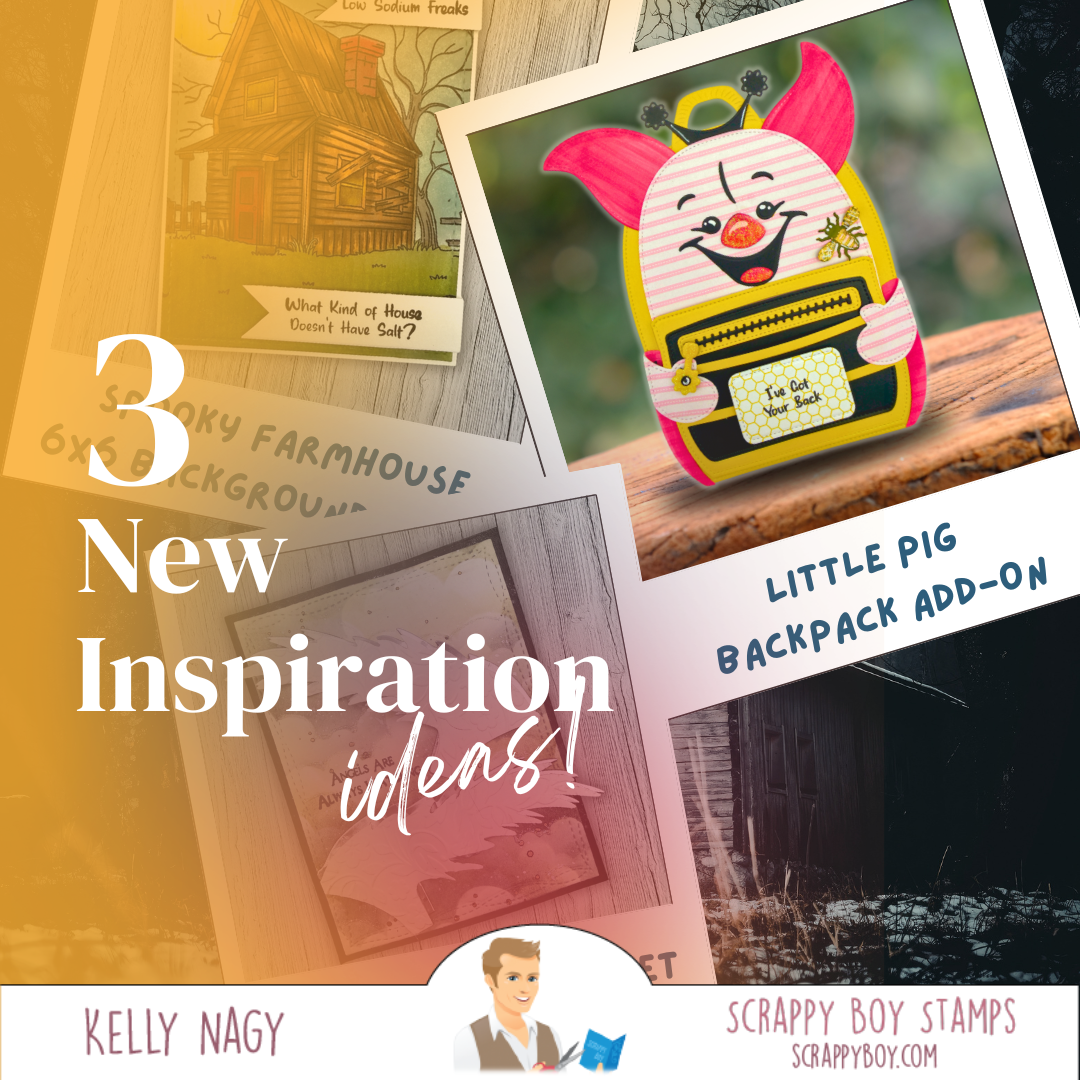
Exploring the newest Scrappy Boy Stamps release has been such a creative journey! For this set of projects, I challenged myself to take three very different elements—the Spooky Farmhouse background, the Wings & Sun dies, and the Little Pig Backpack add-on—and design cards that each tell their own story. From moody and textured to bright and uplifting to sweet and playful, these cards may look completely different at first glance—but there’s a common thread in how they were built. Take a closer look and see if you can spot what ties them all together! It’s my adhesive from TAPERUNNER.COM! Use Kelly10 for 10%OFF only at TapeRunner.com website.
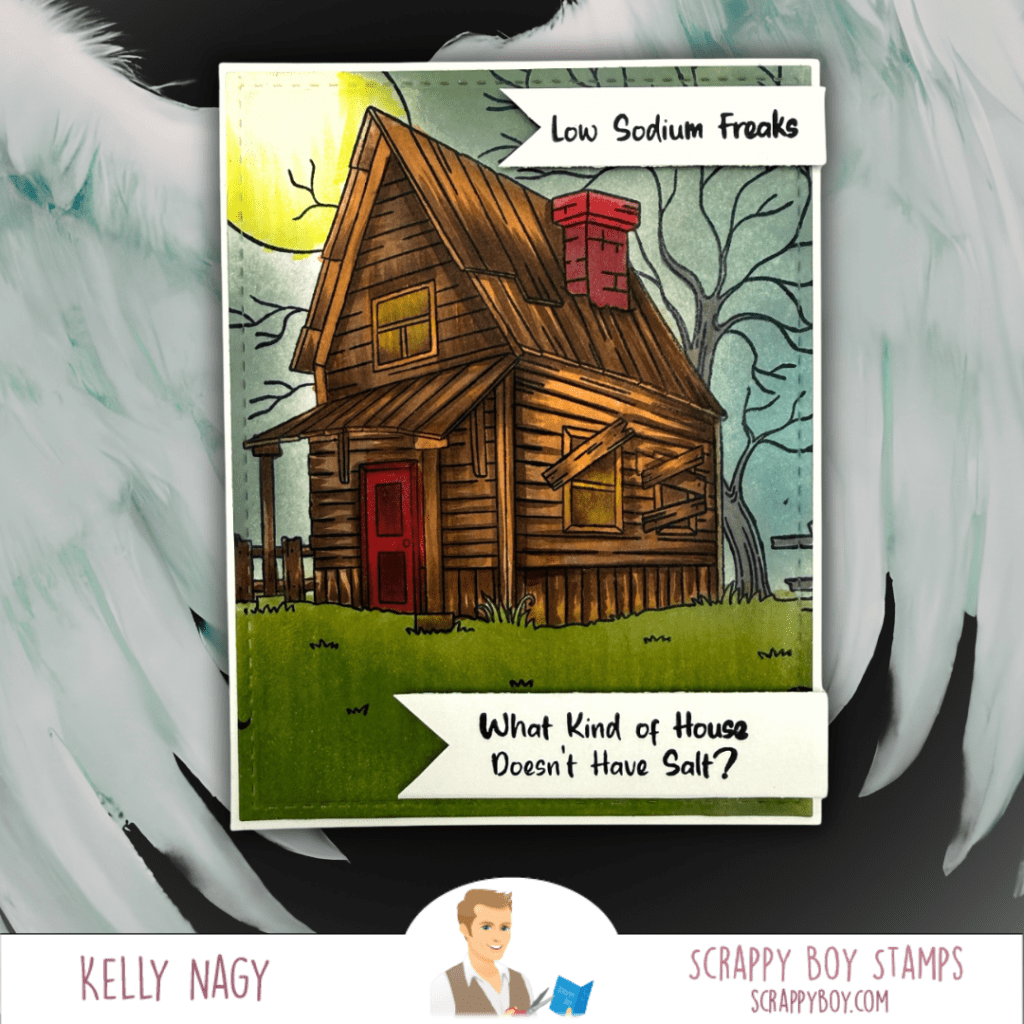
The Spooky Farmhouse 6×6 Background Stamp brings in layered texture and seasonal depth. I cut it down to fit a standard A2 sized card front.
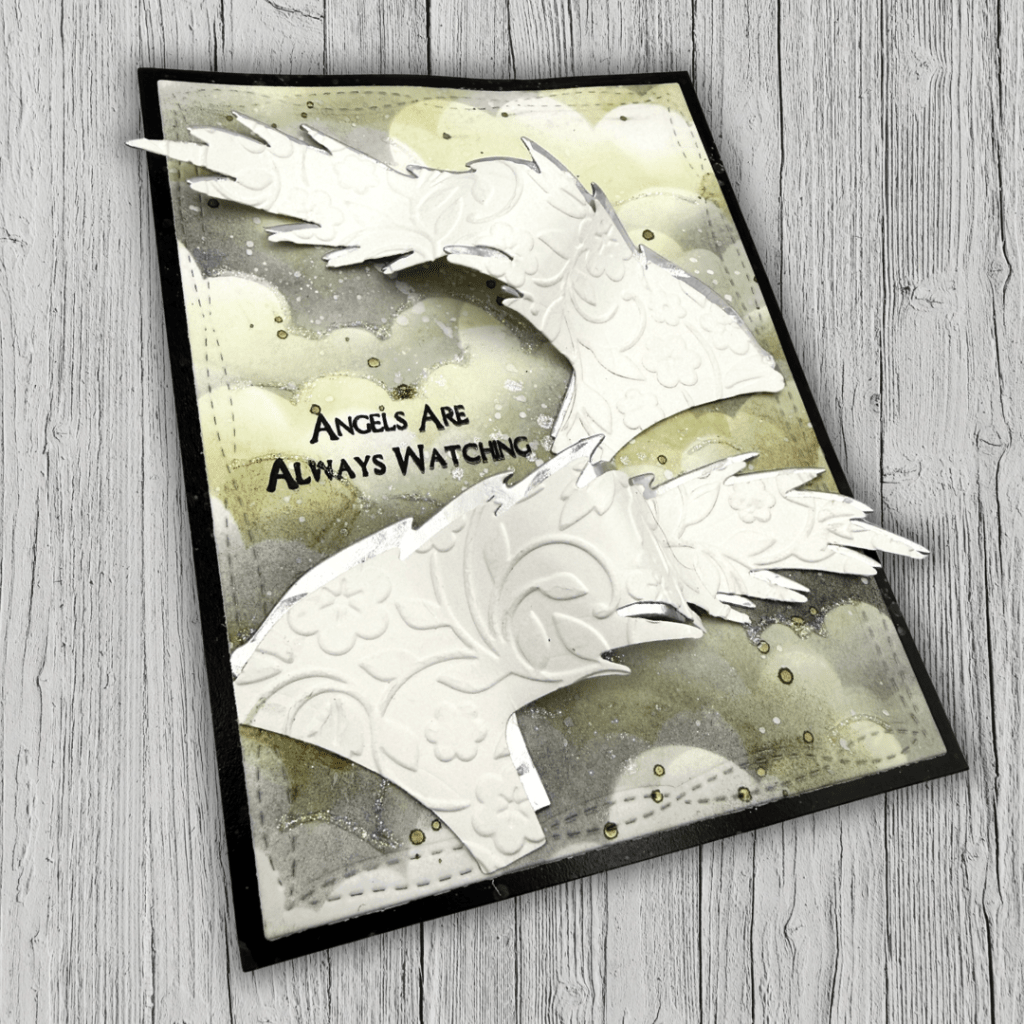
The Wings & Sun Dieset offers a softer, uplifting focal point with dimension. I ran the diecut wings through an embossing machine using a folder from my stash. I think it adds fun dimension, but not necessary. I then applied foam tape in thin strips to create waves and movement. The sentiment is from Bump In The Night and great to send an uplifting message, “Angels Are Always Watching.”
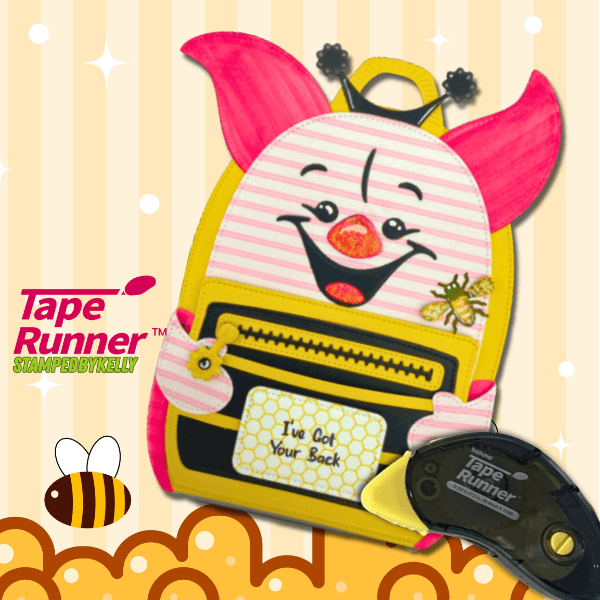
The Little Pig Back-Pack Add On adds a whimsical, character-driven element. Featuring the dry adhesive from TapeRunner and use PROMO CODE KELLY10 for 10%OFF your TapeRunner Cart.
Love putting my layers together with TapeRunner dry adhesive. Less Mess! Convenience ❤️
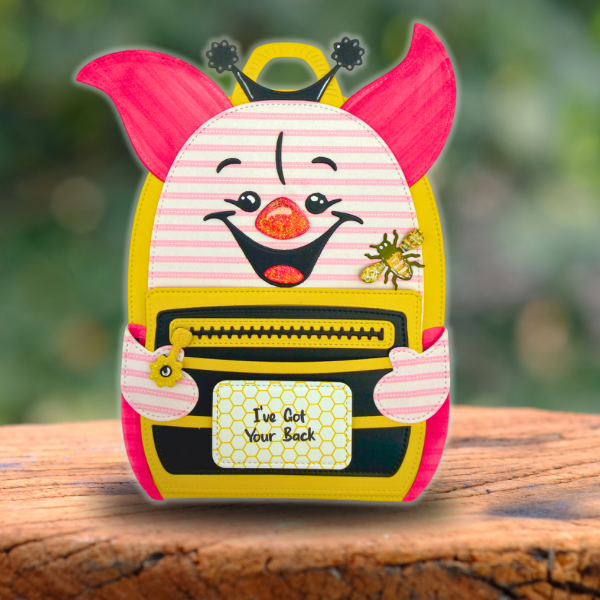
I wanted the pig to be dressed like a bee, so I used yellow snd black card for the body and ran the mouth diecut through a second time and cut the flower zipper pull a teo times in black to create a bee antennae. The bee is from the Honey Bear Back Pack Add-On Set.. Patterned papers are from the Honey Bear 6×9 paper pack. All of the Little Pig’s body cut from the pink striped patterned papers, with some elements colored with alcohol markers, white gel pen and crystal glaze for added shine.
Coincidentally, I found delight in the “I’ve Got Your Back” sentiment from Bump In The Night, which is a perfect for those who love a GOOD PUN! Perfect for ANY backpack project, LOL!
While each project stands on its own stylistically, they were intentionally designed with a unifying creative approach. Support small businesses and find these products and so much more at Scrappy Boy Stamps
I invite you to explore the projects and consider this:
👉 What is your favorite design element or technique?
Engagement and shared perspective are what makes this creative community so impactful. Thanks for following, liking and commenting below!👇
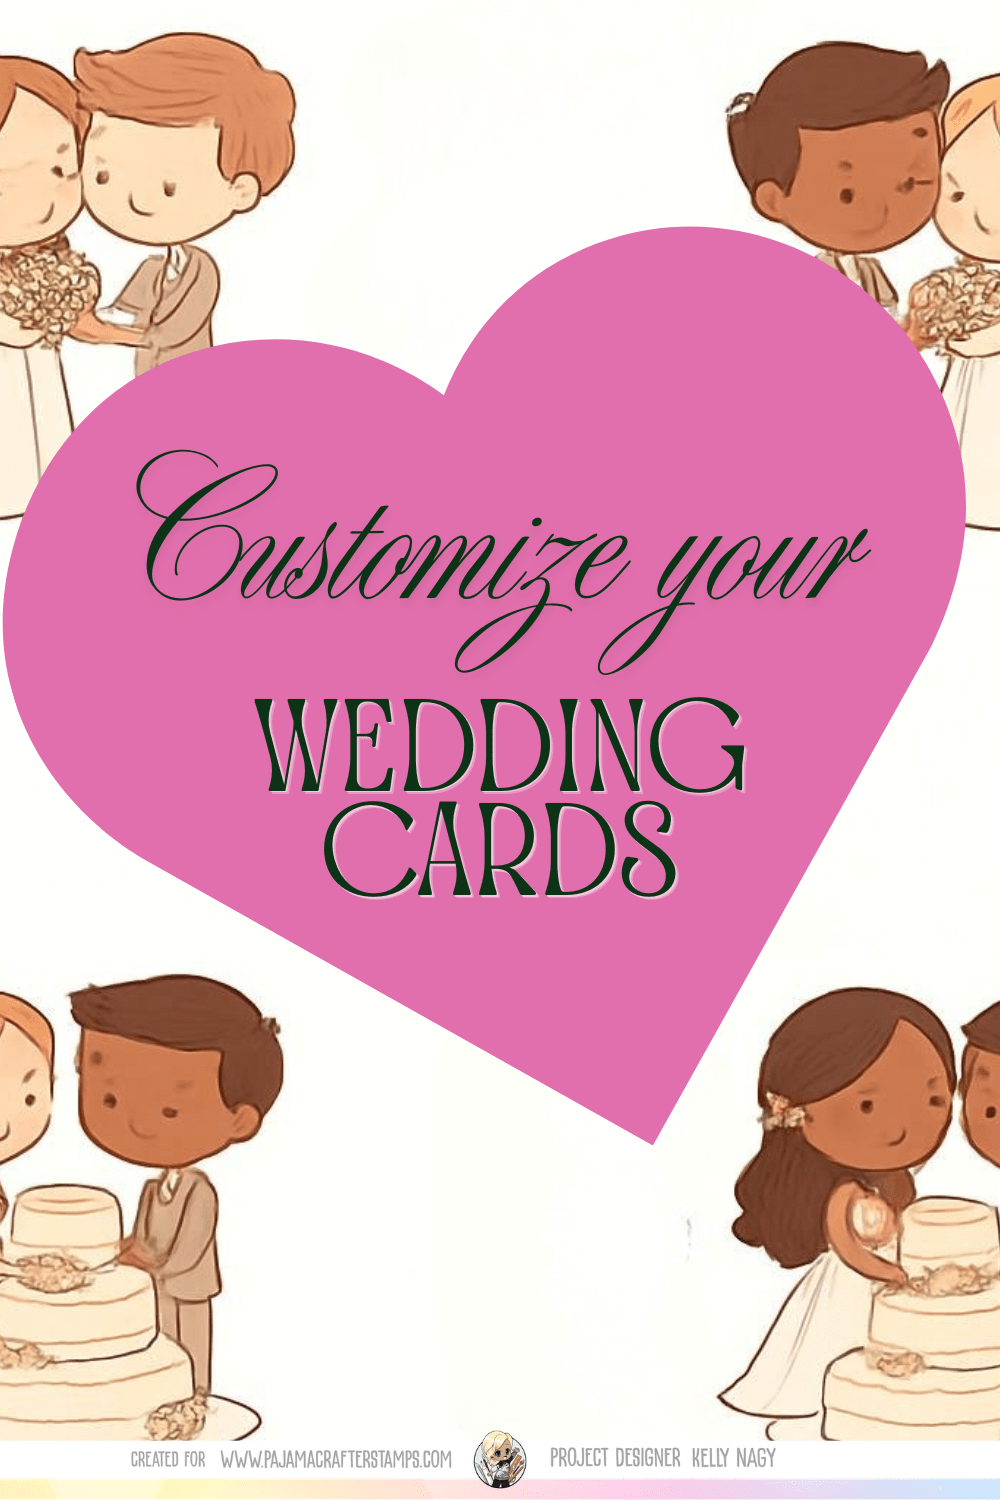
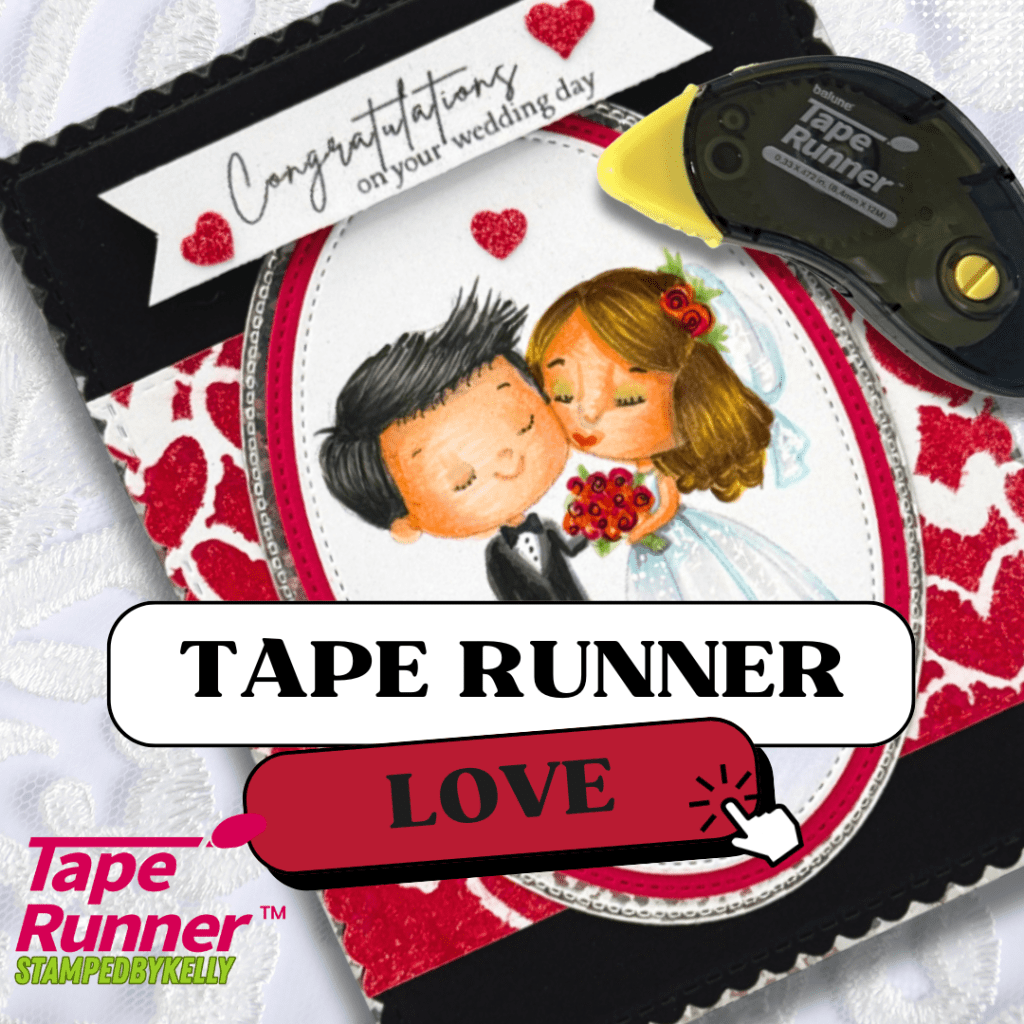
For today’s project, I designed an A2-sized card using the BOUND BY LOVE stamp set from Pajama Crafter Stamps’ newest release. The sweet, intimate illustration of the couple instantly brought me back to my own wedding day, which became the heart behind my color selections, including hair and skin tones.
I leaned into a classic black-tie color palette using COAL and MARSHMALLOW cardstock, accented with bold red to represent love and roses. I’ve always loved that combination—it feels timeless, elegant, and full of emotion.
To add depth and interest, I used the IN MY HEART OF HEARTS stencil in the background. The pop of red and repetition of hearts creates movement without distracting from the focal image. A layer of DISCO BALL Specialty Silver Sparkle Card Stock adds just the right touch of shimmer—because every wedding card deserves a little sparkle.
Layers easily put together using TAPERUNNER.COM
I really enjoy the convenience and ease of using my hand-held dry adhesive from Tape Runner. Use promo code KELLY10 for 10% OFF your cart!
What I love most about this design is how easily it can be customized. Whether you match wedding colors or personalize details for the couple, it’s a layout that adapts beautifully.
This card was made with intention and heart—just like the celebration it represents.
Visit Pajama Crafter Stamps to pick up the new release set called BOUND BY LOVE or to check out any of the other wonderful offerings they have.
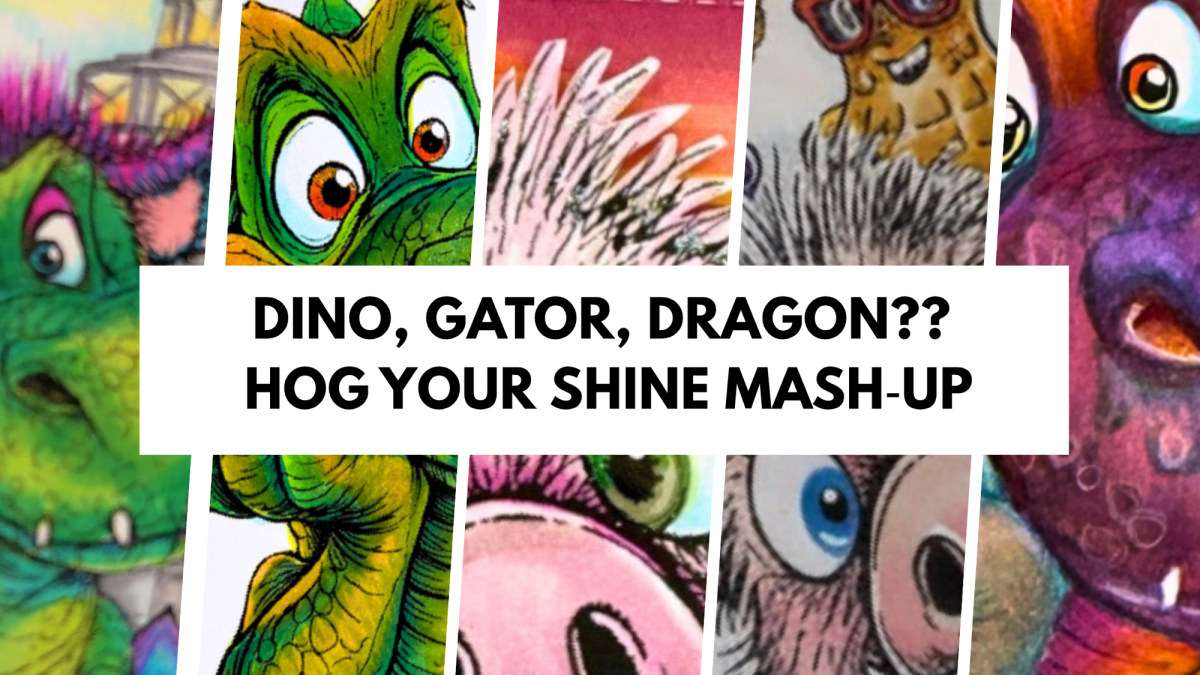
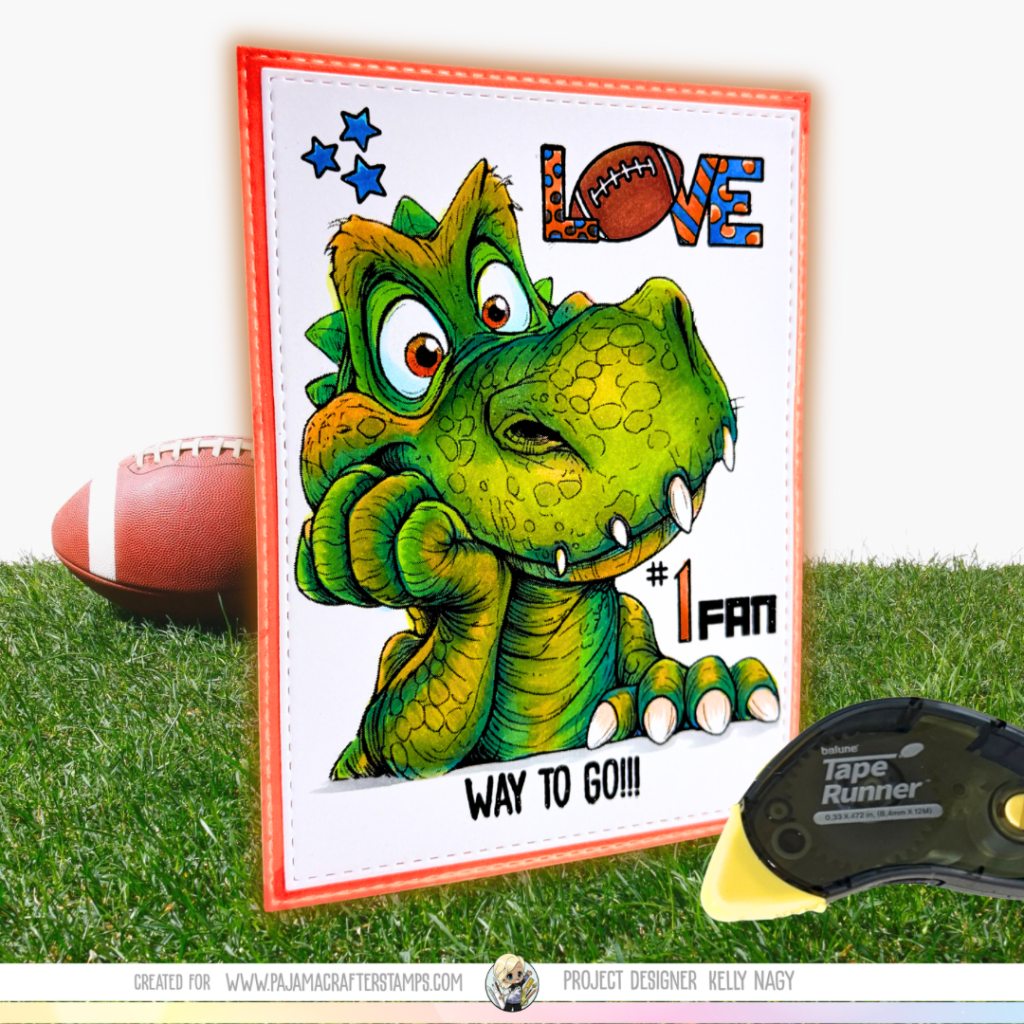
Dino, Gator, or Dragon? Join the Pop of Color Instagram Hop as I reimagine Pajama Crafter Stamps’ new Closer to Extinction and pair it with the fresh Hog Your Shine release. Is that stamped creature a dinosaur, an alligator, a dragon—or something entirely new? I masked and mashed up images for a playful, unexpected twist. Hop over to Instagram to see the full card, my WIP shots, and the design team’s colorful projects — plus giveaway!
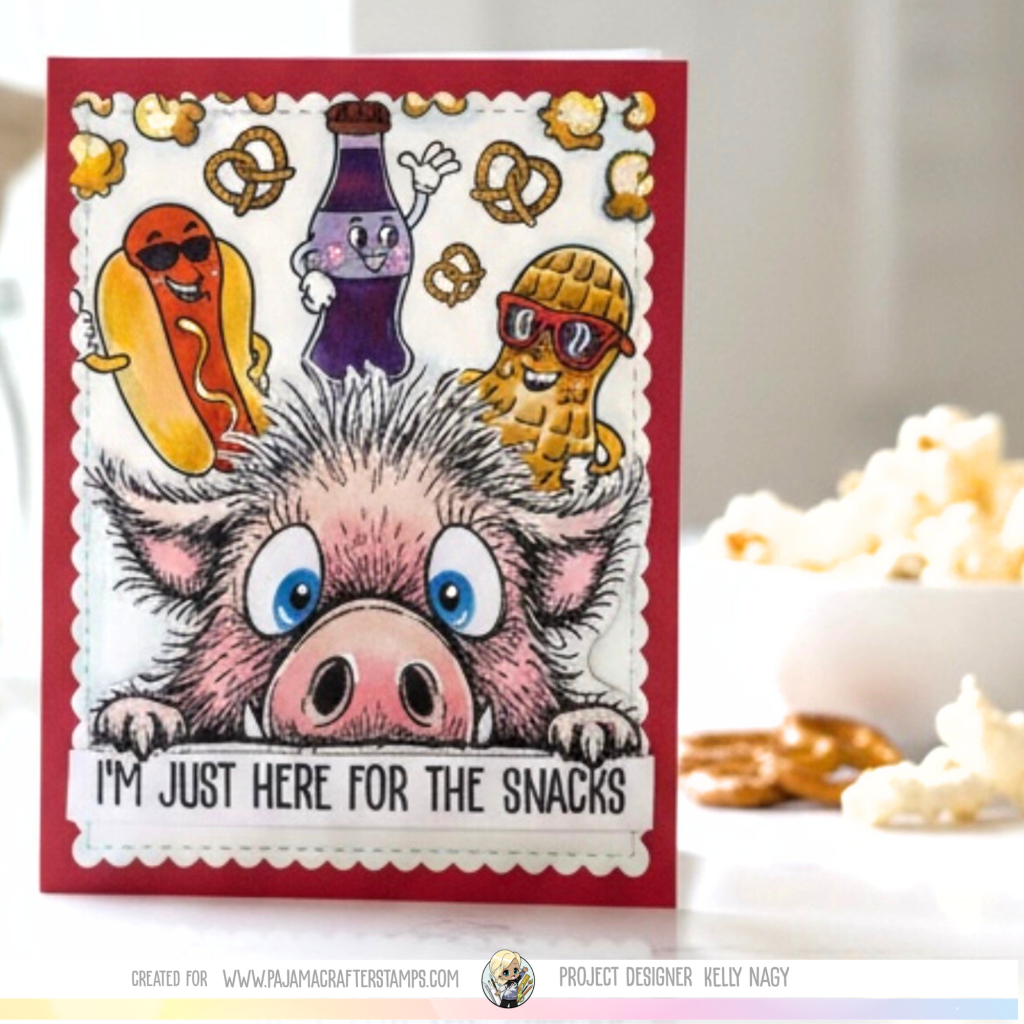
Today I’m thrilled to share Pajama Crafter Stamps’ newest release: Hog Your Shine! I paired this new set with two favorites — Stadium Food and Date Night — to make a fun, snack-loving card with the giggle-worthy sentiment, “I’m just here for the snacks!” Food (and friends) really are the best part of any get-together, and these stamps capture that playful vibe perfectly.
Marshmallow Cardstock — my go-to for alcohol-marker coloring; crisp, bright, smooth finish
Pig Press — used on top of my stamp positioner for a solid impressions every time
Barely Arts glue — available as Starter Kit (with detailed tip) and Refill — my adhesive for layering when a wet glue is desired
Color and technique I colored on Pajama Crafter Stamps’ Marshmallow Cardstock with alcohol markers for bold, smooth blends and bright, crisp results. The Hog Your Shine images are perfect for layered color and playful shading, and Stadium Food adds that snack-time charm. I used the Pig Press with my stamp positioner to get clean, even impressions every time.
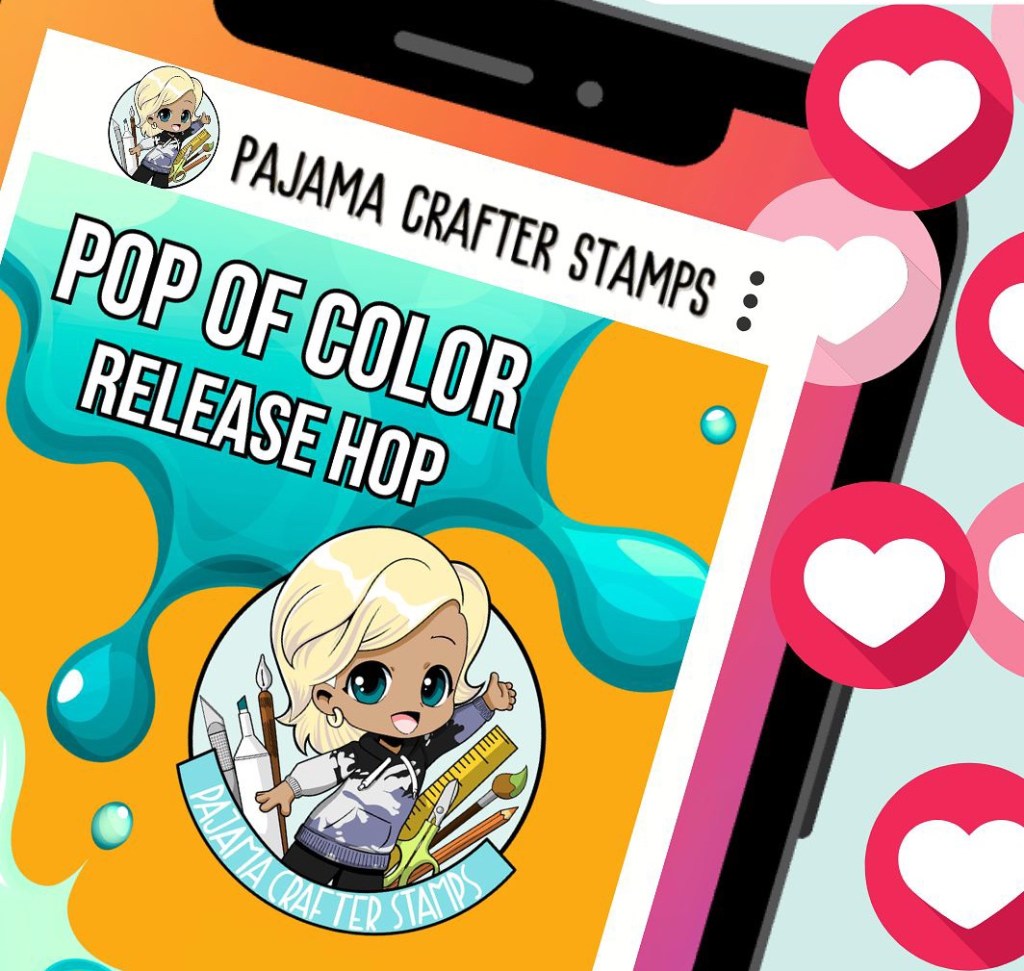
Join the POP of Color Instagram Hop We’re hopping over on Instagram for the Pajama Crafter Stamps March 2026 Inspiration Hop: POP of Color. Our design team is sharing colorful new projects, tips for using color and contrast, and loads of crafty inspiration. Hop with us on Instagram at @PajamaCrafterStamps and @stampedbykelly — there’s also a chance to win a certificate toward purchases on the Pajama Crafter Stamps site!
Shop and support Fill your cart at PajamaCrafterStamps.com — I’ve included product links above for easy shopping.
See you on Instagram — hop, enjoy the projects, and don’t forget the snacks!
Here is a perk at my HOP CARD, which I used the NEW RELEASE, Closer to Extinction, but with creative color placement, made him a FLORIDA GATOR!! To put my simple layers together, my GO TO dry adhesive is from Tape Runner and you can use promo code KELLY10 for 10% off your cart.
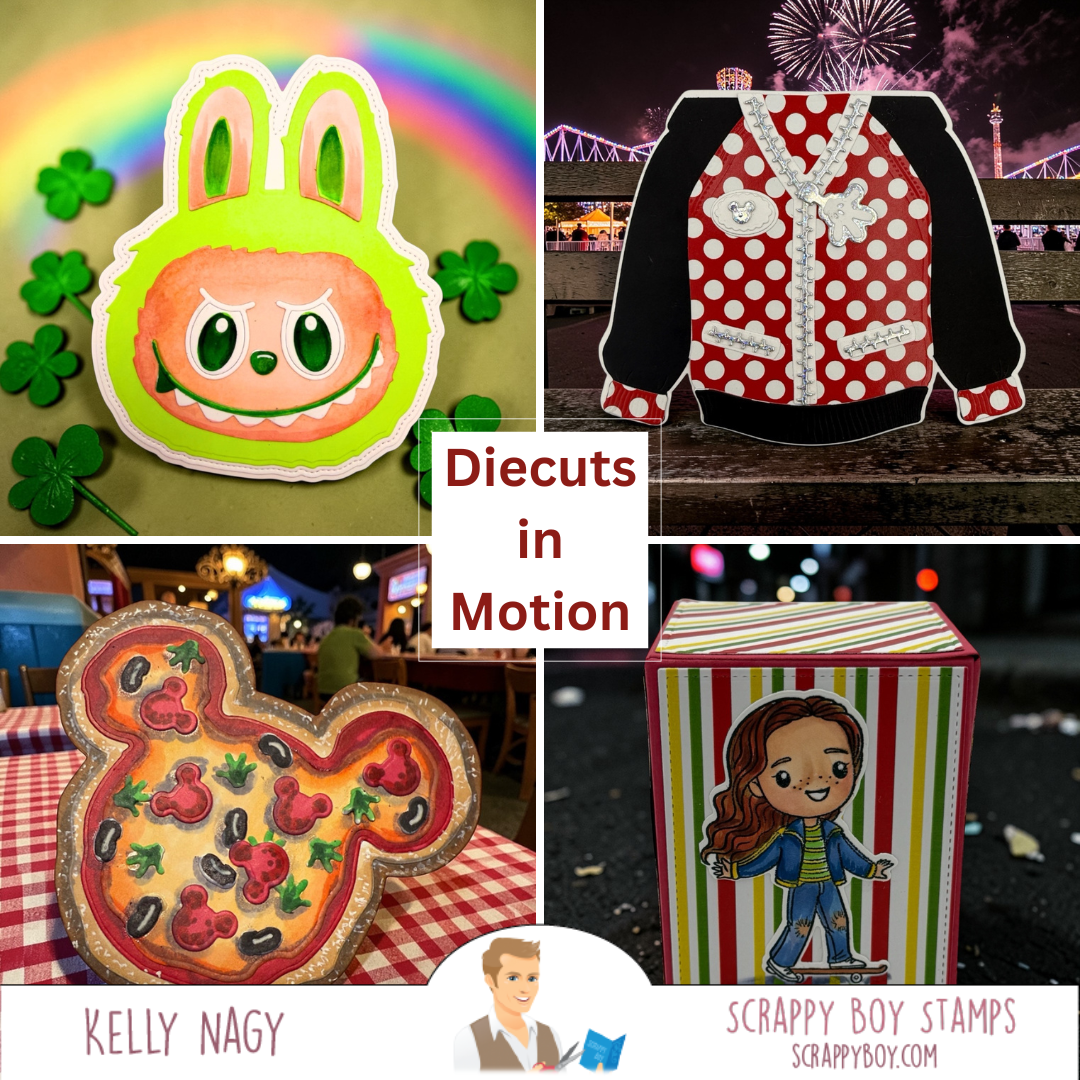
Unlocking Creativity with Die Cuts in Card Making! ✂️✨
Welcome back, crafty friends! Today, I’m excited to share how die cuts can transform your card making and elevate your projects to new heights. From festive designs like the Shabubu Head Die Set for St. Patrick’s Day to cozy creations with the Hoodie Shaped Card, the possibilities are endless!
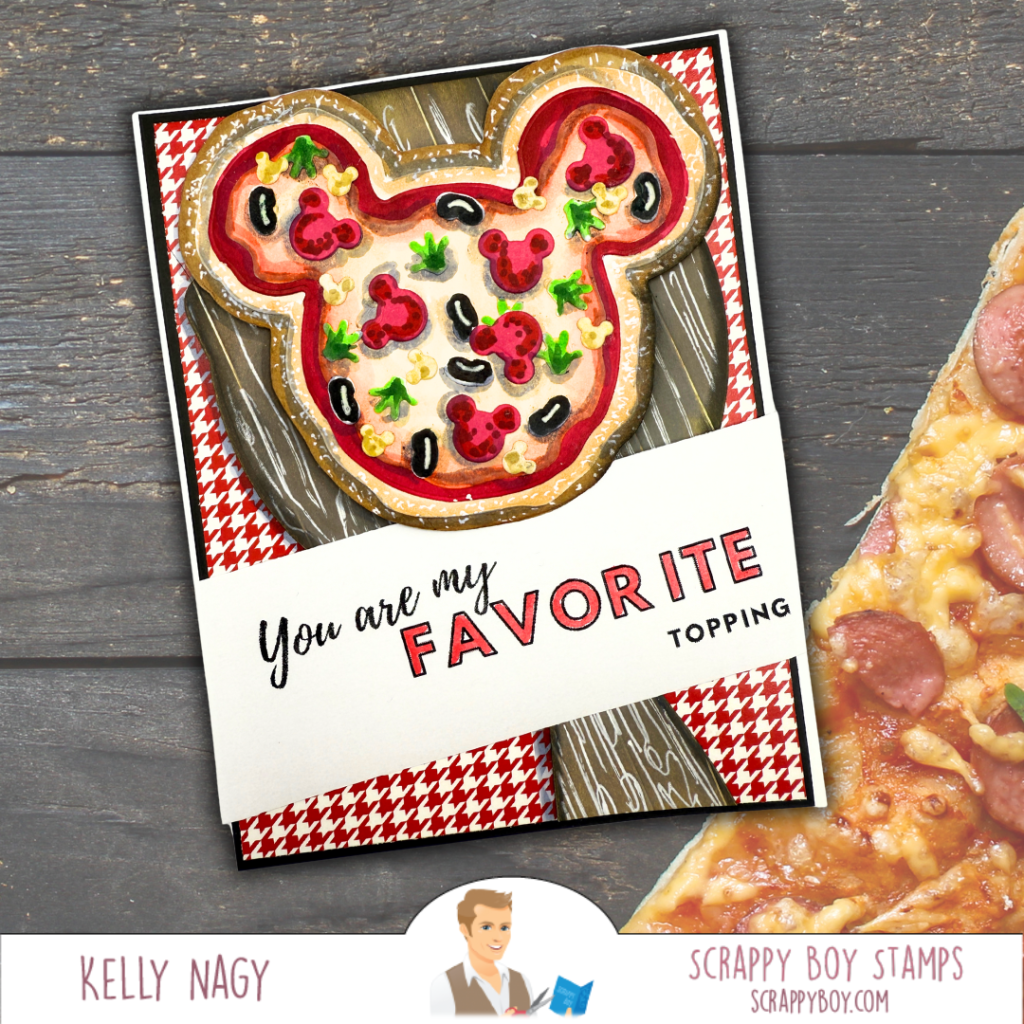
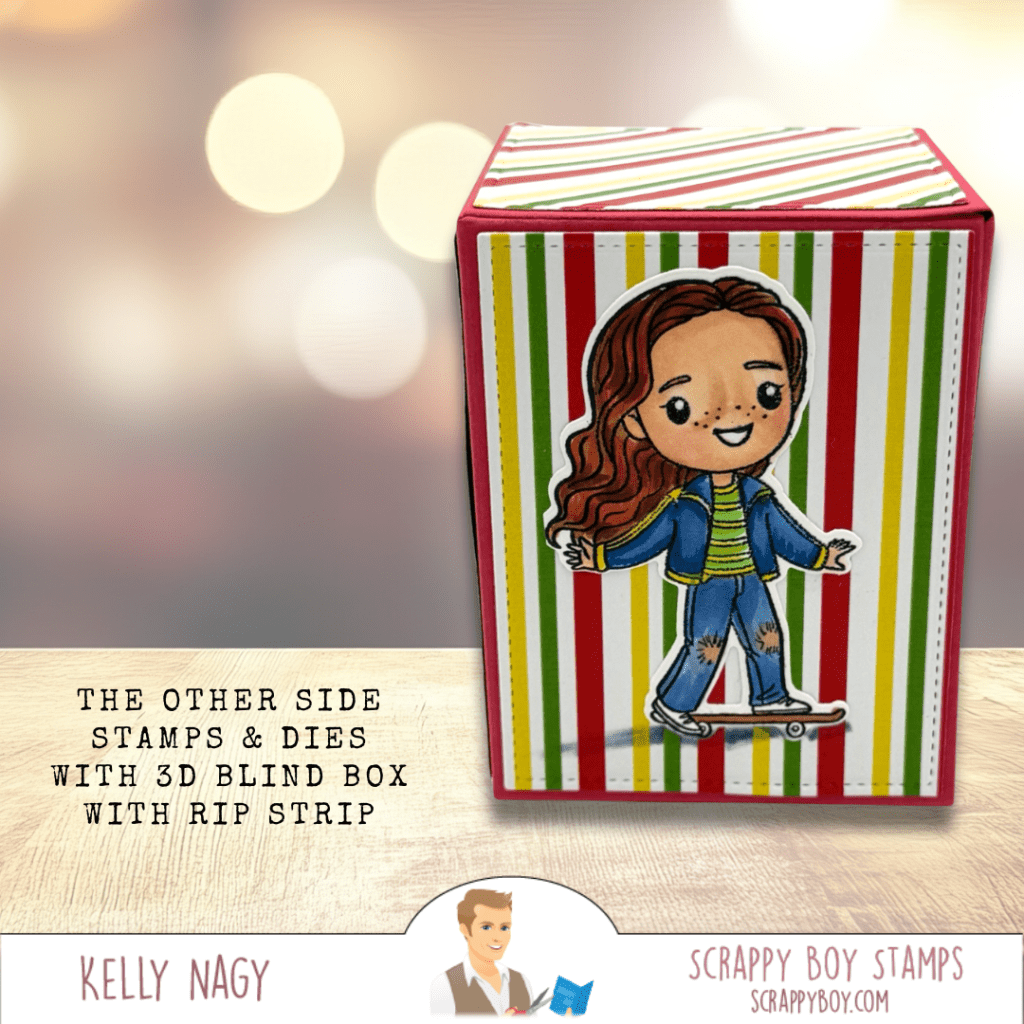
Get inspired by the fun Mouse Pizza Builder Die Set and the creative Blind Box with Rip Strip for unique gift card presentations. With die cuts, you can add dimension and personality to your cards, making them truly special. Ready to unleash your creativity? Let’s dive into these amazing projects together! 💖🎉
Hey there, crafty friends! Are you ready to take your card making and paper crafting to the next level? Let’s dive into four fabulous projects that showcase how die cuts can truly transform your creations!
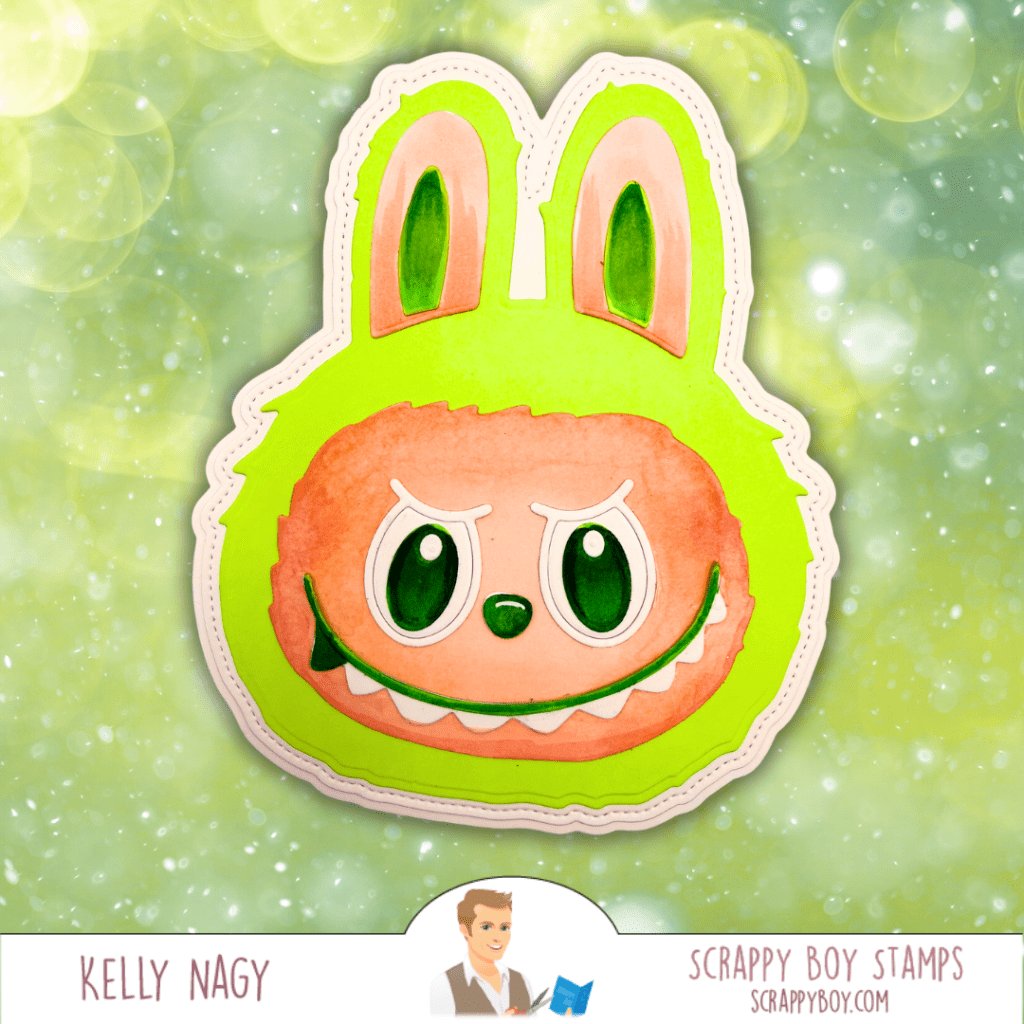
1️⃣ Shabubu Head Die Set: Just in time for St. Patrick’s Day, this die set lets you customize adorable characters in vibrant green! With die cuts, you can add dimension and personality to your cards, making them extra special. 🎉💚
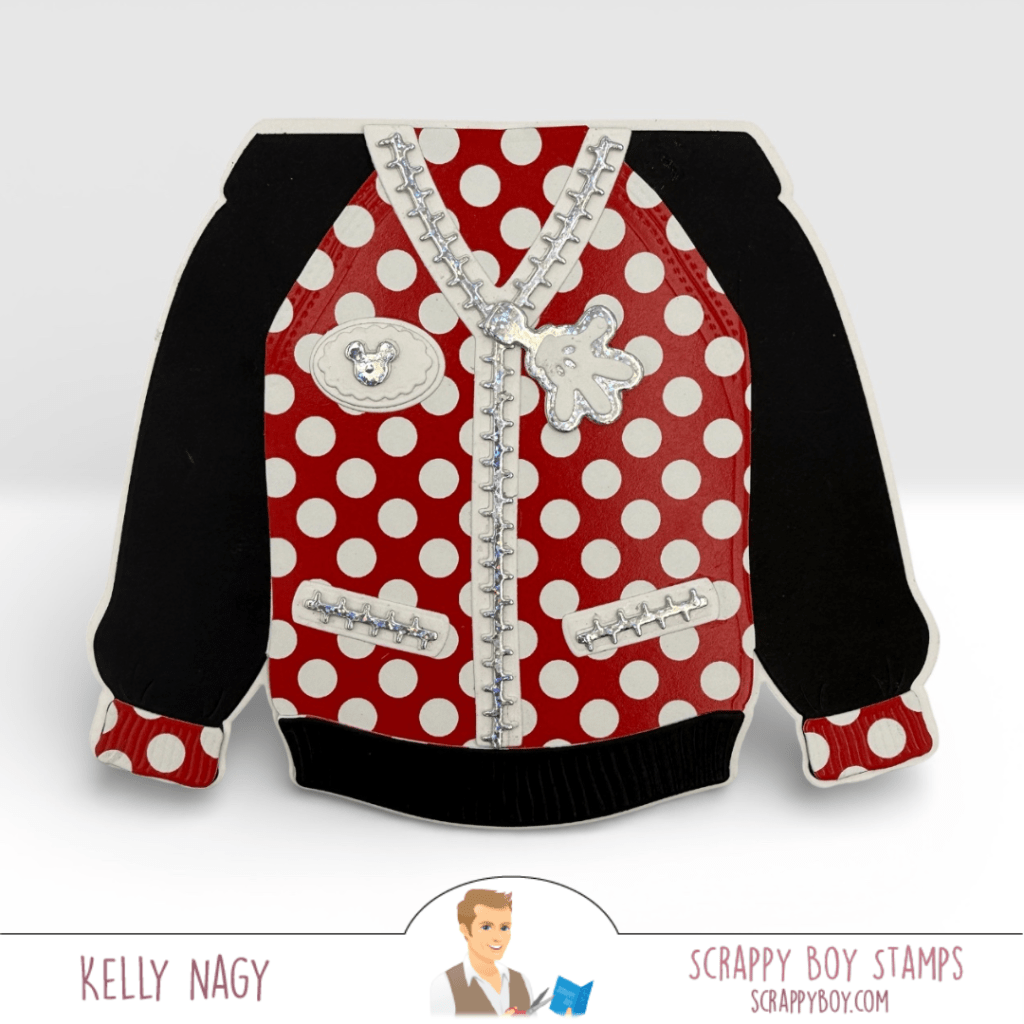
2️⃣ Hoodie Shaped Card & Add-On Die Set: Say goodbye to basic cards! This hoodie die set allows you to create cozy, themed cards that can be zip-up or feature front pockets. Customization is key, and with just a few die cuts, you can create a professional-looking design that’s full of warmth and fun. 👕✨
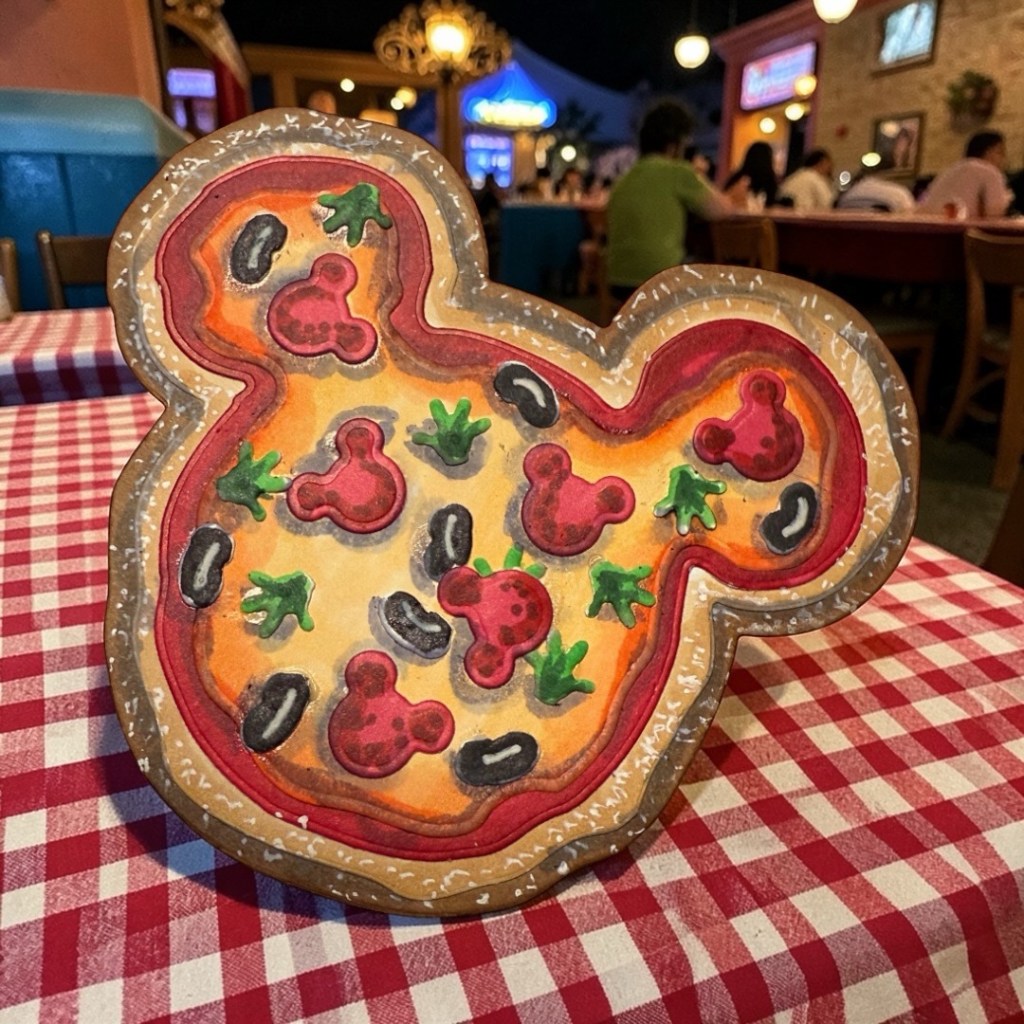
3️⃣ Mouse Pizza Builder Die Set: This set proves that die cuts can do much more than just cut flat shapes! Use them creatively, like I did when I transformed a piece from the Magic Mirror Mini Die Set into a pizza board. Experiment with cutting your dies in plain white cardstock and let your imagination run wild with colors and arrangements! 🍕🐭
4️⃣ Blind Box with Rip Strip: This project combines playful design with functionality! Using patterned paper and an image from The Other Side Stamp Set, I created a gift box that’s perfect for presenting a gift card. The rip strip adds an exciting reveal, making gift-giving even more delightful! 🎁✨
With die cuts, the sky’s the limit! You can add dimension by layering your cuts, and even more depth by adding shadows and colors using your favorite mediums or simple ink blending on the edges.
So, are you ready to unleash your creativity? Dive into these projects and see how die cuts can elevate your crafting game! Share your favorites in the comments below, and let’s inspire each other to create something amazing!
I use dry adhesive and liquid adhesive for my projects. There are specific times when one works better than the other. Follow me for more tips on that and if you wish to visit taperunner.com you can use code Kelly10 for 10% off your cart.
Discover three fun paper crafting projects featuring the newest release from Scrappy Boy Stamps! In this post, I’m sharing an A2 scene card, a playful mini slimline card, and a creative Easter favor made with the Shabubu Head Card Die and Blind Box Die. I’m also sharing one of my favorite crafting tips—using dry adhesive from Tape Runner to keep layers smooth and warp-free while assembling detailed card designs. ✂️✨
The newest release from Scrappy Boy Stamps is packed with playful characters, creative dies, and fun papers that make crafting an absolute joy! Today I’m sharing three different paper projects featuring items from this release. Each project highlights how easily these products can be mixed, matched, and customized to create something truly unique.
Before we jump into the projects, I also want to share one of my favorite crafting essentials. When assembling my cards and layered die cuts, I almost always reach for dry adhesive from Tape Runner. Dry adhesive is fantastic for cardmaking because it helps keep papers—especially lighter weighted papers—from warping or developing ripples, which can sometimes happen with wetter adhesives.
Another reason I love using dry adhesive is that it’s a bit more forgiving at the start. If something isn’t perfectly aligned, you can gently warm the adhesive with a heat tool and carefully lift the piece to reposition it before it fully bonds. This makes it much easier to straighten layers and fine-tune placement while assembling your design.
If you’d like to give it a try, you can visit taperunner.com and use the promo code KELLY10 to receive 10% off your entire cart.
A2 Landscape Card – The Other Side
For my first project, I created an A2 landscape card using the The Other Side Stamps & Outline Dies. I paired the images with the Beyond The Normal Living Room Background Stamp to build a fun and detailed scene.
To pull the design together, I used patterned papers from the Beyond the Normal 6×9 Paper Pack. The papers coordinate beautifully with the stamped images and really help bring the entire card to life. I love how easy it is to create a full scene with this collection—it almost feels like stepping right into the story.
When layering the stamped images and patterned papers, I used dry adhesive from Tape Runner to keep everything smooth and flat. Scene cards often include multiple layers, and dry adhesive helps prevent bubbling or distortion in the patterned paper.
Products Used
The Other Side Stamps & Outline Dies Beyond The Normal Living Room Background Stamp (6×6) Beyond The Normal 6×9 Paper Pack
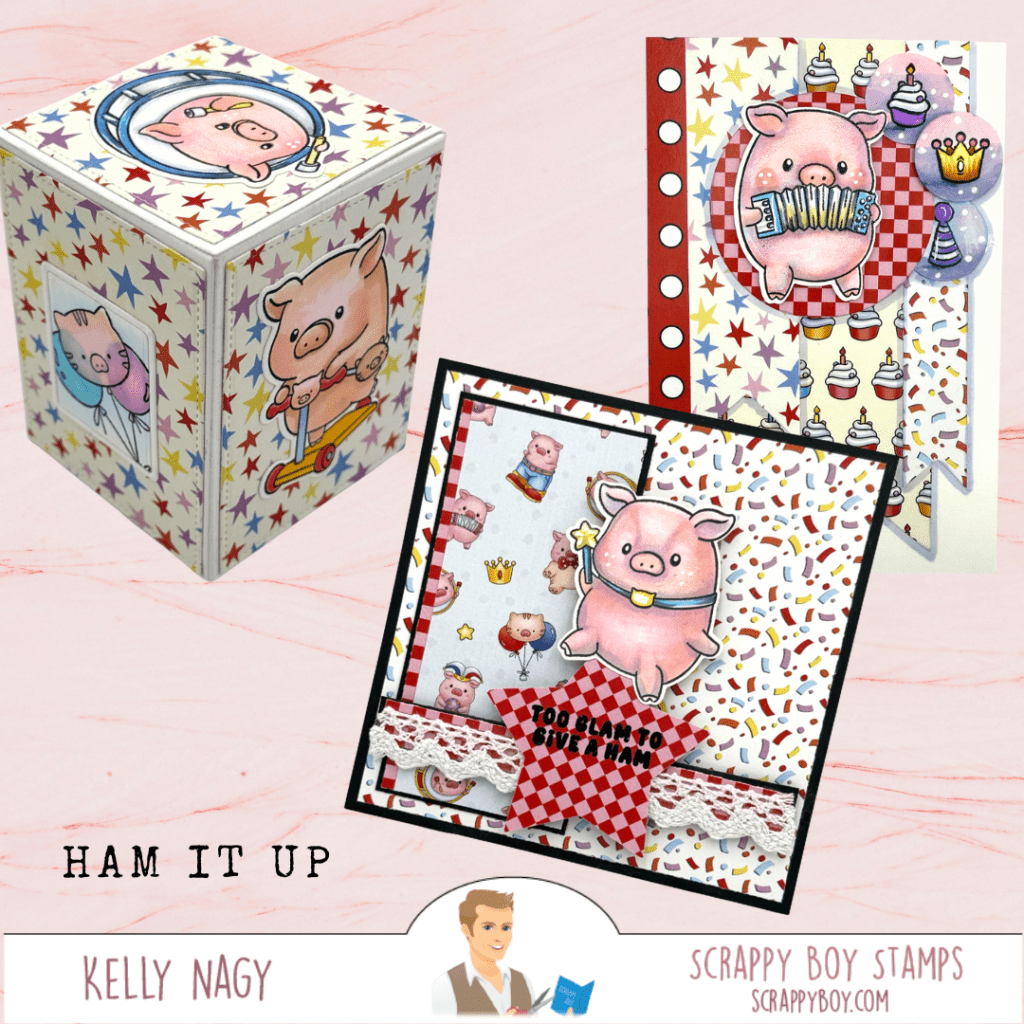
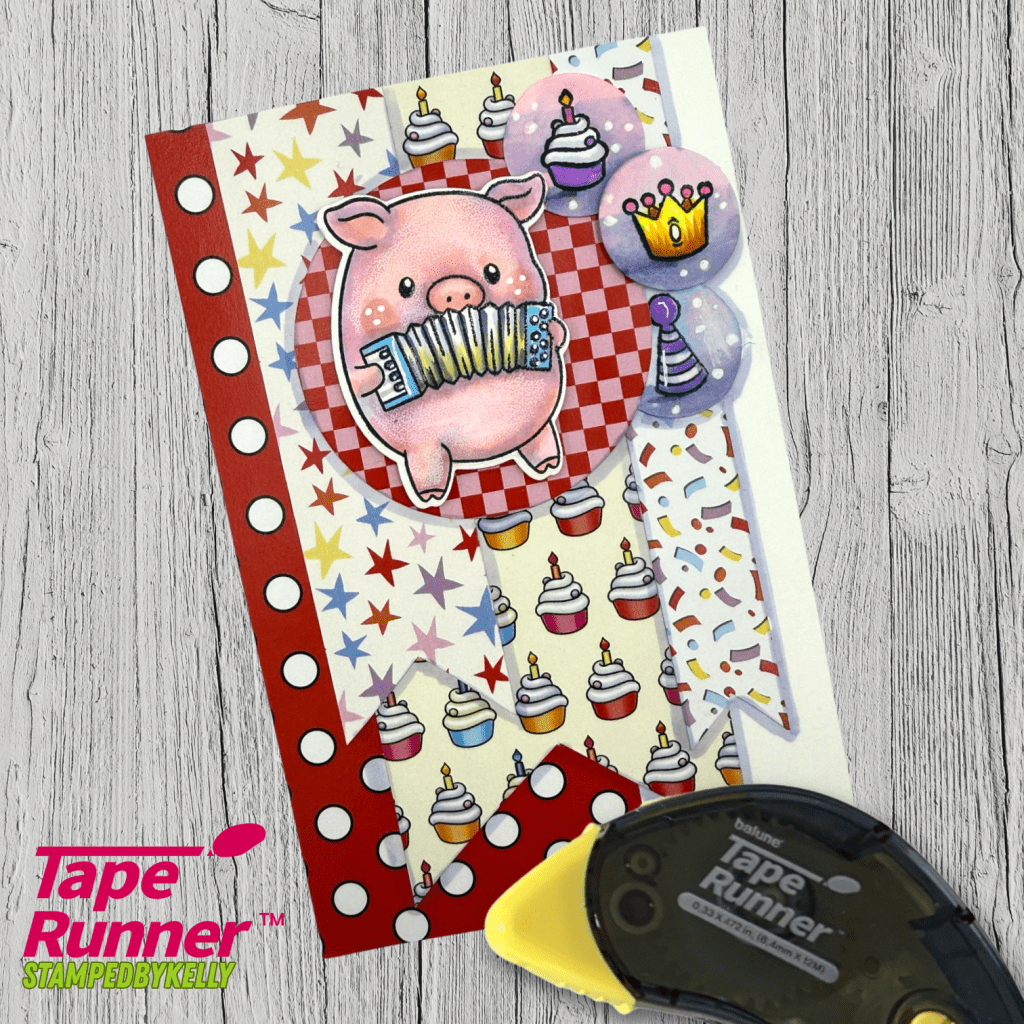
Mini Slimline Card – Ham It Up
Next, I created a playful mini slimline card using the adorable Ham It Up collection.
This project features the Ham It Up Stamps, Outline Dies, and the coordinating 6×9 Paper Pack. The patterned papers add the perfect pop of color, while the stamped images bring so much personality to the card.
Mini slimline cards are such a fun format when you want something a little different while still keeping the design simple and eye-catching. I again used dry adhesive from Tape Runner while assembling the layers and die cuts because it works wonderfully for stacking die-cut elements while keeping everything smooth and wrinkle-free.
Products Used
Ham It Up Stamps Ham It Up Outline Dies Ham It Up 6×9 Paper Pack
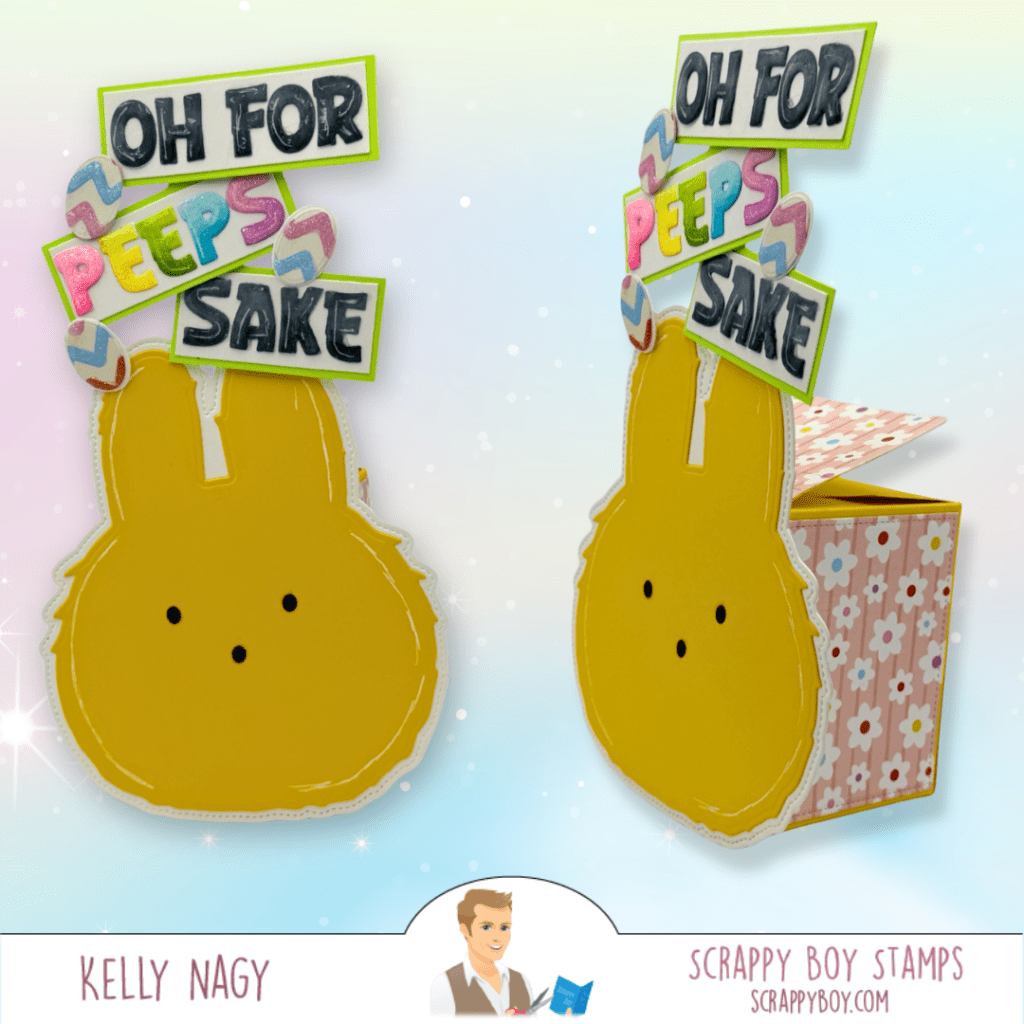
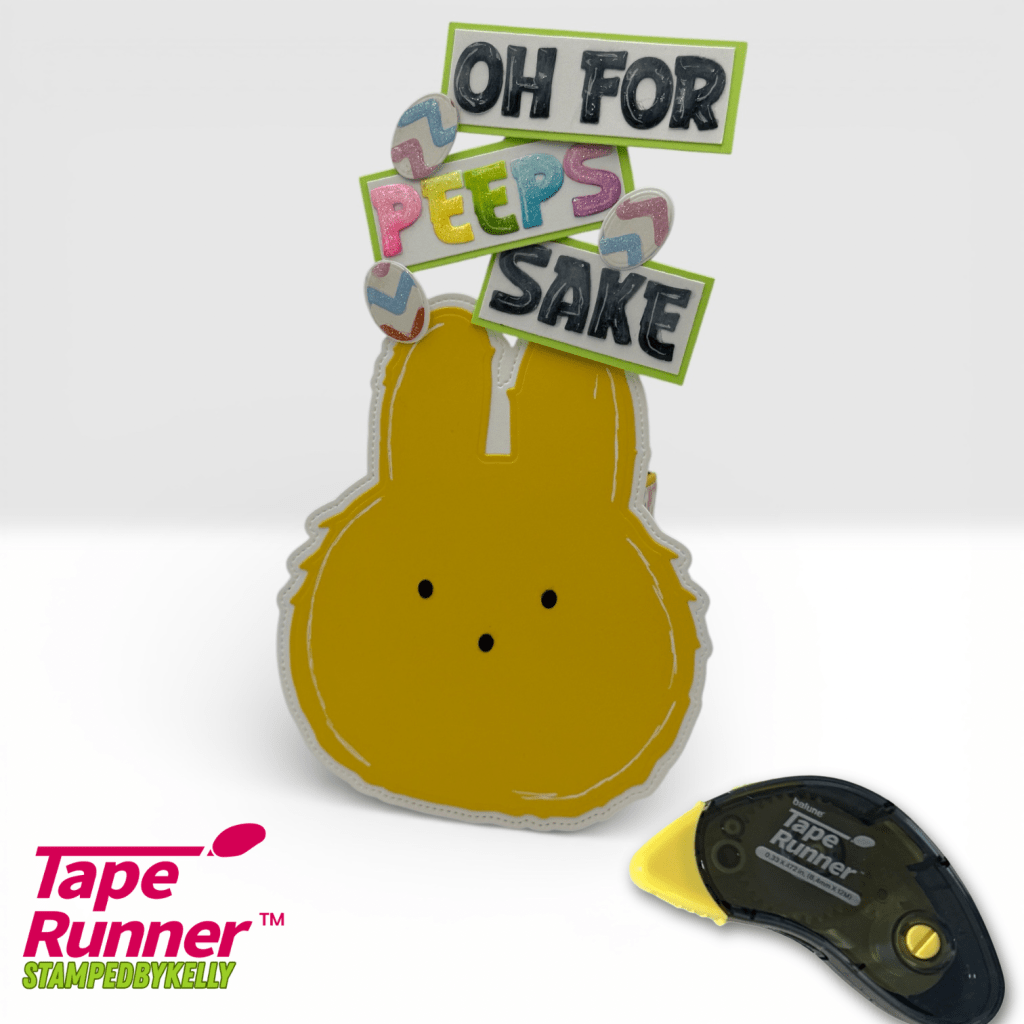
Shabubu Easter Favor – A Fun Surprise Project
For my third project, I wanted to create something a little unexpected! I used the Shabubu Head Card Die and paired it with the Blind Box Die with Rip Strip to design a fun Easter favor or small gift project.
The Blind Box die creates a playful interactive element with the rip strip, making the project feel like opening a surprise package. To personalize the favor, I added a custom message using the Scrappy Boy Alphabet Die.
This would be perfect for Easter treats, small gifts, or party favors, and I love how these dies can be combined in creative ways to create something completely new. While building up the layered die pieces for the Shabubu design, dry adhesive from Tape Runner made it easy to stack the layers neatly while keeping everything perfectly flat.
Products Used
Shabubu Head Card Die Blind Box Die with Rip Strip Scrappy Boy Alphabet Die
So Many Creative Possibilities
This newest release from Scrappy Boy Stamps offers so many fun ways to create cards, gifts, and interactive projects. Whether you’re making detailed scene cards, mini slimlines, or surprise gift packaging, these products make it easy to craft something memorable.
And when it comes to assembling those layers, dry adhesive from Tape Runner is one of my favorite tools for keeping papers smooth, preventing warping, and allowing a little flexibility while putting everything together.
If you’re interested in these products, you can find Scrappy Boy Stamps products at scrappyboy.com as well as at Scrapbook.com.
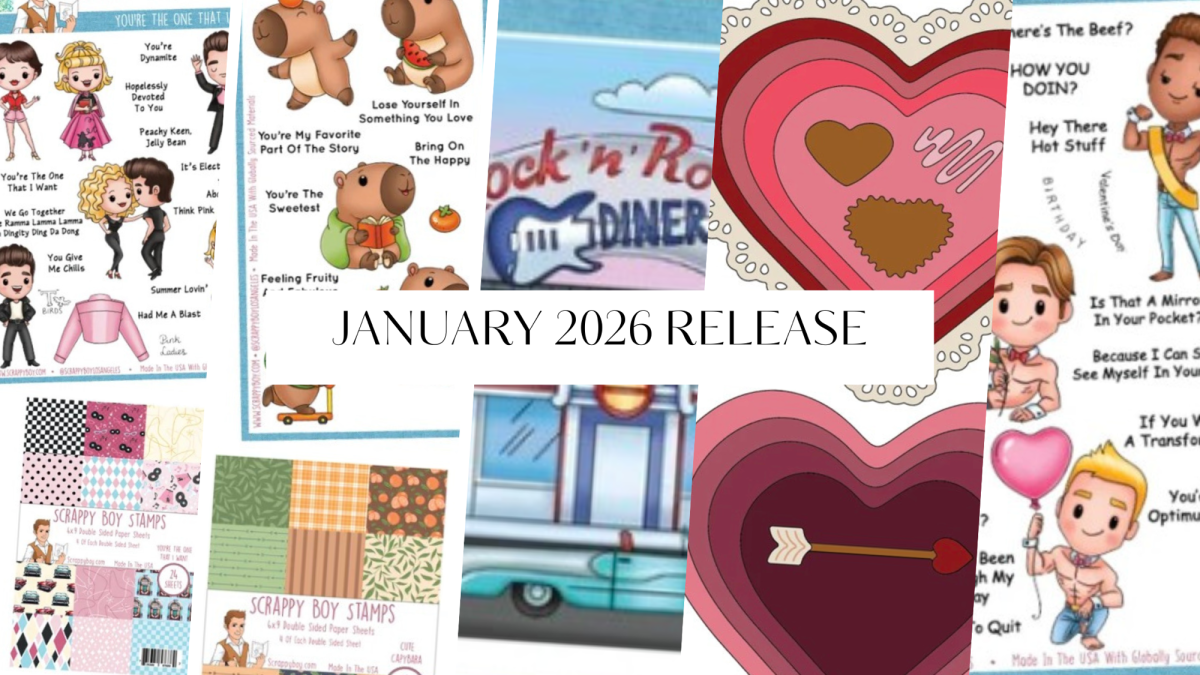
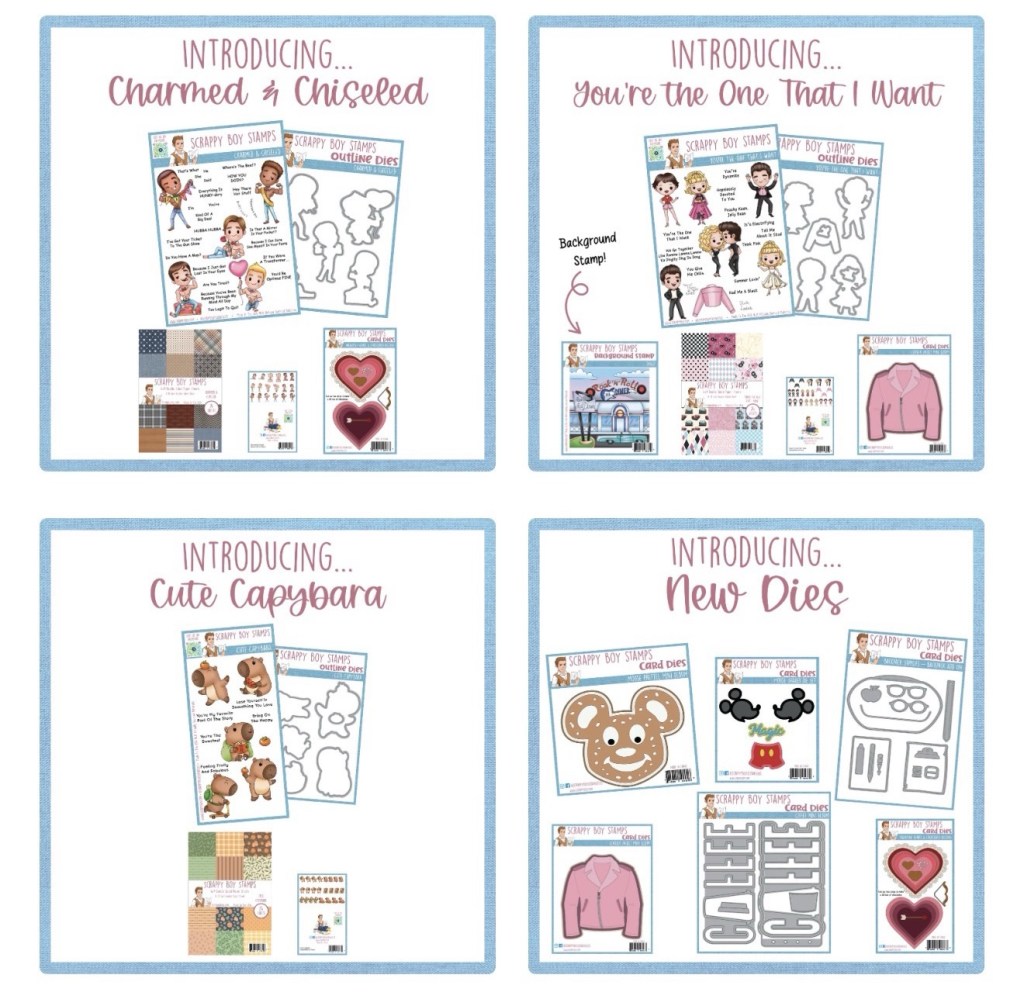
I’m thrilled to share some wonderful inspiration featuring the latest releases from Scrappy Boy Stamps last month. Our February Release is coming on the 20th!!!
Get ready to unleash your creativity with three stunning cards that showcase the beautiful new collections!
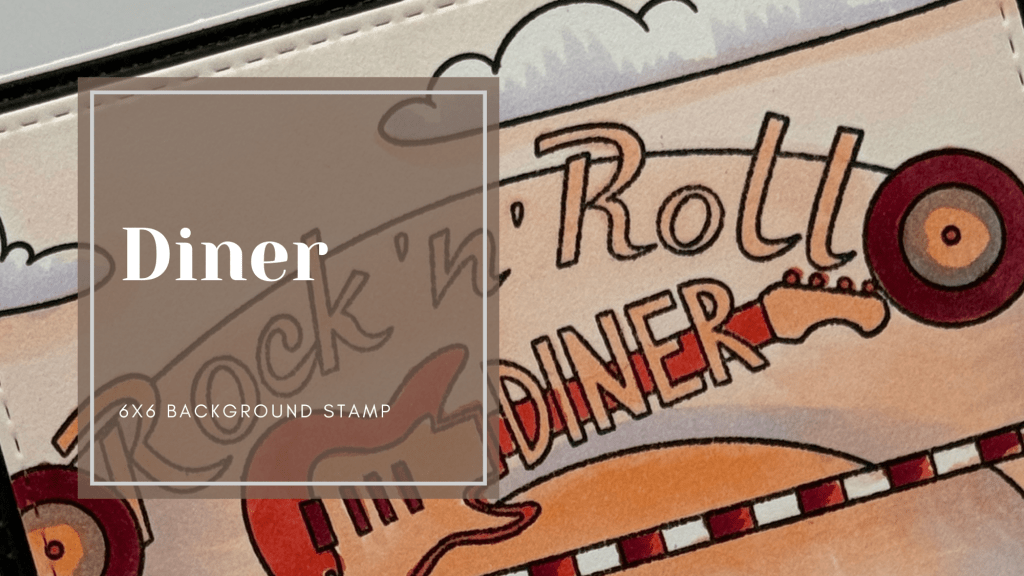
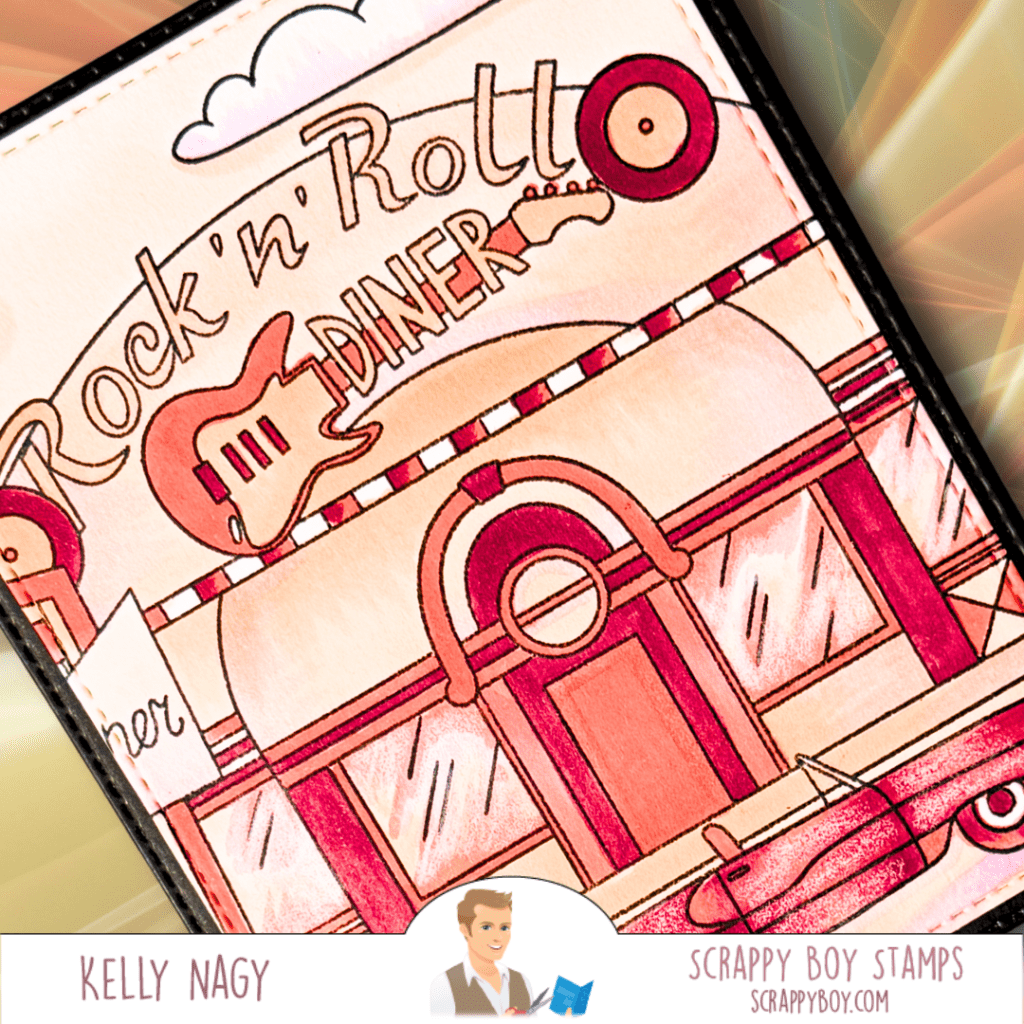
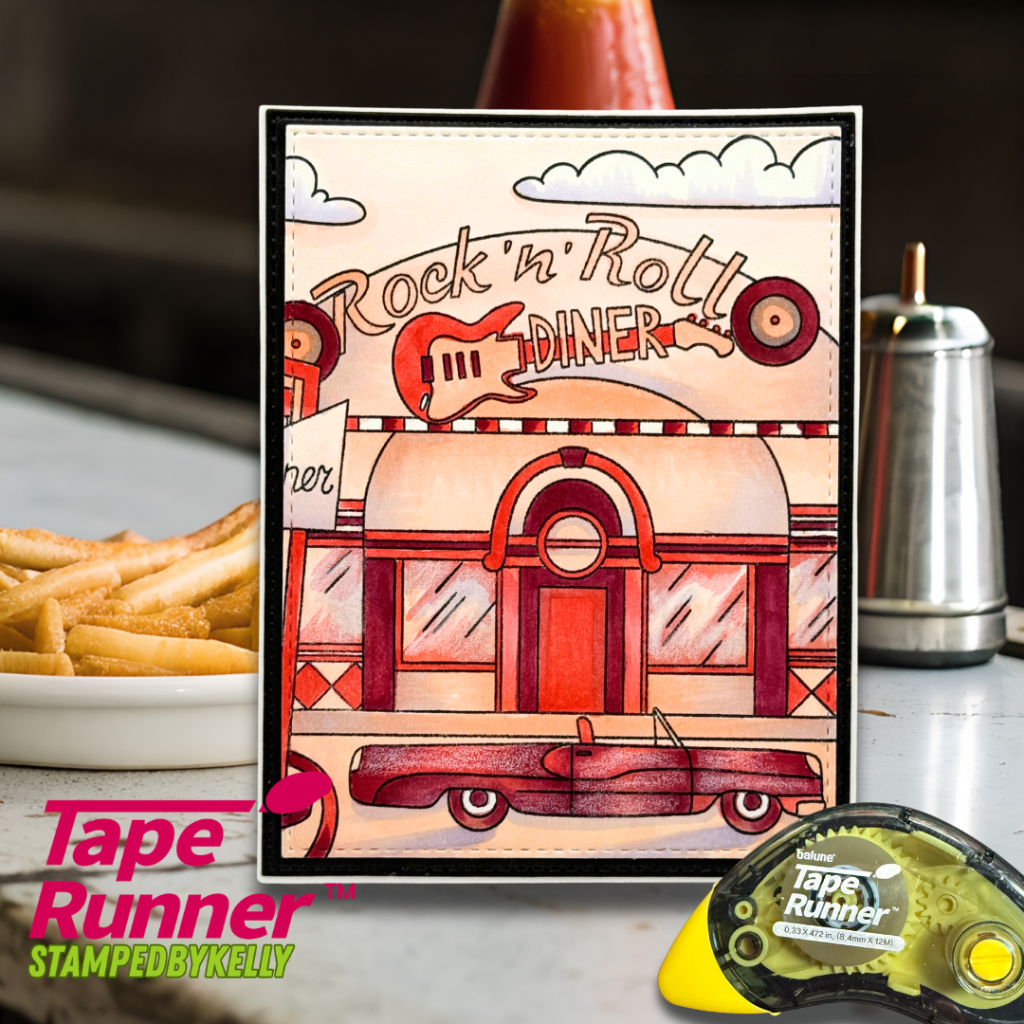
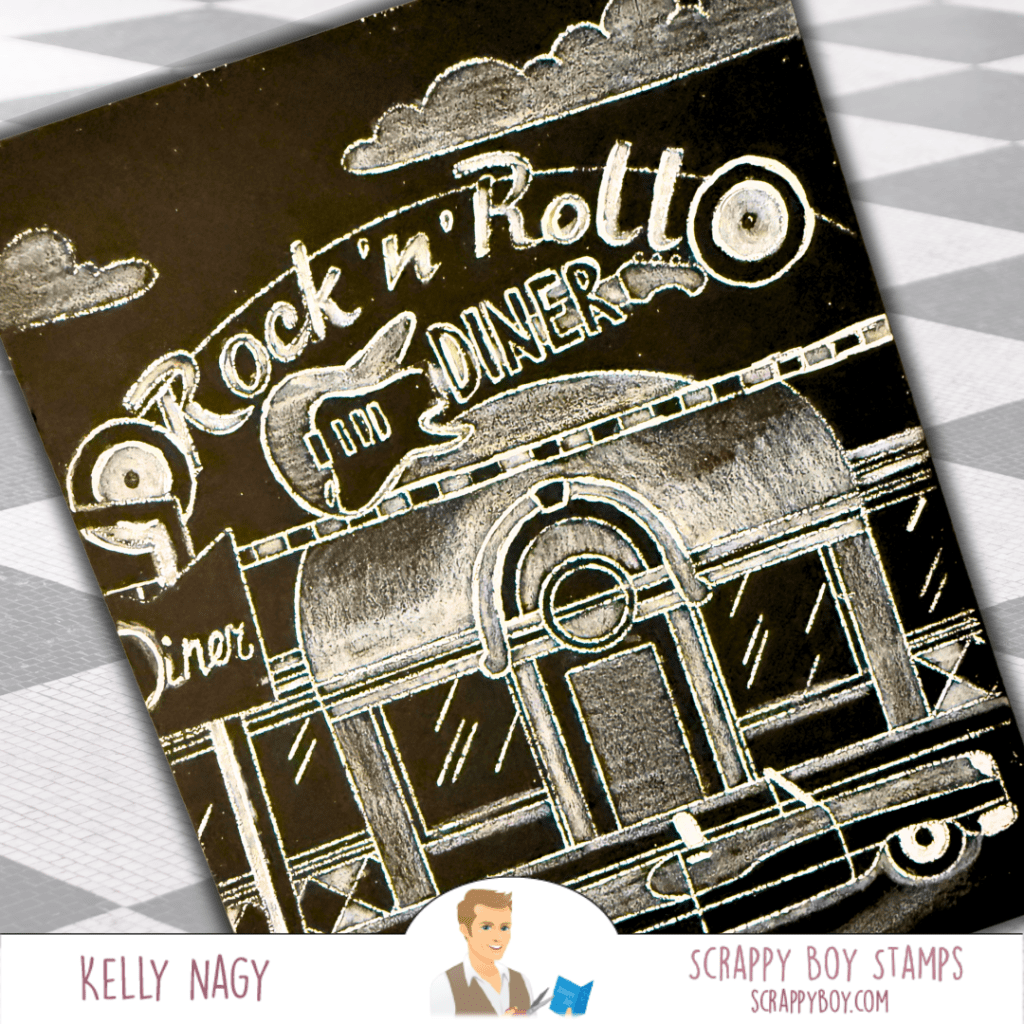
Diner Background Stamp 🍔 First up, we have the Diner Background Stamp. This fun and nostalgic stamp adds a playful touch to any project.
For my first card, I took on the February Color Challenge, utilizing a monochromatic color palette to create a striking design. Using varying shades of red, I crafted a vibrant backdrop that perfectly embodies the diner theme. Pairing this backdrop with complementary colors makes the card truly pop and highlights the versatility of the Diner stamp!
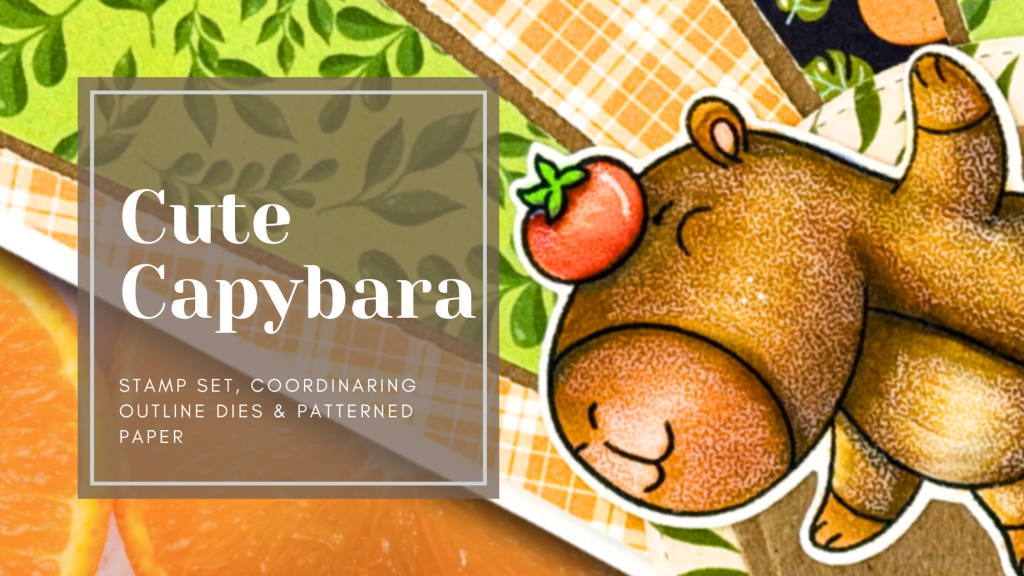
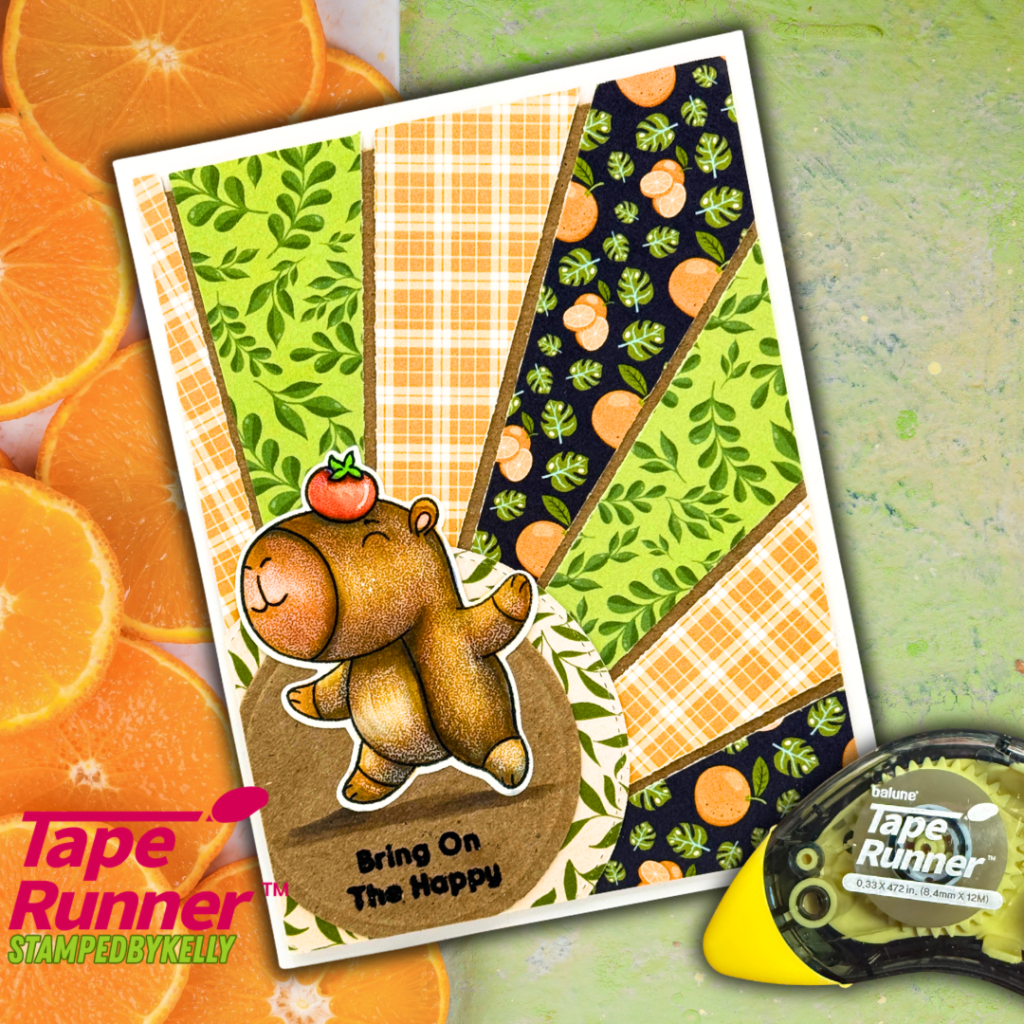
Cute Capybara Collection 🦙 Next, let’s talk about the Cute Capybara Collection, which includes adorable stamps,outline dies, and coordinated patterned paper.
I crafted a cheerful card featuring these lovely capybaras enjoying a sunny day. With whimsical patterns and soft color schemes, this collection truly brings joy to your crafting!
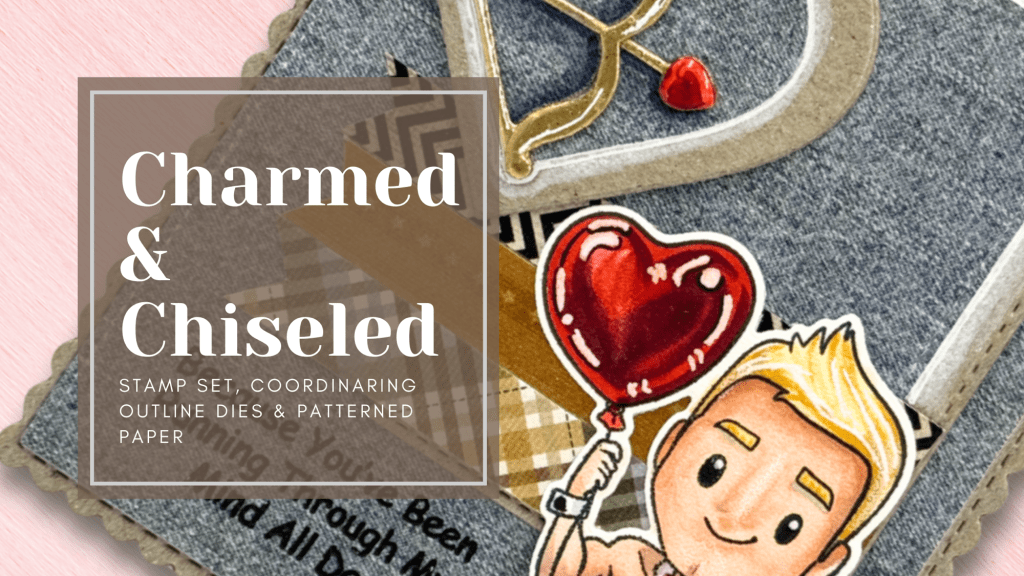
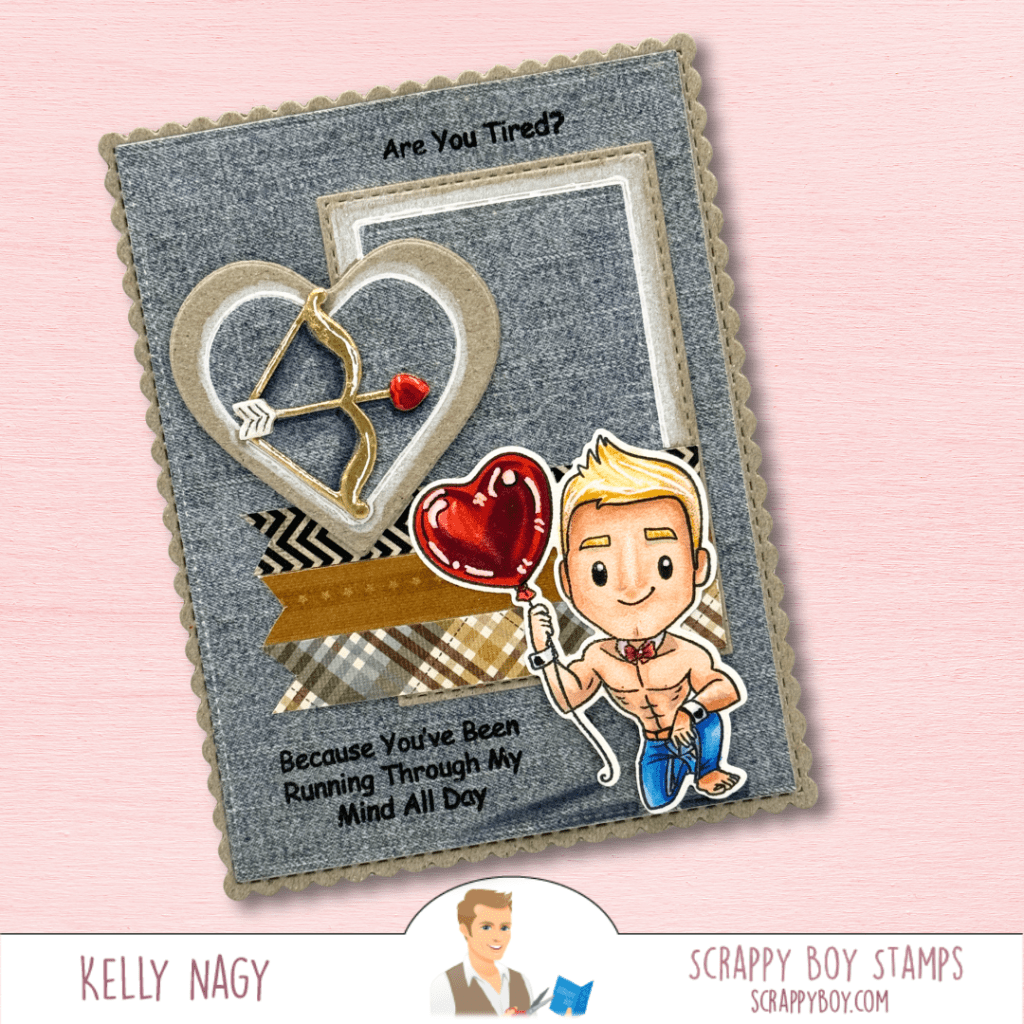
Charmed & Chiseled Collection 💖 Lastly, I couldn’t resist using the Charmed & Chiseled Collection. With its stunning stamps and outline dies, this collection is a must-have!
I accented my card with the Valentine Hearts & Chocolates Nesting Dies for that perfect romantic touch. It’s great for crafting heartfelt cards this Valentine’s season!
Sneak Peek for Next Month! 🌟 I’m excited to invite you back next month, where I’ll be taking the Diner Background Stamp and incorporating it into a layout that is also monochromatic. It will be stamped with white ink, embossed on black paper, and then colored with a variety of white pencils to create a beautiful chalkboard effect. You won’t want to miss it!
Here is a throwback from last week with inspiration using same products, only in a totally different way!!! Happy Crafting!!
I hope these ideas inspire you to get creative with the Scrappy Boy Stamps January release! Explore these products to make your own unique creations. Happy stamping! 🌟
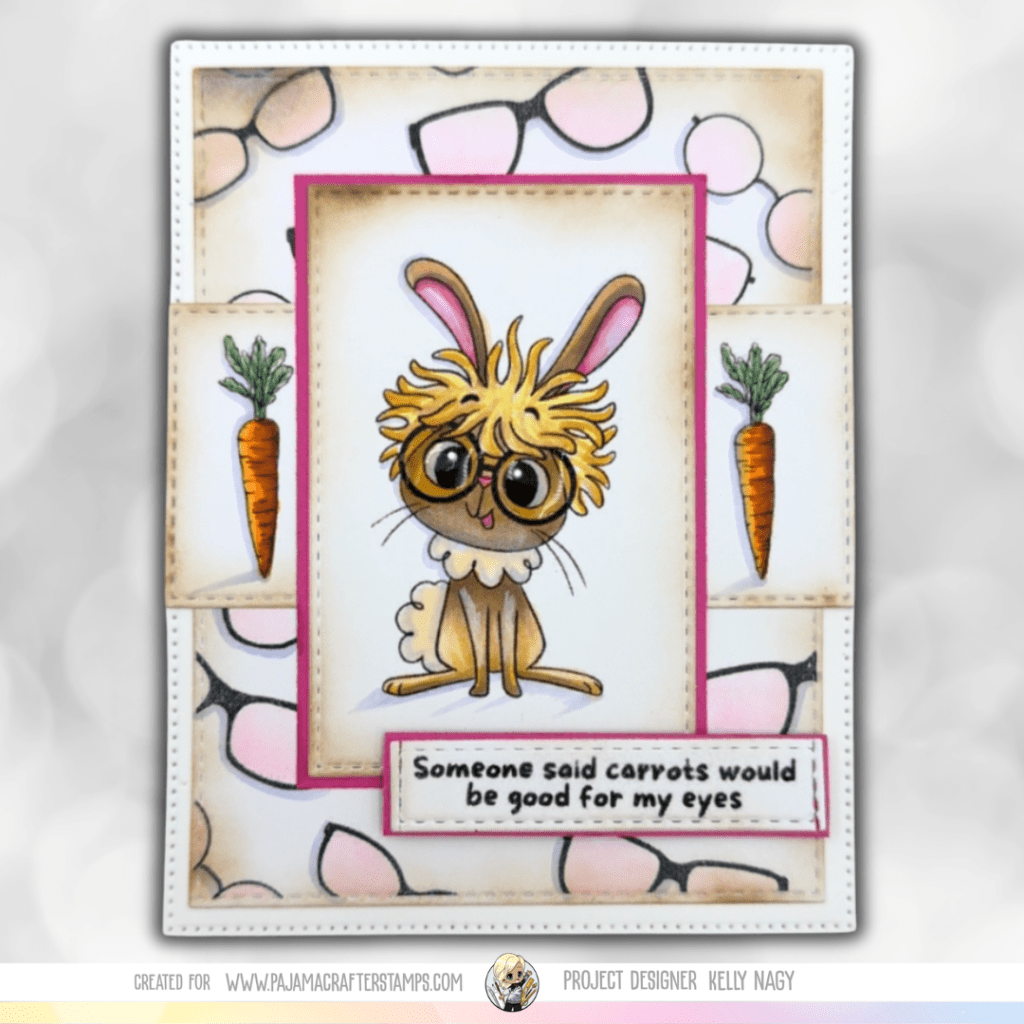
Jan 2026 New Release from PAJAMA CRAFTER STAMPS featuring card using FUNNY BUNNIES
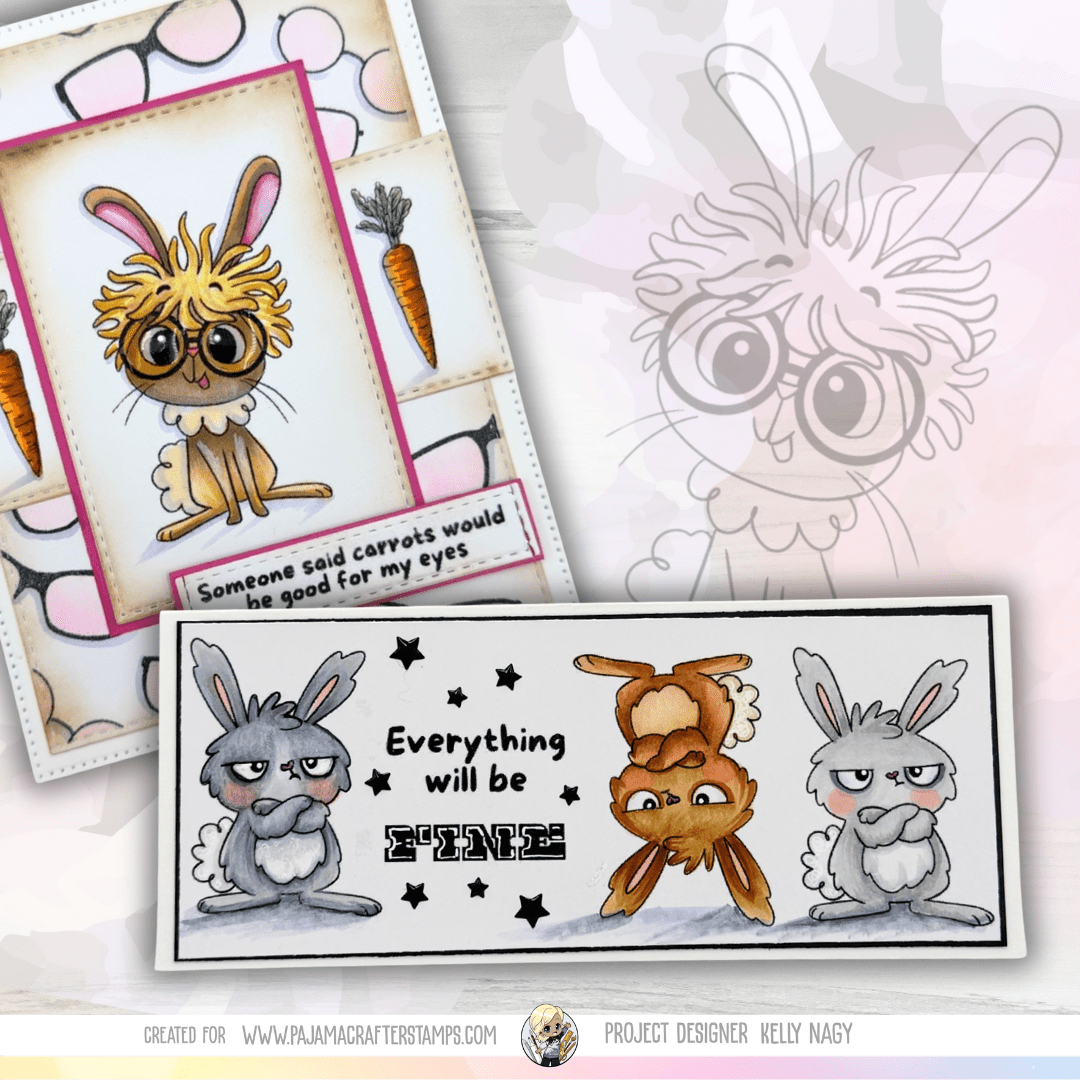
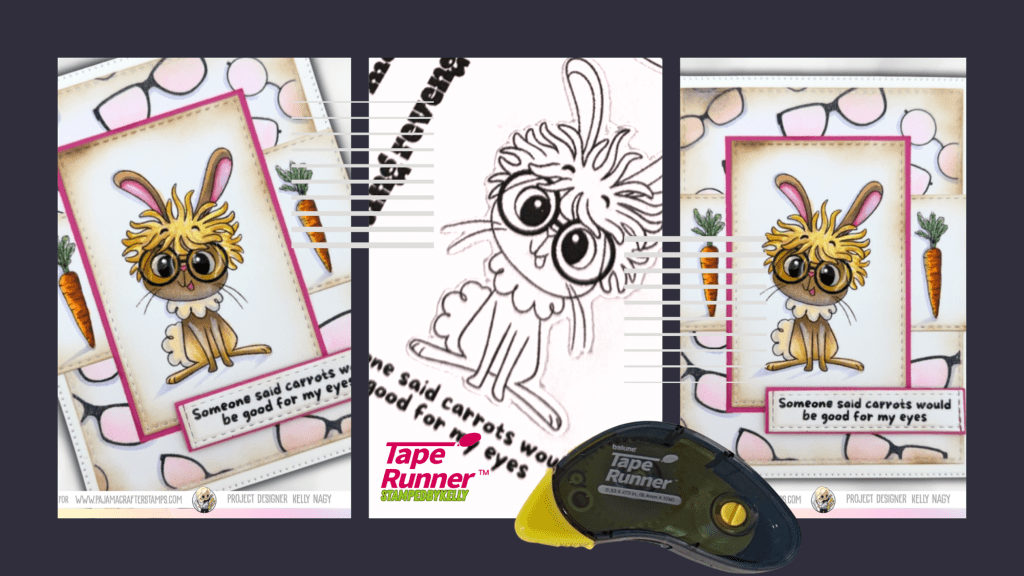
Hey there, crafty friends! I’m thrilled to share my latest creation featuring the delightful Funny Bunnies stamp set, just released by Pajama Crafters this January. This 6 x 6 stamp set is not just adorable; it’s bursting with personality and charm that’ll undoubtedly make your crafting experience exceptional! I have edited the photo to prevent theft of the images, but you can see the official photo on the Pajama Crafter Stamps’ website through my personal link here: https://pajamacrafterstamps.com/STAMPEDBYKELLYBLOG
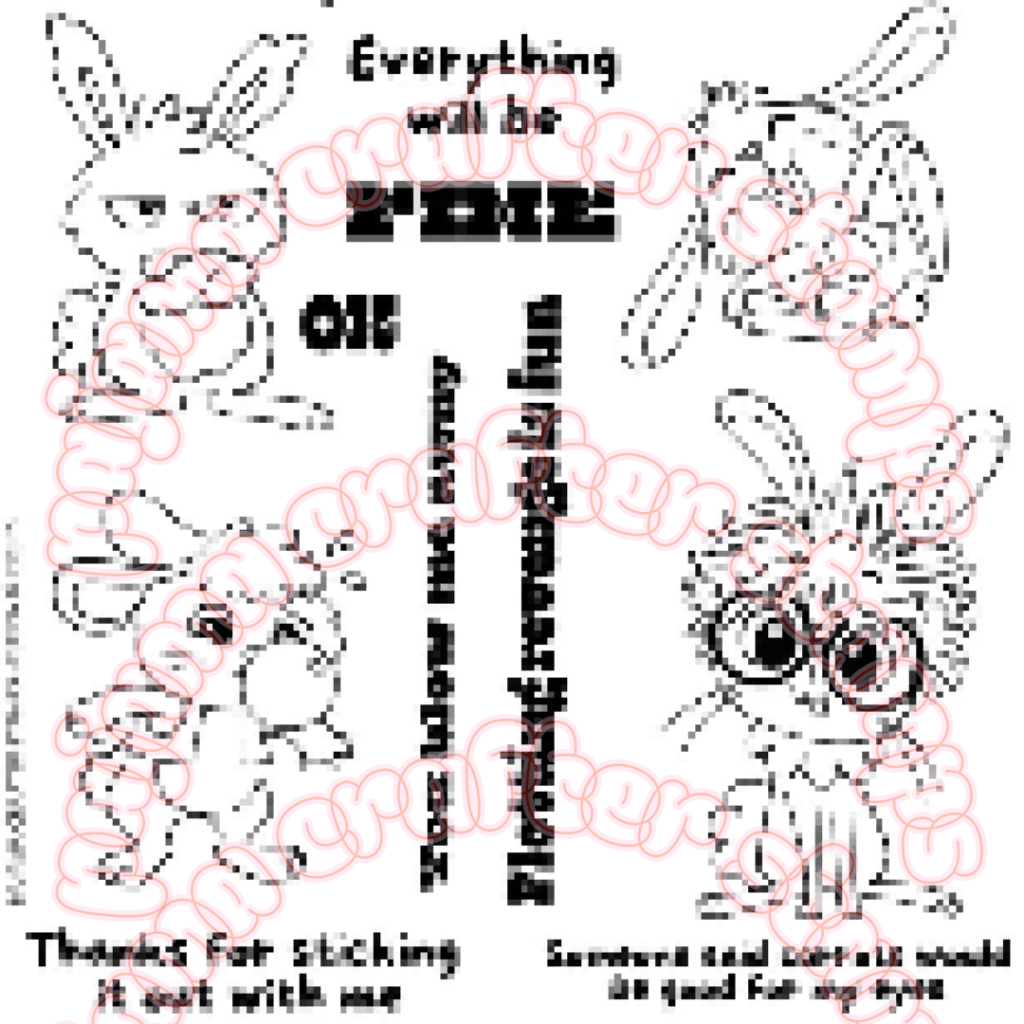
Copy Protected Sneak Peek
Each bunny in this set is the perfect size to truly stand out on an A2 card. Just picture it: a single bunny, commanding the stage and bringing smiles to anyone who sees it! Among them, there’s a bunny with an angry face that brings a giggle, a sweet one blowing bubble gum, and—my personal favorite—the chic bunny with quirky glasses and an amazing hairdo, which I think is as cute as a button!
Featuring Funny Bunnies Stamp Set – Jan 2026
I incorporated some patterned paper from my stash to create a stunning backdrop, but don’t shy away from using your favorite background techniques! The best part about the bunnies is that they can shine against any creative landscape you conjure. Imagine the fun possibilities!
📸 See Here for a Peek at the full stamp set! Funny Bunnies Stamp Set Pajama Crafter Stamps
Don’t underestimate the power of words—this set comes with a variety of sentiments, from phrases like “Everything will be FINE” to heartfelt messages celebrating friendship. Bunnies are no longer just for Easter; they’re here to spread joy year-round!
For this card, I carefully stamped that fabulous “nerdy” fashionista bunny onto marshmallow alcohol blending cardstock. Coloring her in with my trusty Copics brought her to life, and I added some dainty details with a white colored pencil and gel pen to make her pop even more. To give the design solid grounding, I layered some gorgeous stitched dies from my stash, which I ink blended with Distress Inks for added depth. I used my trusty TAPE RUNNER dry adhesive and love how quick it came together with NO DRYING time!!! Visit http://www.taperunner.com and use PROMO CODE: KELLY10 for 10% off your entire cart!
10% OFF PROMO CODE: KELLY10 at TapeRunner.com
And let’s not forget the sentiment! I opted for a playful touch: “Someone said carrots would be good for my eyes!” It’s the perfect mix of humor and warmth that captures the essence of these funny little creatures.
I hope this card inspires you in your crafting journey! If you feel encouraged by what I’ve shared and want to explore this adorable stamp set yourself, please consider clicking my affiliate link. Every click brings a smile to both me and Pajama Crafters, showing that you appreciate what I share.
🌟 Exciting news, everyone! I’m thrilled to share the inspiration behind my newest card creation featuring Pajama Crafter stamps! 🎨✨
Join us today on Instagram as we kick off our Rewind Hop, starting at the Pajama Crafter Stamps INSTAGRAM page. We’re showcasing our favorite products and projects from 2025 that are sure to spark your creativity! Don’t forget to comment, like, and follow each designer in the HOP for a chance to win a gift card to the Pajama Crafter Stamps shop! 💖🎁
Let’s get crafting together! 🛌💌 #PajamaCrafterStamps #StampedbyKelly #HamdmadeCards
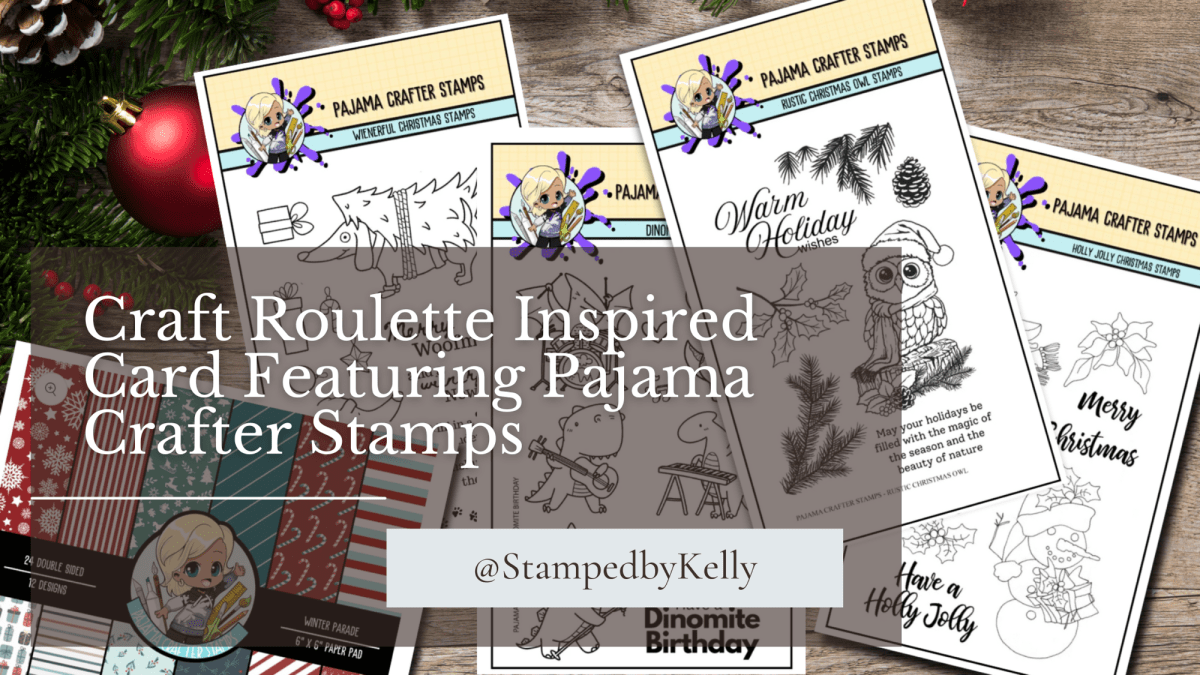
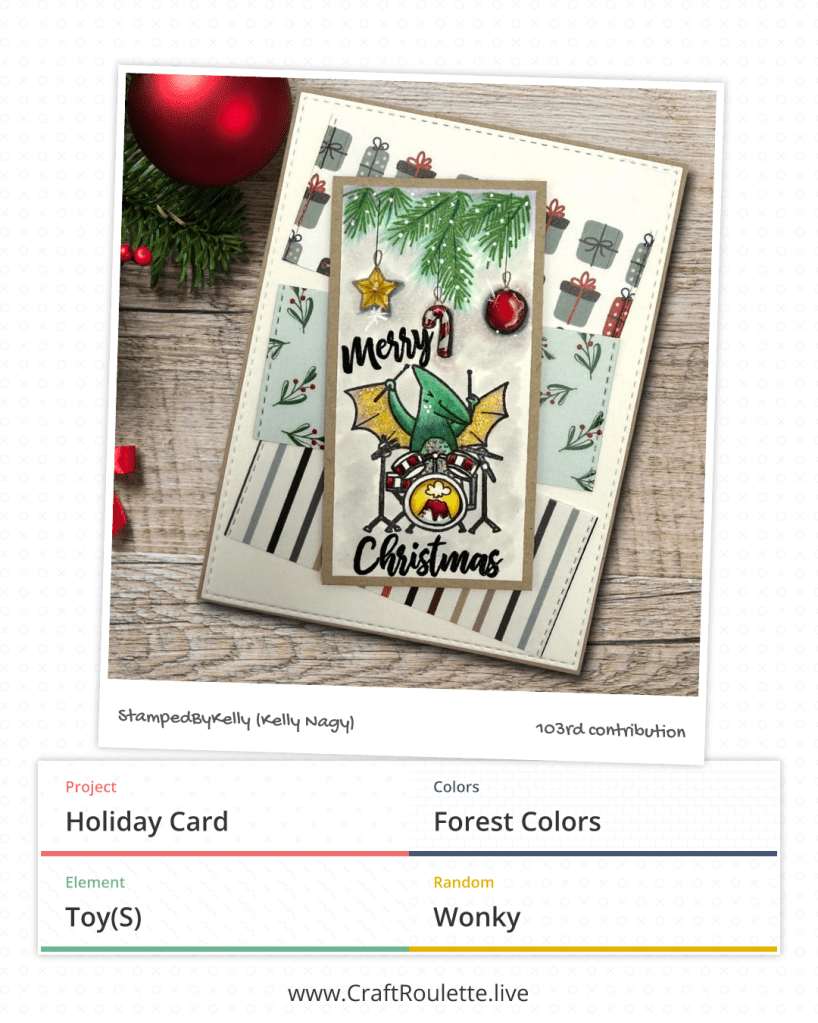
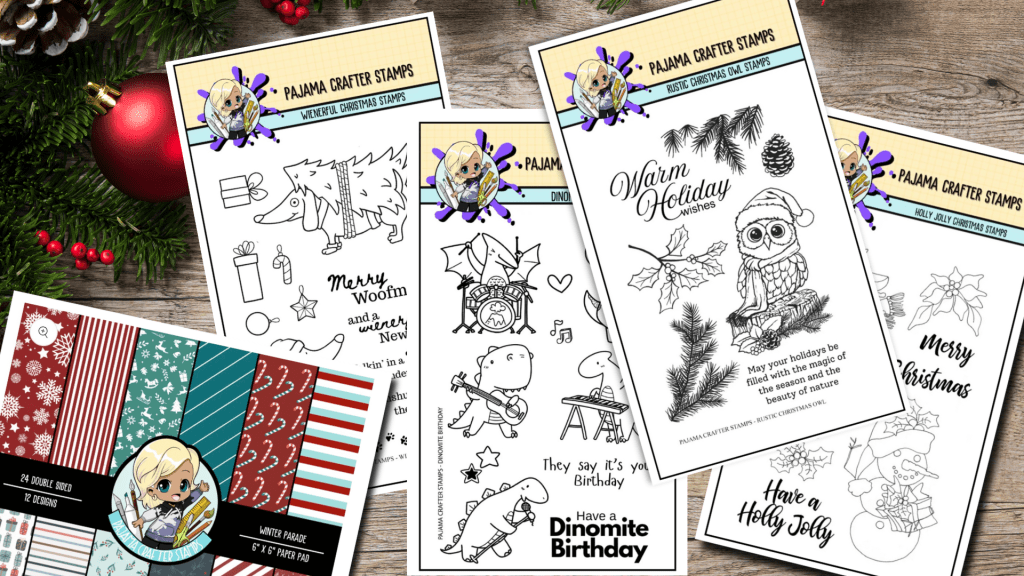
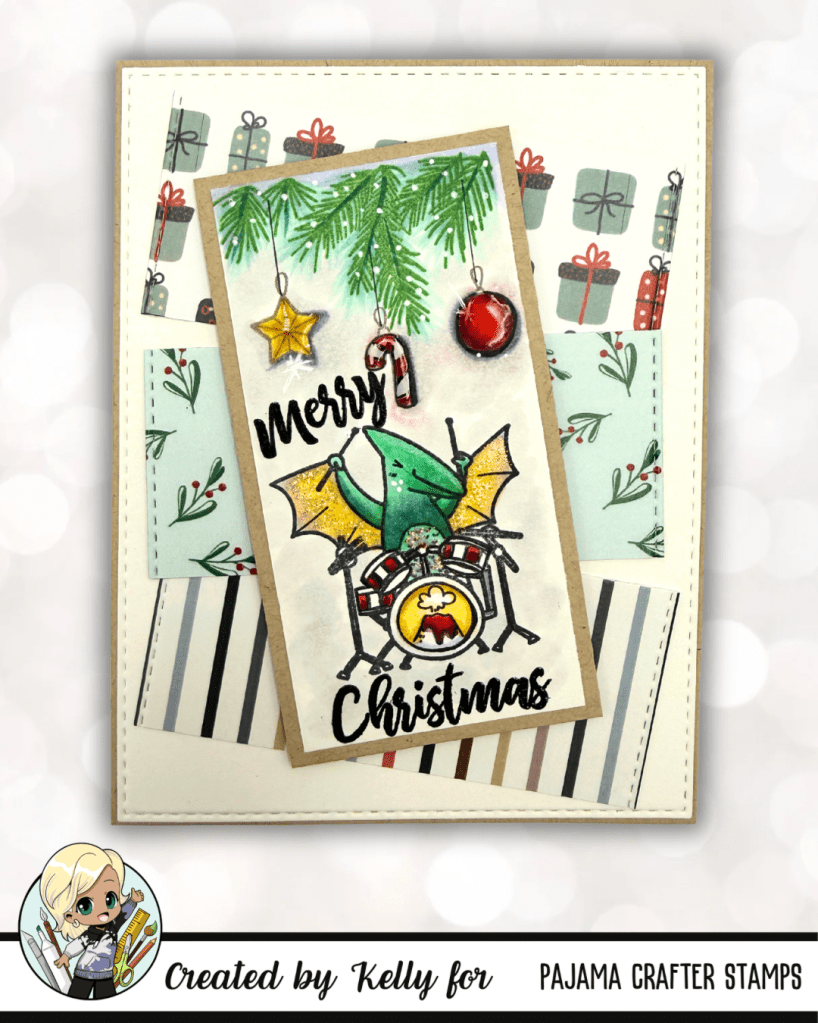
Craft Roulette inspired me this week — the challenge was a fun mash-up: Project: HOLIDAY card Colors: Forest Colors Element: Toy(s) Random: Wonky
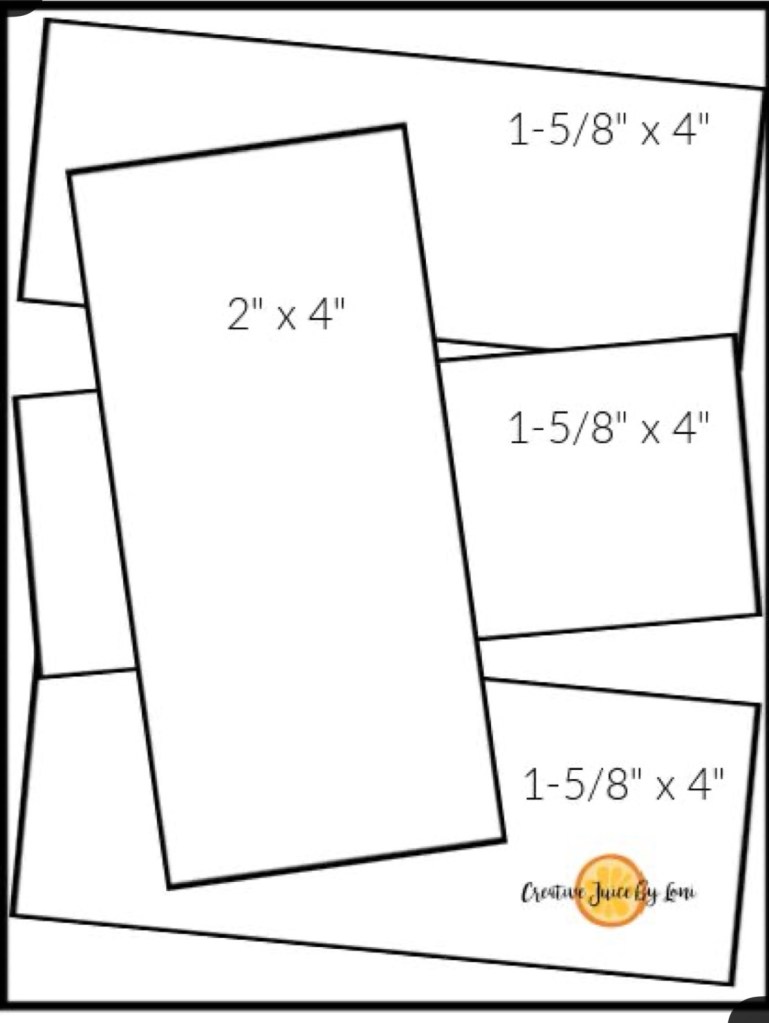
I leaned into cozy, rustic holiday vibes and made a wonky, toy-themed holiday card using Pajama Crafter Stamps’ products. I started with a kraft colored card base, layered a white card layer using a smaller stitched panel and 3 separate stitched strips of paper 1 5/8 inch tall with my stitched die and placed them in a wonky format to give the design playful movement. The sketch came from a Pinterest post I loved by Creative Juice by Loni, but I modified it with my stitched dies to add texture and interest, plus I wanted my patterned papers to be more centered and cut them down a bit to approximately 1 5/8 inch x 3 3/4 inch wide.
Design highlights
Forest palette: deep pine greens, warm browns, golden yellow sunlight peeking through the trees and berry red accents for a classic holiday feel.
Toys element: I used the dinosaur playing drums from Dino-mite Birthday Stamp Set, ornament images from the Weinerful Christmas Stamp Set, pine branch from the Rustic Christmas Owl Stamp Set and the sentiment from the Holly Jolly Christmas Stamp Set.
Wonky layout: the tilted stitched panels using 3 different patterned papers from the 6×6 paper pack called WINTER PARADE. plus a slightly askew sentiment strip makes the card feel fun and handmade.
Finishing touches: foam tape to pop up focal images, a dusting of white gel pen “snow,” and crystal 3-d glaze and Stickles for some glitz.
Cut card base out of Kraft card stock. 5 1/2 x 4 1/4.
Cut a white cardstock out if a slightly smaller stitched A2 sized stitched rectangle to allow some kraft color base to perk through.
Cut 3 strips of patterned paper from the Christmas Parade Paper Pack at 1 5/8 in x 4 or use a size smaller A2 layering rectangle to add stitches on the edge of slightly smaller stitched panel; adhere each panel a little wonky/askew. See photo.
Stamp the dinosaur playing drums image towards the bottom of a white piece if cardstock measuring 1 3/4 2 in x 3 3/4 in. Color with your favorite medium. I used Olo and Copic together, with some white pencil.
Stamp pine branch on top and select 3 small ornaments and stamp haphazardly under the branch, connecting each ornament to the tree using a straight edge and a black fine liner pen.
Adhere the stamped panel to a piece of kraft cardstock 2×4 inches. using dry adhesive mini tape runner. I used the Tape Runner MINI.
Adhere all pieces except the stamped and colored matted panel using the Tape Runner Mini from http://www.TapeRunner.com. For 10% off use code: KELLY10
Add sentiment, Stickles, crystal effects glaze and white gel pen snow; this allows you to tuck a sparkly accent or two.
Add the stamped panel with double-sided foam tape for added dimension.
I used a dirty ink-blending brush with some leftover Walnut Stain Distress Oxide Ink from Ranger. It took a little of the brightness out of the stark white panels to give a rustic or dreamy feel. You can simply add a small amount of the ink to a clean brush snd ink blend off most onto a piece of scrap paper and THEN to your project. It’s very subtle.
If you liked this, try the same sketch with different color combos or swap the images for other critters, toys or ornaments. Thanks for stopping by — and if you shop Pajama Crafter Stamps, I’d appreciate you using my affiliate link above!
Great news — there’s an Instagram hop today, Friday, December 19! Stop by the Pajama Crafter Stamps Instagram page to get started for your chance to win a gift card to use in the shop. HOP on over to my INSTAGRAM page at StampedByKelly to start. We’d love to see you join the fun — hop, comment, and enter to win!
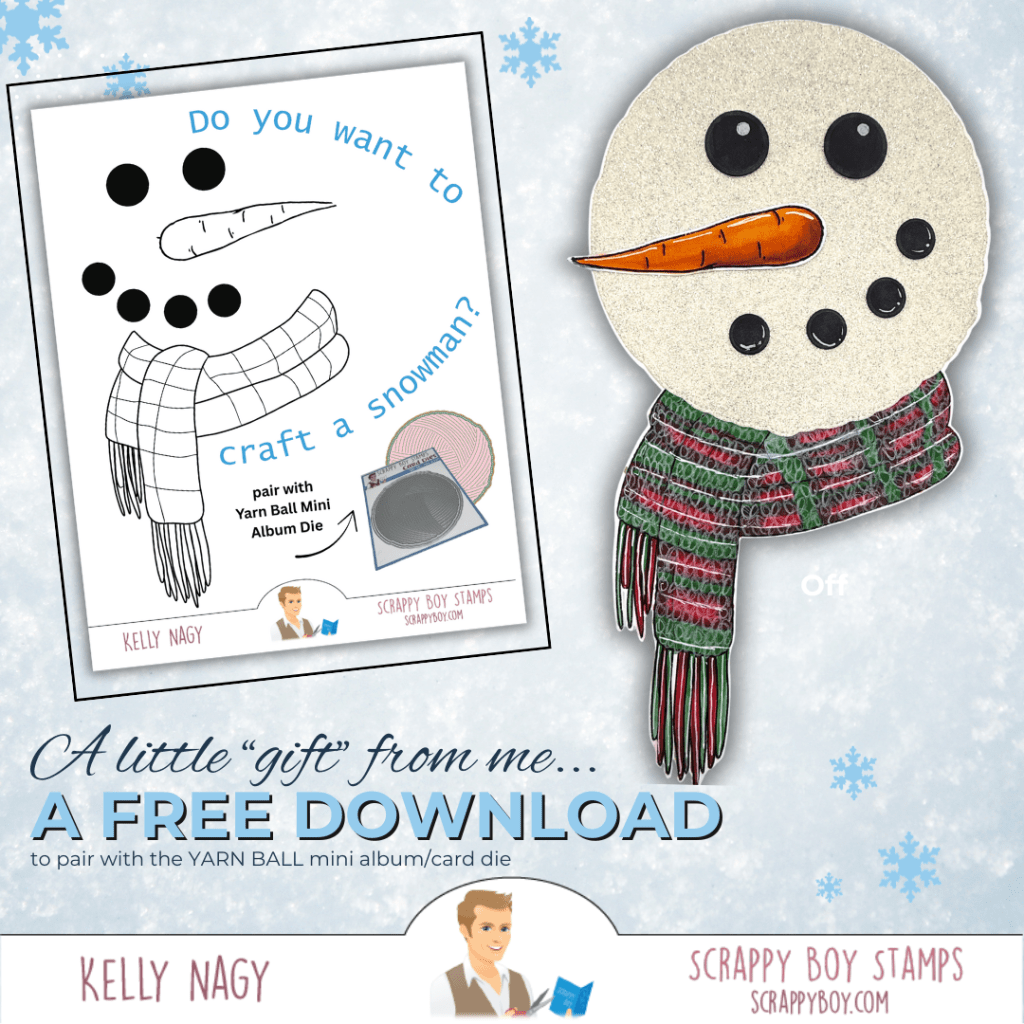
Fun downloadable to pair with items in your SCRAPPY BOY stash…or any circle dies, cutters or cut your own out of construction paper. Great activity for kids, grandchildren and everyone in between!
Happy Monday, crafty friends! 🎉✨ Today, I’m excited to share a delightful project using the Scrappy Boy YARN MINI ALBUM / CARD DIE. With just a few simple steps, you can create an adorable snowman that’s perfect for the winter season! Plus, I’ll showcase two additional projects featuring Scrappy Boy stamp sets to highlight the versatility of this die. Let’s get started!
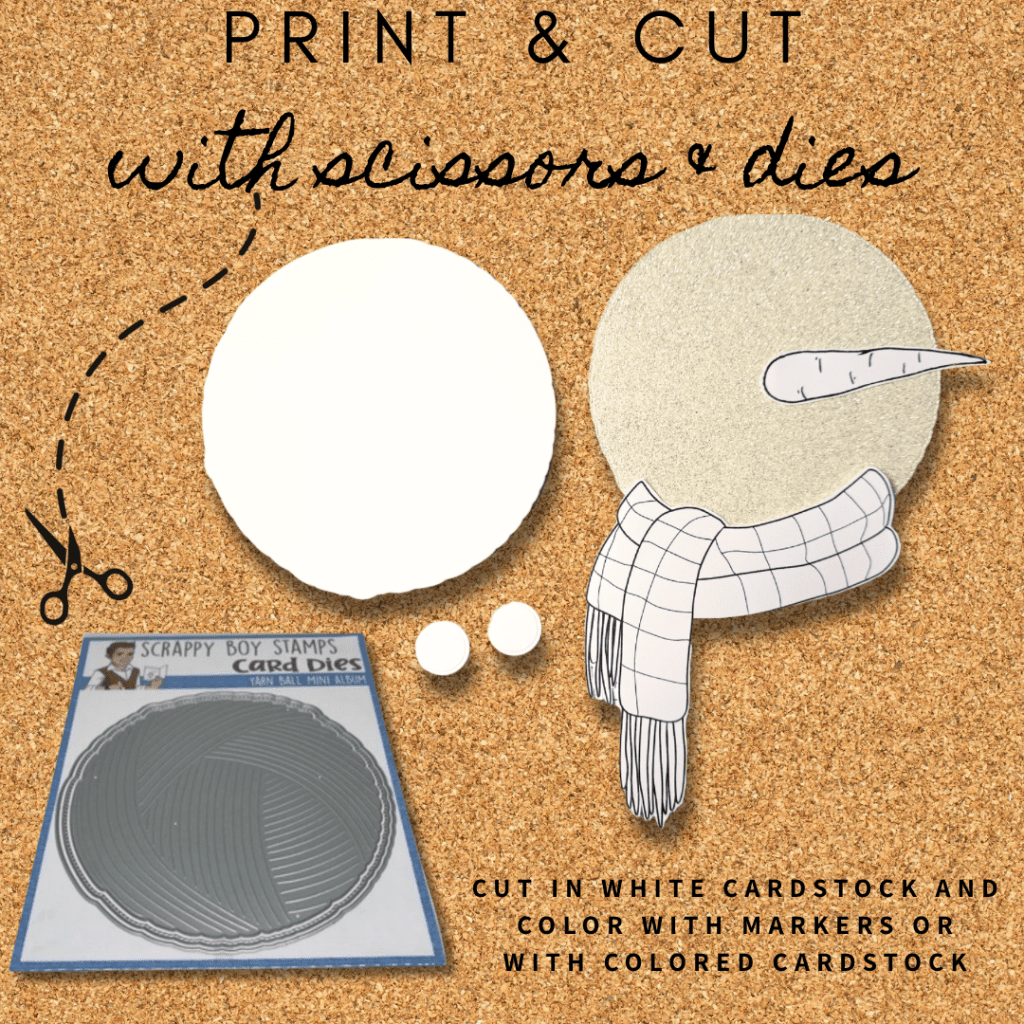
Tip: Make sure to print on cardstock for better durability!
Step 2: Cut Your Pieces
Using the YARN MINI ALBUM / CARD DIE, cut out the snowman pieces from white cardstock:
Base: This will be the mat underneath the head of your snowman.
I cut my top layer out of white glitter cardstock for extra interest.
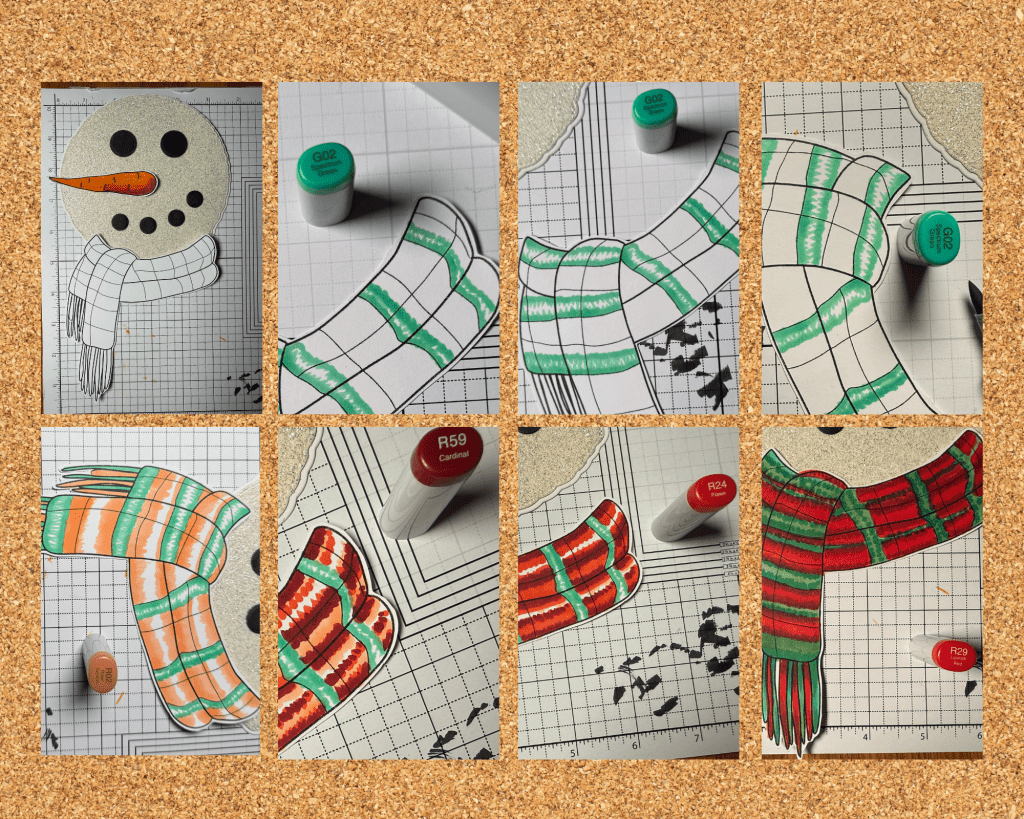
Accessories: Cut out scarf and “coal” from colored cardstock or white (easy) and color up with Black Markers.
If you own the TRAILER MINI ALBUM / CARD DIE, you can also create wheels by cutting circles from black cardstock instead of the printed coal circles!
I cut in white card and colored up with my COPIC 100.
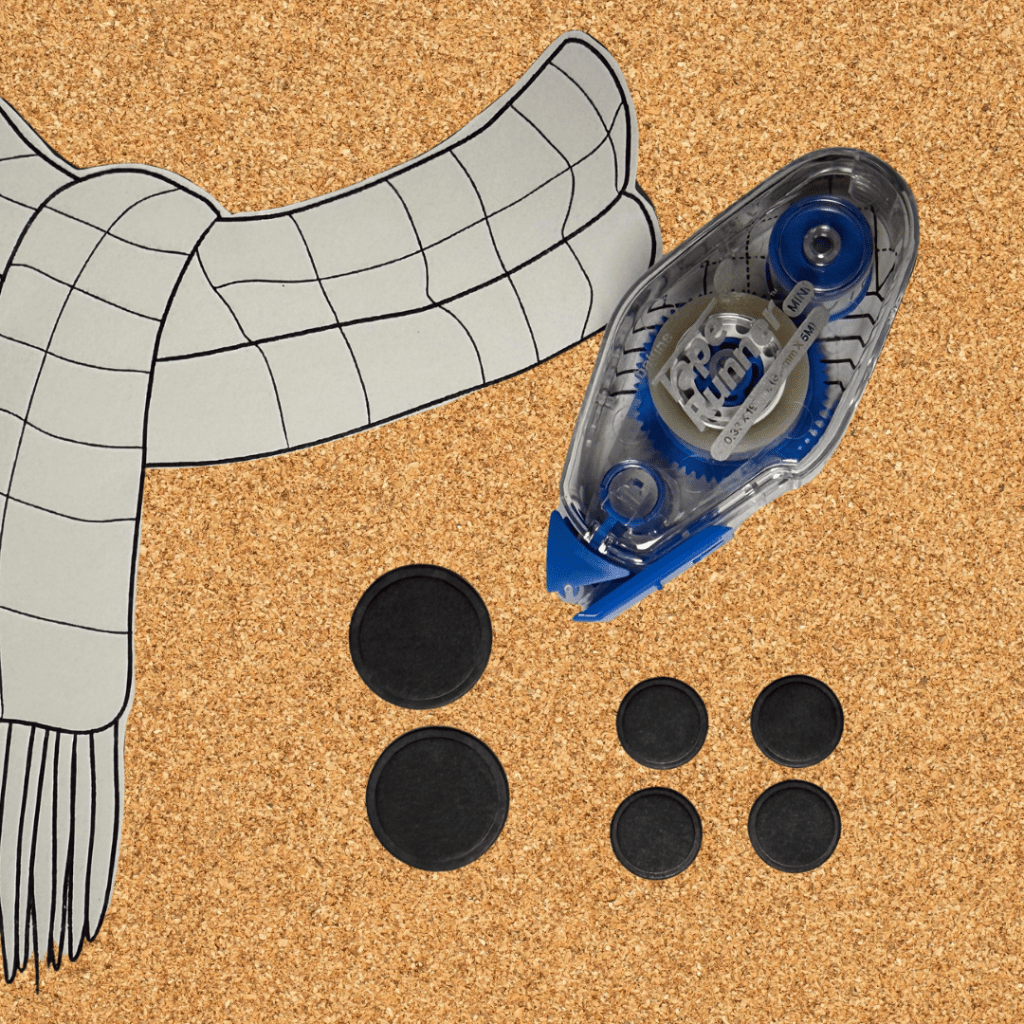
Step 3: Color Your Accessories
Bring your snowman to life by coloring the accessories. Use markers, colored pencils, or your favorite coloring medium to add personality to your snowman!
Step 4: Assemble Your Snowman. I used the TAPE RUNNER MINI to put my snowman together. You can get 10% OFF your purchase at http://taperunner.com using PROMO CODE: KELLY10
Now it’s time to put it all together!
Start with the base: Attach the snowman’s head (the smaller winky circle) die to the base (the larger circle).
Add accessories: Glue scarf and buttons (Scrappy Boy Shirt Mini Album Card Die), circles (tires and hubcaps from the TRAILER MINI ALBUM AND CARD DIE) or a circle punch from your stash. If you like to fussy-cut, the circles are on the printable page.
Final touches: Add white gel pen accents to eyes, carrot nose and mouth.
Additional Projects to Inspire You
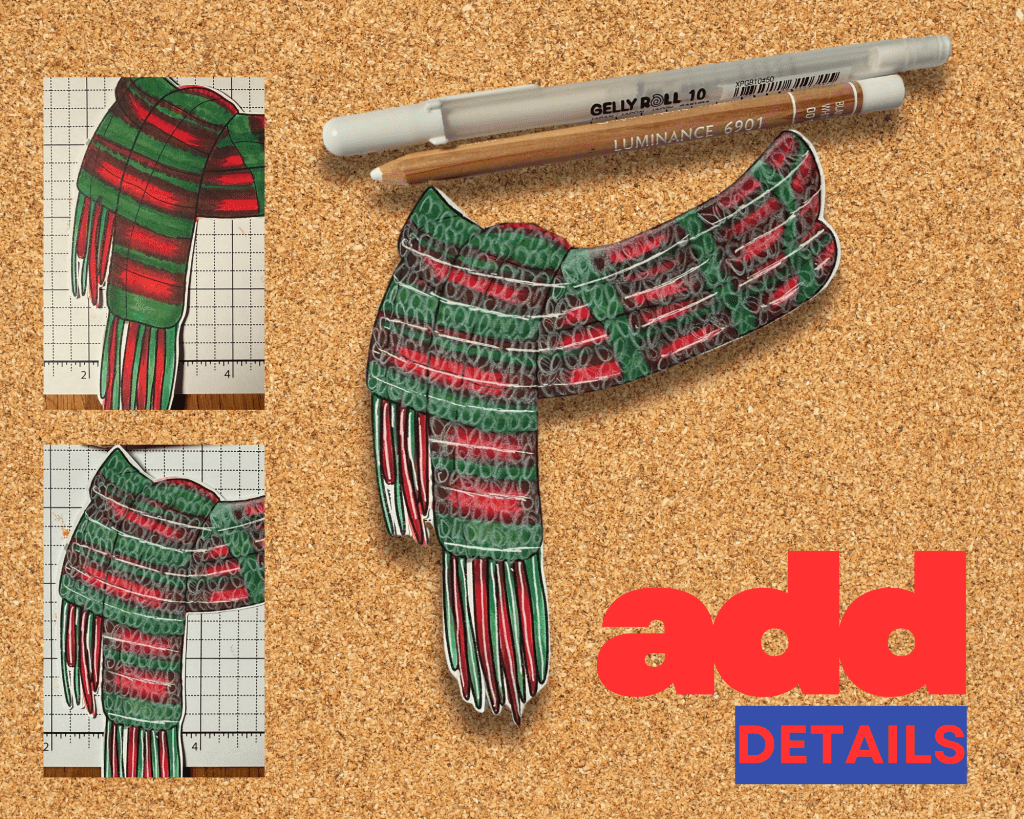
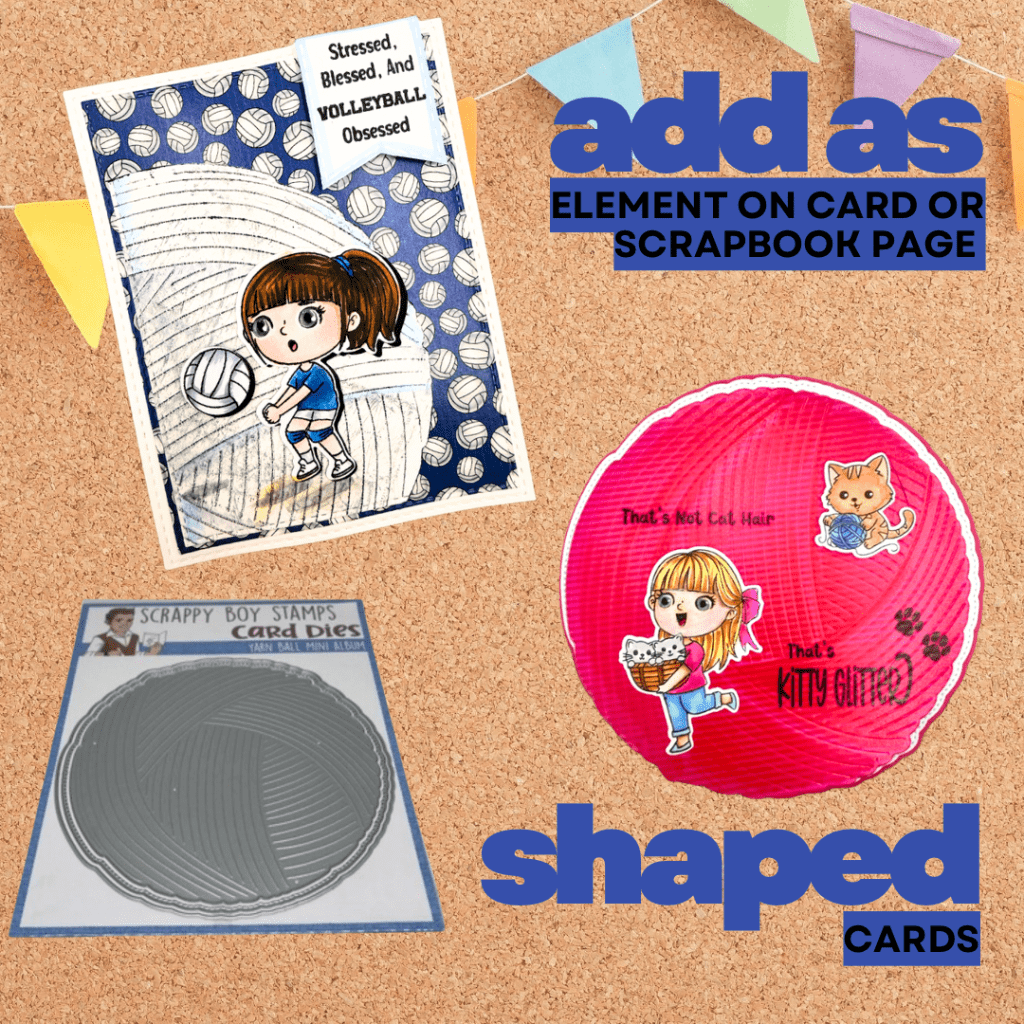
Yarn Ball Card Using the same die, I created a cheerful yarn ball card perfect for any crafting enthusiast. Just cut and decorate with bright, fun colors—it’s a great way to brighten someone’s day! Stamp set is the CUTE GIRLS CAT LOVERS: https://scrappyboy.com/products/cute-girls-cat-lovers-6×8-stamp-set
Volleyball Encouragement Card I transformed the YARN MINI ALBUM / CARD DIE into a volleyball for a fun volleyball-themed card! Just ink blend over with a gray or extremely light handed-blending with black and use the embossed die-cut piece,. The ink reveals and accentuates the texture.
Share Your Creations
I can’t wait to see your snowman and other projects! Be sure to tag me @stampedbykelly and share your creations on the Scrappy Boy Friends and Inspiration Facebook page.
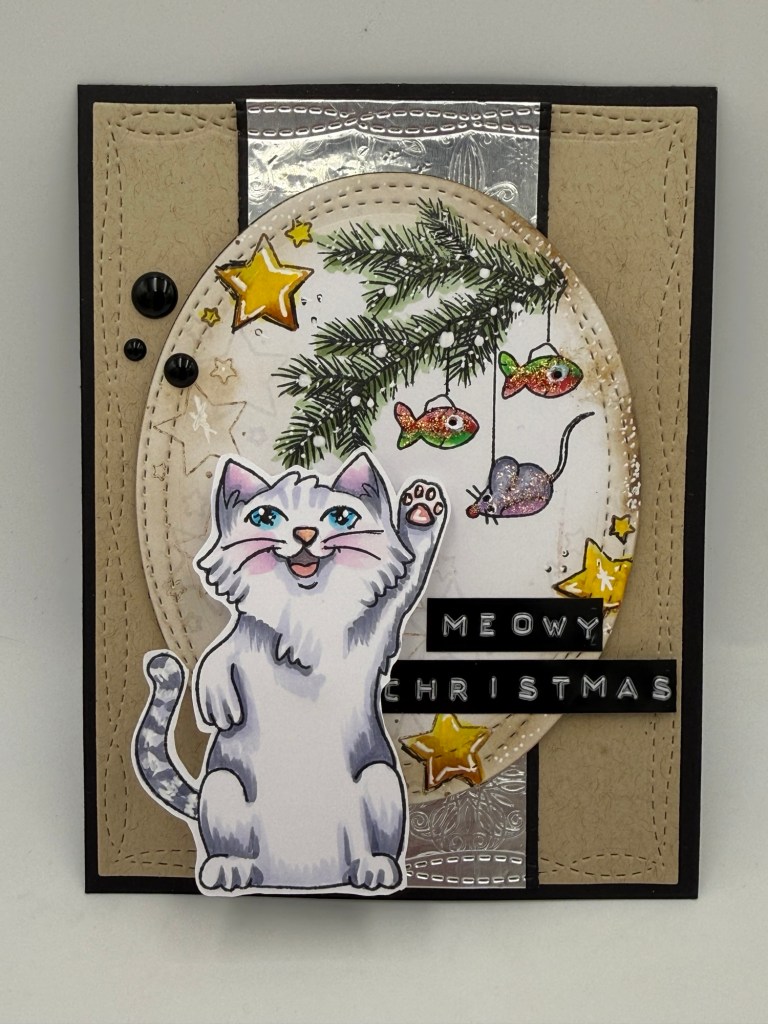
🎉✨ Meet my latest handmade card featuring a mischievous kitty on a mission to whack those Christmas ornaments! 🎄😸 Using the HIGH FIVE and RUSTIC CHRISTMAS OWL stamp sets, I created a scene that’s all about festive fun! Plus, an ACTION WOBBLER adds a playful touch to this naughty kitty.
Who else has a cat that loves to stir up holiday mischief? Share your stories below! 😻👇 #HandmadeCards #CatMischief #HolidayFun
Hello, fellow crafters! Today, I want to share a delightful project that combines two of my favorite Pajama Crafter Stamp’s stamp sets: Rustic Christmas Owl and High Five. 🦉🐱
Here is a photo using the images from RUSTIC CHRISTMAS OWL set:
I recently whipped up a fun card featuring the evergreen branch from the Rustic set, paired with the playful mouse and fish smaller images as “ornaments” and one of the mischievous cats from the High Five set. The stars are also from the HIGH FIVE set and really pop off the page! The best part? The process of mixing and matching these stamp sets to create something entirely unique!
Step by Step Breakdown
Choosing the Base: I started with a lovely card base in BLACK, setting the perfect tone for a non-traditional Christmas-themed creation.
Stamping the Cat: I stamped the adorable cat, coloring it up with my Copic markers, ensuring to capture all the little details that make it so charming. It sets the stage for a warm holiday vibe!
Ornament Fun: Next, I added the ornaments from the High Five set, hanging them playfully from the limb I stamped onto a piece of Alcohol Marker Friendly paper using a stitched oval die. I used my Copic markers to color the branch and ornaments. I then used Diamond Stickles to add extra sparkle. Their vibrant colors really pop against the background!
Making the Mischievous Cat Wiggle: No card is complete without a hint of mischief! After stamping and coloring the cheeky cat from the HIGH FIVE set, I attached an ACTION WOBBLER on the back of the cat in the middle of the back-side of the cat cutout and adhered it as if it’s ready to pounce on those ornaments. It adds a whimsical touch that’s sure to bring a smile.
Finishing Touches: I added some stamped stars using a Distress Oxide ink pad in WALNUT STAIN and colored up in yellow and added white gel pen for shine.
Why Mixing Sets is So Much Fun
One of the joys of crafting is the ability to personalize every little detail. When you mix and match different stamp sets, you’re not only saving time, but you’re also sparking creativity in ways you might never have imagined!
I love how the Rustic Christmas Owl branch turns this non-Christmas set called HIGH FIVE, into a warm and light-hearted holiday-themed card with a classic feel, while the playful elements of the High Five set give it a modern twist. It’s like creating a whole new story on each card, filled with charm and cheer!
Press the arrow to see ACTION WOBBLER in action
Have you tried mixing different stamp sets? I’d love to see your creations! Share your thoughts in the comments below.